E-11 show-off

Mr_Sparkle

Well-Known Member
Well,
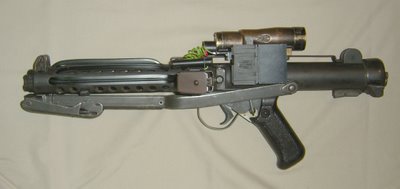
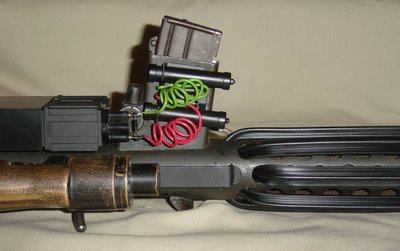
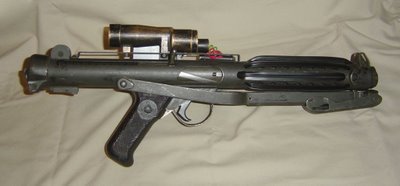
Its been a while since I've seen an E-11 buildup on here so I thought I would post what I've been up to... I'm pretty happy with it but it needs a few finishing touches like rebluing the cut-down mag and darkening up the exposed brass on the scope. I love the real weathered finish on the different parts but am hoping that a little brass black will knock down the intensity of the brass to bring it a little closer to the real deal.

Based on a Real Sterling, Real Hengstler, Real Scope, SaberFreak's real T-Track, and RPF Cylinders.
Right_01.jpg

Hi-Res Image

Left_01.jpg

Hi-Res Image

Top_01.jpg

Hi-Res Image

Top_04.jpg

Hi-Res Image

NOTE: The images in the post don't seem to be loading consistantly but the "Hi-Res" links all seem to be working just fine. Just click on them if the others don't load.

Chris Reiff
The Parts of Star Wars
 
Chris,

That E-11 you've put together looks fantastic. In fact, I rather like the "exposed brass" look quite a bit. It makes my MR version look like it hasn't seen any use.

If you do make any more adjustments, please post the pics.

One question: Are you going to change the color of the wires?

Ted.
 
I like a little of the brass showing also but I think it needs a just little more black on the scope just to get it to integrate into the blaster a bit more. I won't be painting the scope just darkening some of the brass areas. I like having the letters and numbers showing and the natural wear that it has...

In regard to the wires... I may end up putting black wires on there but in the black and white photos of the props the wires NEVER looked black to me. Then, a while back I came across a color photo from our own MoffEaton that showed the Red and Green wires. They probably painted them black at some point but I figured I'd do it up in the colors first to see how it looked.

Chris
The Parts of Star Wars
 
That looks great. I like the way you used the original screws to mount the scope. I want to do that, but my Sterling came with a scope rail already attached and I can't fit them under there. It's one of the wider, lower rails but looks really nice so instead of removing and replacing the rail I am thinking of shortening those screws just a bit.

How did you attach the Hengstler box?

Mike
 
Thanks for the comments guys.

Mike,
Those screws aren't the originals that came with the scope... My scope only had one of the two screws so I had to buy replacements. I couldn't track down identical replacement shoulder screws like were in there but any 10-32 screw should fit just fine... The ones I used were just plain Socket Cap Screws from the local hardware store. They had the added benefit of no "slot" being visable in the head and were already black. The heads are a bit taller than I wanted but I'll live with it for now. They will be easy to change at some point in the future as I used a button head socket cap screw for the rear scope attachment and can easily unscrew the rail and remove the scope.

To attach the hengstler and the cylinders I used some 3M atuomotive trim tape. Its great stuff and is black already so it hides really well. Its meant to hold trim pieces in place on cars so I figured it would do the job on the blaster. It holds really well but if I ever decide to take it off it is pretty easy to remove.

Chris
The Parts of Star Wars
 
Had a few questions in PMs... I'll answer them here for everyone.

The wires are just out of an old junk box. Just solid core wire so it keeps the coil shape. They are soldered to the hengstler leads and just wrapped around the back side of the Cylinder baseplate and the ends are just tucked underneath. Here is moffeaton's old pic that shows the colored wires. (I think it was out of an odd pics thread or something a while ago. Not sure though)

luke1.jpg


The Rail is just a half inch strip of steel from Online metals. Lonepigeon ordered the strips... I just bent them into the right shape and ground the front end down a bit to fit in the vent holes at the front. The front just got an s bend in it that locks it in the hole when the back end is secured. The back end just got a radius ground on it then I drilled and tapped the back end of the gun to receive a 6-32 button head cap screw to hold it down. The originals were just riveted in place but I wanted to be able to remove it.

<div class='quotetop'>(Hirohawa @ Jun 28 2006, 03:00 PM) [snapback]1270147[/snapback]</div>
Looks great.

What type of paint are you using on the brass scope?
[/b]

Thanks. I haven't done anything to the scope... It is exactly as it was the day I got it with the original 1942 paint on it.

Chris
The Parts of Star Wars
 
Good work Chris.

...inspiration... must finish mine.

<div class='quotetop'>(Darth Fetty @ Jun 28 2006, 09:09 PM) [snapback]1270235[/snapback]</div>
Great job.

I've never seen those colored wires before.
[/b]
 
In response to another question regarding the t-track installation and painting and installation process.

As far as painting the t-track... I heated and installed the t-track unpainted. once it had all cooled down and returned to full rigidity I pulled the grips back out of the Sterling. Thats not an easy feat as inside the holes they re-expand a bit and didn't want to come out. They did though. I made sure to scratch numbers in the back sides and indicate which end was the front of each so I could put them all back exactly as they were. I then painted them with the Krylon Fusion Satin Black paint and let them dry. Once they dried I cramed them back into place. That was a bit of a rough few mins but they went back in eventually. I know a little paint scraped off here and there as they were cramming back in the holes but you can't see any of that once they are reinstalled. Even if you could its just an added bit of natural weathering.

Chris
The Parts of Star Wars
 
Chris,

Thanks for all of the information. In particular, your response to my question about the colored wires.

I took a look at the b/w photo in CHRONICLES (p.91) and I agree with you. The wires don't seem to be black. Being b/w (and all of the other issues associated with trying to "read" these old prop photos) it's impossible to say for certain but it seems they are two different colors.

Thanks, Moffeaton for the color pic.

Ted.
 
Chris - Love your Blaster, but prefer the black wires.

Questions:

I know you mentioned you used tape to attach the Hengstler. I'm surprised it's strong enough. The gun is round and the box is flat. How do they match up right so the bond is strong enough and the counter doesn't set crooked?

Also - is this the tape you used - MMM-03609?

Finally - did you order the tape online or purchase it local?
 
<div class='quotetop'>(Stormy320 @ Jun 29 2006, 03:40 AM) [snapback]1270541[/snapback]</div>
I know you mentioned you used tape to attach the Hengstler. I'm surprised it's strong enough. The gun is round and the box is flat. How do they match up right so the bond is strong enough and the counter doesn't set crooked?

Also - is this the tape you used - MMM-03609?

Finally - did you order the tape online or purchase it local?
[/b]

The tape is plenty strong. I actually ran a piece prettymuch the length of the Hengstler box oriented on the channel on the back side of the hengstler socket. That grove helps locate the box on the curve of the gun body.
The tape has a little thickness to it as well and really sticks great. I did clean the side of the gun with a little denatured alcohol first just to make sure there was no oil or dirt that would cause a bad contact.

The Tape I used is 3M Automotive Acrylic Plus Attachment Tape (Part # 051131 06384)
BLACK - 1/2in x 5yd x .045in thick

I just picked it up at the locak car parts store. Its made to attach body side mouldings, rocker panel trim, etc.
 
Back
Top