DY-100 SS Botany Bay scratchbuild

Couchdivot

New Member
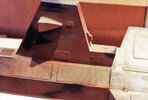
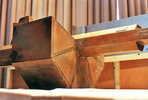
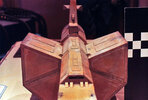
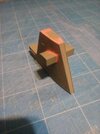
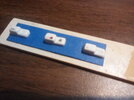
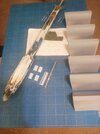
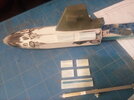
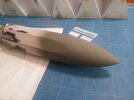
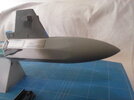
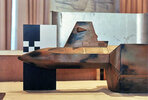
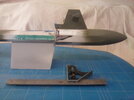
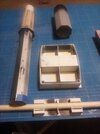
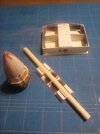
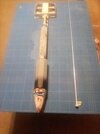
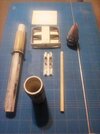
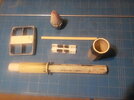
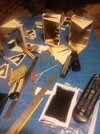
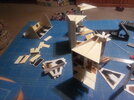
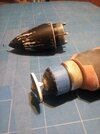
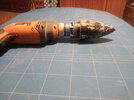
Attached are in progress pics of my build. Project started from paused video measurements, than adapted to fit available PVC/CPVC. Additional details and measurements were pulled from a variety of online blueprints...in short, it doesn't really match the studio model but still looks good. Project started before I found this site....and found the assortment of photos posted on another thread by spockboy...wish I had seen those sooner but too much material and time invested to go back. I'll live with it just looking good.
 

Attachments

  • IMG_20201111_040626.jpg
    IMG_20201111_040626.jpg
    721.2 KB · Views: 142
  • IMG_20201111_040510.jpg
    IMG_20201111_040510.jpg
    768.2 KB · Views: 127
  • IMG_20201111_035233.jpg
    IMG_20201111_035233.jpg
    658 KB · Views: 121
  • IMG_20201111_035123.jpg
    IMG_20201111_035123.jpg
    744.5 KB · Views: 124
  • IMG_20201111_035012.jpg
    IMG_20201111_035012.jpg
    472.9 KB · Views: 125
Been working on cleaning up and smoothing/shaping front nose cone. Majority of shaping was done by using power drill as a simple lathe. Attachment are plastic disks secured with carriage bolt, washers, and nylon threaded lock nut. Nose cone itself has layers of narrow triangular wedges, smaller scrap plastic strips, and a combination of Bondo brand plastic metal (for harder areas) and spot and glazing putty (for the smaller gaps and pits).
 

Attachments

  • IMG_20210307_204417.jpg
    IMG_20210307_204417.jpg
    703.1 KB · Views: 93
  • IMG_20210307_204341.jpg
    IMG_20210307_204341.jpg
    729.2 KB · Views: 92
  • IMG_20210307_204538.jpg
    IMG_20210307_204538.jpg
    437.7 KB · Views: 103
So, while I'm working on the next step, I have a question I'd like to pose: Should I go for "screen accurate" or "functional logic"? Let me explain.

Screen model has five of the 16 cargo containers attached. By the consistent design of the five shown, its easy to assume they all are the same and interchangeable. Hence, they would all attach to the main hull in the same manner. Following that thought, the hull pattern for all 16 slots would also be the same.
 

Attachments

  • actual model (3).jpg
    actual model (3).jpg
    918.4 KB · Views: 98
  • actual model (2).jpg
    actual model (2).jpg
    1 MB · Views: 103
  • actual model (5).jpg
    actual model (5).jpg
    894.2 KB · Views: 101
While I like the details shown on the exposed left and right sides and the "clamps" on the exposed cargo container sides, I don't see how additional containers would attach.

For my model, I'm considering basing the mounting mechanism on the panel pattern shown on the top panels. It's the most repeated pattern visible. Since there's three raised panels, the underside of each cargo container would have to be recessed to clear these panels. If I can get it to work, I'm looking to attach the containers with strong magnets so they are removable and interchangeable.
IMG_20210313_124322.jpg

Of course, if I glue the containers in place and go for a more screen accurate depiction, it makes all this moot. I'm looking forward to some thoughts and input.
 
IMG_20210315_155526.jpg
Coning tower almost complete. From ridges came from a Gatorade lid. Side vent details from a similar lid. Both had backsides sanded to make the pieces thinner and more pliable.
IMG_20210307_202118.jpg
IMG_20210307_202059.jpg

Current primer of choice is Rust-Oleum self etching primer. It doesn't seems to have the clogging problems I've had with white clean metal primer and the coverage and blending between different materials and surfaces is the best I've found so far.

Also formed the "oil pan" details found on three locations.
IMG_20210315_155439.jpg
?hash=b64249834639faf1ca4e59f55958ed24.jpg

IMG_20210315_171016.jpg
IMG_20210315_170953.jpg
 

Attachments

  • IMG_20210307_201424.jpg
    IMG_20210307_201424.jpg
    689.8 KB · Views: 67
  • IMG_20210307_202203.jpg
    IMG_20210307_202203.jpg
    707.6 KB · Views: 63
  • IMG_20210315_155508.jpg
    IMG_20210315_155508.jpg
    441.7 KB · Views: 74
Still trying to make sense of the posting tools on here...sorry for my posting out of order and messing up the inserts. Here's the front ridge details I spoke of.
IMG_20210307_202203.jpg
IMG_20210307_201424.jpg
 
My wife accuses me of over-engineering everything....I'll let you be the judge of that. Tolerance levels on sub-assembly are so tight, I almost don't need any glue to hold them together.

IMG_20210307_204022.jpg
Cap inside nose cone is 1/2" CPVC, with hole drilled in center to accept 1/4" metal rod for structure and stability. Metal rod and 1/2" CPVC pipe run the entire length of the ship.
IMG_20210313_123923.jpg
IMG_20210307_204056.jpg

Plastic discs cut by scribing concentric circles with my Lutz proportional divider, one of my favorite hand tools. Love the way it locks in place (for the most part-just watch out for drift)....scribing takes more time to cut but that's the price you pay for accuracy.
16178300474697842512332315645543.jpg

Major hull structures now attached, minus nose cone and rear engine assembly.
IMG_20210307_201245.jpg
IMG_20210307_201311.jpg
IMG_20210307_201643.jpg
IMG_20210307_201929.jpg
 
Logic prevailed... the removable cargo pod containers is out. The primary reason for wanting to do it was so I could go back and forth from launched version to the screen version. Launch version idea first generated when I saw a Saturn lamp build and thought....how cool to use something like that as a display stand? Why the OBVIOUS flaw of there's about 300 years of space weathering difference between the two versions didn't occur to me sooner!

I will still construct five separate cargo pods- they will just be glued to the hull structure. Since the two exposed side panels of these pods have two raised panels, if they fit together there should be a gap between each pod joint equal to 2xthickness of raised panel.
actual model (5).jpg
 
Still working on this project. Sanding, priming, filling, repeat. I'm almost finished with blending the attached nose cone. Ribbed panels (4) on either side of coning tower manually scribed with dividers from 1mm sheet styrene. Ran into a problem with cargo containers. Seems the base (skinny) side wasn't skinny enough. I had to add two strips of 2mm thick stock, making the containers 4mm taller than I intended, just so they would fit. That may effect how the front of the containers line up...I may have to modify those as well to get the right height/angle...time will tell.
 

Attachments

  • IMG_20210906_142643.jpg
    IMG_20210906_142643.jpg
    729.5 KB · Views: 72
  • IMG_20210906_142816.jpg
    IMG_20210906_142816.jpg
    446.6 KB · Views: 57
  • IMG_20210907_151932.jpg
    IMG_20210907_151932.jpg
    434.6 KB · Views: 55
  • IMG_20210907_153144.jpg
    IMG_20210907_153144.jpg
    412.6 KB · Views: 73
  • actual model (8).jpg
    actual model (8).jpg
    935.6 KB · Views: 69
  • IMG_20210907_153116.jpg
    IMG_20210907_153116.jpg
    422.9 KB · Views: 56
Beautiful scratch job. Looks very professional, like a commercial kit.
Thanks for the compliment.... Slow but steady. Want to know my attention to detail? After your comment, I counted the number of ridges on the coning tower panels. BUMMER!.... Studio model has 23, mine has 22. Though, if you think I'm redoing that....well, I'll let someone else judging me take the time to count.
 
While I like the details shown on the exposed left and right sides and the "clamps" on the exposed cargo container sides, I don't see how additional containers would attach.

For my model, I'm considering basing the mounting mechanism on the panel pattern shown on the top panels. It's the most repeated pattern visible. Since there's three raised panels, the underside of each cargo container would have to be recessed to clear these panels. If I can get it to work, I'm looking to attach the containers with strong magnets so they are removable and interchangeable.
View attachment 1436374
Of course, if I glue the containers in place and go for a more screen accurate depiction, it makes all this moot. I'm looking forward to some thoughts and input.
Oh...so that is what "quote" does.
 
Thanks for the compliment.... Slow but steady. Want to know my attention to detail? After your comment, I counted the number of ridges on the coning tower panels. BUMMER!.... Studio model has 23, mine has 22. Though, if you think I'm redoing that....well, I'll let someone else judging me take the time to count.
Not to mention....I wasn't even keeping track of "how many parts" there were....makes me wish I had cut double of everything so I could offer it as a one-off reproduction.... NOT! Unless you know someone who wouldn't blink at a 3-4G price tag?
 

Your message may be considered spam for the following reasons:

If you wish to reply despite these issues, check the box below before replying.
Be aware that malicious compliance may result in more severe penalties.
Back
Top