Sean Bradley
Well-Known Member
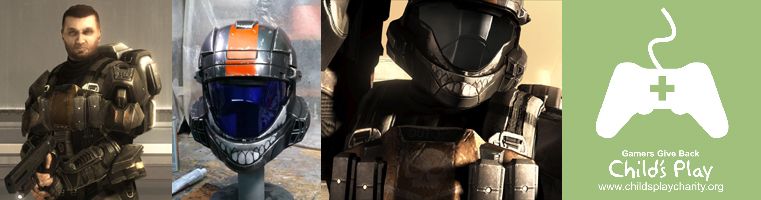
New alternate ODST helmet made for Child's Play and Laird MacLean.
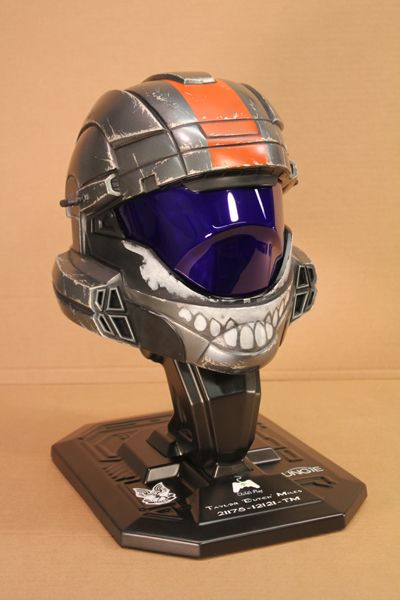
"Corporal Taylor Miles. 'Dutch'... Death's head slapped right on his helmet. Heavy weapons specialist. Time on Mars tends to give a man... perspective."
- Gunnery Sergeant Edward Buck
So it's been a long, strange journey since making my first ODST helmet back in 2009. I've made a lot of costumes but haven't made a totally new ODST bucket since that first rushed Pepakura helmet. I've always felt I could do better, so when my old buddy Laird MacLean asked if I could make a new helmet for his Child's Play fundraiser this year, I thought I'd have another go at it.
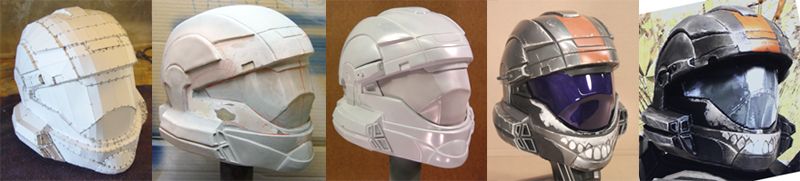
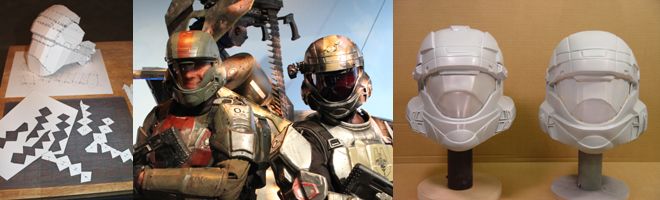
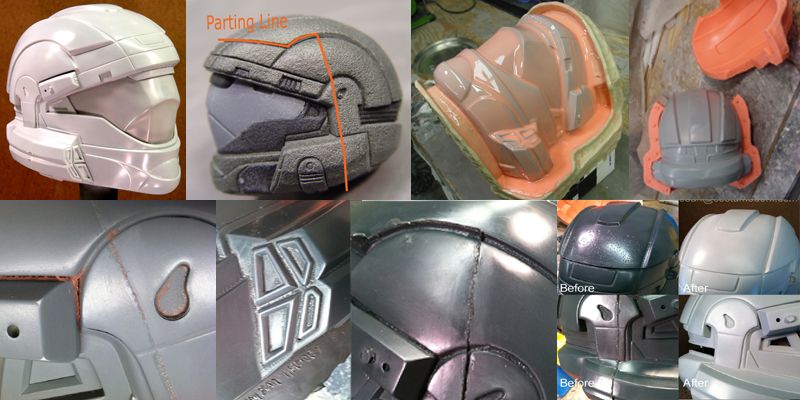
I started with a pepakura base for the helmet, but ended up chopping and re-configuring the helmet almost completely. I downloaded a nice early version of the helmet modeled by Rundown from the 405th wiki and scaled it to the approximate size of my other helmet. When it comes to scaling, I take an educated guess, fold it, and if it's too small or too big, I scale up or down by 10% and try again. I made about 3 different attempts to find the right size for this helmet. The standard helmet I made was fairly oversized. When comparing it closely against the live action ODST suits made by Legacy Effects Studios last summer at HaloFest, I felt strongly that I needed to find a new scale just slightly smaller than before, but not as confining as the Legacy helmets.
Once I had the basic helmet scaled and folded, I followed typical pepakura procedure, carefully brushing the paper with polyester resin in light layers until it had enough strength for thicker coats of resin/bondo mix, then alternating layers of fiberglass and 'rondo' inside the helmet. Once the helmet was structurally sound, I began the process of sanding and rounding the corners, filling in low areas, and making changes to the model. The pep helmet was a great base to build over, and comparison with the in-game character model showed where I needed to make changes. The jawline of the helmet was narrowed, rounded, and the chin was cut out, and moved forward and down. The crest was ground down, filled, then relocated. The raised sections on the top of the helmet were redone in thicker relief based on references. I used foam window insulation tape of various thicknesses to help guide the areas I was filling in with Bondo. Before long, every inch of the helmet was ground down or cut out, filled, re-mastered, and replaced. The final lines were cut with files, and the final details were hand cut from styrene plastic or sealed MDF. To see the extent of all the work done to alter the base model check the gallery here: Dutch Helmet Process pictures by ScaryMonkey75 - Photobucket
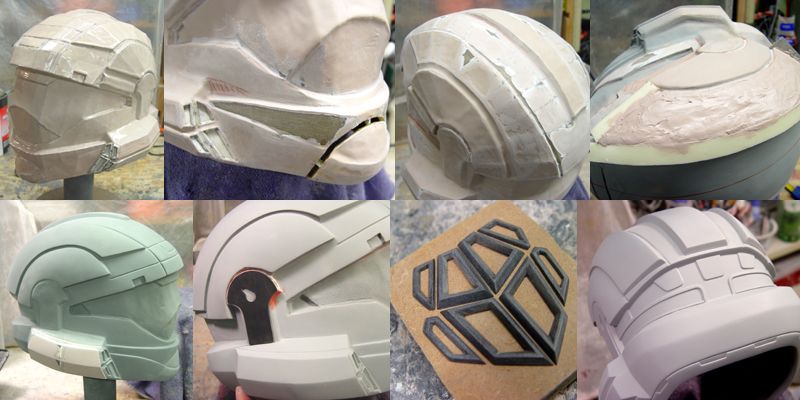
Once the helmet model was completed it was coated with a final layer of primer that once dry was buffed to 600 grit. Polishing the model was intended to make the rubber mold less porous, and to reduce the amount of finish sanding after casting. Once the helmet was prepped for molding, I proceeded to trip and fall flat on my face. :O The first attempt at molding was a failure on two accounts; seasonal material curing problems and a complicated mold design. I was inspired by the mold tooling of the ODST action figure helmets and attempted to move the parting line to minimize sanding/filling the castings. The design might have worked, but it slowed down the molding process by making the mold more complicated than necessary. Though I properly prepared the mold materials (silicone rubber can sometimes separate in the winter months) the temperature in my shop was low enough to prevent the print coat from fully curing. The result was a complicated mold with bubbles and uncured areas throughout the surface I so painstakingly detailed and polished. I've never encountered this problem with the print coat before, but with some phone calls to Smooth-On's tech dept. we sorted out a solution.. I usually keep my shop around 60 - 65 degrees and never had any problems before, but their recommendation is that the material should be used at no less than 73 degrees. I've recently remade the flawed molds in a temperature controlled cabinet, kept it all above 73 and everything cured perfectly. Since the mold for the helmet would have to be remade I had no choice but to finish a less than perfect casting for my deadline. More filler. more sanding a few more late nights later got me back on track to paint and assembly of the helmet.
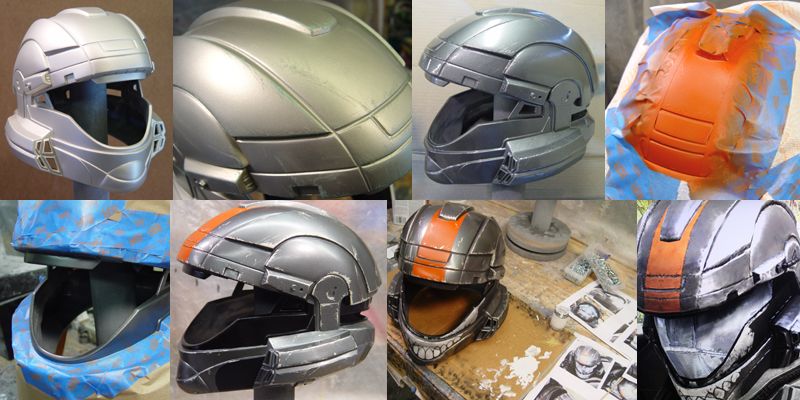
The paint application I use for my ODST helmets begins with a nickel silver basecoat. Over the silver I paint a resist over corners and to simulate scratches on the surface. I've taken to using toothpaste for my resist... y'know because it's minty fresh and prevents cavities.") This resist is scrubbed and scratched off later after the topcoat of Duplicolor Gunmental Gray dries. The rest of the painting is a mixture of airbrushing and handpainting, adding the black visor/vent areas, red/orange stripe, the skull face, and weathering and grime.
This resist is scrubbed and scratched off later after the topcoat of Duplicolor Gunmental Gray dries. The rest of the painting is a mixture of airbrushing and handpainting, adding the black visor/vent areas, red/orange stripe, the skull face, and weathering and grime.
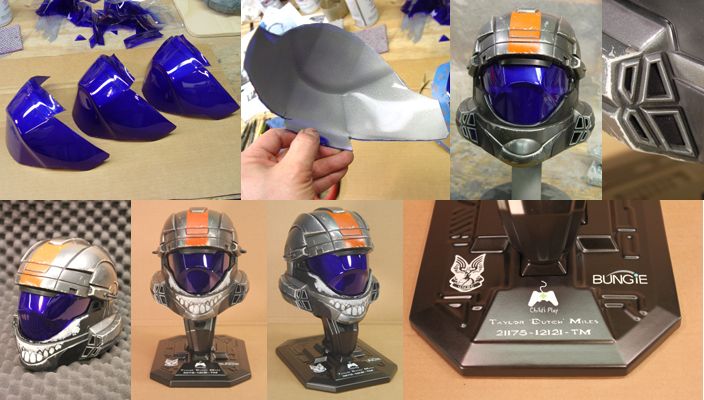
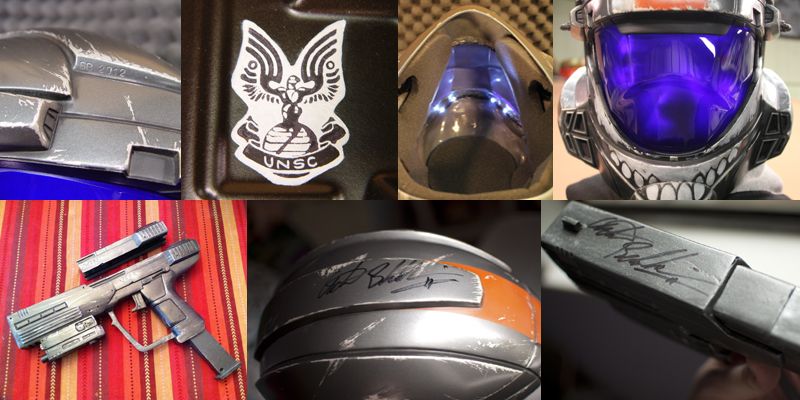
The visors were vacuumformed in clear .060 PETG, then hot bath dyed with Jaquard iPoly fabric dye to cobalt blue. The backside of the visors were lightly misted with an ultra chrome paint airbrushed in a very fine mist. Admittedly, the visors came out much darker than desired, but I'm so accustomed to people wanting them as dark as possible! I was pleasantly surprised to discover that the pre-existing visors I make fit the 'Dutch' helmet even better than the old standard helmet. Installation only required a couple of short screws (for centering and adjusting) and a little hot glue to secure the visor in place. The hoses from the ear holes to the forward sensors were made with plastic tubing, pinstripe tape and heat shrink wrap and then glued in place. The vent holes were covered in loose mesh fabric, then the fan system and interior lights were installed inside the helmet. To complete the presentation I made a Halo-styled helmet display stand with handpainted logos and nameplate.
The finished helmet and stand were then whisked away to Emerald City Comicon by Laird, along with a beautiful prop recreation of Dutch's 'Vera' M6C Socom Automag pistol made by Ben Streeper. The set were signed by Adam Baldwin, the actor known best for his roles as Animal Mother in Full Metal Jacket, Jayne Cobb in Firefly, who also happens to be the voice of 'Dutch' in the Halo 3: ODST game! The signed props will be auctioned off with Laird's items for Child's Play starting May 20th on eBay.
Thanks to Laird for this great project, thanks to Rundown for that Dutch helmet file, and thanks to you for reading.
For more photos from this project: Dutch Helmet References pictures by ScaryMonkey75 - Photobucket , Dutch Helmet Process pictures by ScaryMonkey75 - Photobucket , Dutch Helmet Finished pictures by ScaryMonkey75 - Photobucket
"Corporal Taylor Miles. 'Dutch'... Death's head slapped right on his helmet. Heavy weapons specialist. Time on Mars tends to give a man... perspective."
- Gunnery Sergeant Edward Buck
So it's been a long, strange journey since making my first ODST helmet back in 2009. I've made a lot of costumes but haven't made a totally new ODST bucket since that first rushed Pepakura helmet. I've always felt I could do better, so when my old buddy Laird MacLean asked if I could make a new helmet for his Child's Play fundraiser this year, I thought I'd have another go at it.
I started with a pepakura base for the helmet, but ended up chopping and re-configuring the helmet almost completely. I downloaded a nice early version of the helmet modeled by Rundown from the 405th wiki and scaled it to the approximate size of my other helmet. When it comes to scaling, I take an educated guess, fold it, and if it's too small or too big, I scale up or down by 10% and try again. I made about 3 different attempts to find the right size for this helmet. The standard helmet I made was fairly oversized. When comparing it closely against the live action ODST suits made by Legacy Effects Studios last summer at HaloFest, I felt strongly that I needed to find a new scale just slightly smaller than before, but not as confining as the Legacy helmets.
Once I had the basic helmet scaled and folded, I followed typical pepakura procedure, carefully brushing the paper with polyester resin in light layers until it had enough strength for thicker coats of resin/bondo mix, then alternating layers of fiberglass and 'rondo' inside the helmet. Once the helmet was structurally sound, I began the process of sanding and rounding the corners, filling in low areas, and making changes to the model. The pep helmet was a great base to build over, and comparison with the in-game character model showed where I needed to make changes. The jawline of the helmet was narrowed, rounded, and the chin was cut out, and moved forward and down. The crest was ground down, filled, then relocated. The raised sections on the top of the helmet were redone in thicker relief based on references. I used foam window insulation tape of various thicknesses to help guide the areas I was filling in with Bondo. Before long, every inch of the helmet was ground down or cut out, filled, re-mastered, and replaced. The final lines were cut with files, and the final details were hand cut from styrene plastic or sealed MDF. To see the extent of all the work done to alter the base model check the gallery here: Dutch Helmet Process pictures by ScaryMonkey75 - Photobucket
Once the helmet model was completed it was coated with a final layer of primer that once dry was buffed to 600 grit. Polishing the model was intended to make the rubber mold less porous, and to reduce the amount of finish sanding after casting. Once the helmet was prepped for molding, I proceeded to trip and fall flat on my face. :O The first attempt at molding was a failure on two accounts; seasonal material curing problems and a complicated mold design. I was inspired by the mold tooling of the ODST action figure helmets and attempted to move the parting line to minimize sanding/filling the castings. The design might have worked, but it slowed down the molding process by making the mold more complicated than necessary. Though I properly prepared the mold materials (silicone rubber can sometimes separate in the winter months) the temperature in my shop was low enough to prevent the print coat from fully curing. The result was a complicated mold with bubbles and uncured areas throughout the surface I so painstakingly detailed and polished. I've never encountered this problem with the print coat before, but with some phone calls to Smooth-On's tech dept. we sorted out a solution.. I usually keep my shop around 60 - 65 degrees and never had any problems before, but their recommendation is that the material should be used at no less than 73 degrees. I've recently remade the flawed molds in a temperature controlled cabinet, kept it all above 73 and everything cured perfectly. Since the mold for the helmet would have to be remade I had no choice but to finish a less than perfect casting for my deadline. More filler. more sanding a few more late nights later got me back on track to paint and assembly of the helmet.
The paint application I use for my ODST helmets begins with a nickel silver basecoat. Over the silver I paint a resist over corners and to simulate scratches on the surface. I've taken to using toothpaste for my resist... y'know because it's minty fresh and prevents cavities.
This resist is scrubbed and scratched off later after the topcoat of Duplicolor Gunmental Gray dries. The rest of the painting is a mixture of airbrushing and handpainting, adding the black visor/vent areas, red/orange stripe, the skull face, and weathering and grime.
The visors were vacuumformed in clear .060 PETG, then hot bath dyed with Jaquard iPoly fabric dye to cobalt blue. The backside of the visors were lightly misted with an ultra chrome paint airbrushed in a very fine mist. Admittedly, the visors came out much darker than desired, but I'm so accustomed to people wanting them as dark as possible! I was pleasantly surprised to discover that the pre-existing visors I make fit the 'Dutch' helmet even better than the old standard helmet. Installation only required a couple of short screws (for centering and adjusting) and a little hot glue to secure the visor in place. The hoses from the ear holes to the forward sensors were made with plastic tubing, pinstripe tape and heat shrink wrap and then glued in place. The vent holes were covered in loose mesh fabric, then the fan system and interior lights were installed inside the helmet. To complete the presentation I made a Halo-styled helmet display stand with handpainted logos and nameplate.
The finished helmet and stand were then whisked away to Emerald City Comicon by Laird, along with a beautiful prop recreation of Dutch's 'Vera' M6C Socom Automag pistol made by Ben Streeper. The set were signed by Adam Baldwin, the actor known best for his roles as Animal Mother in Full Metal Jacket, Jayne Cobb in Firefly, who also happens to be the voice of 'Dutch' in the Halo 3: ODST game! The signed props will be auctioned off with Laird's items for Child's Play starting May 20th on eBay.
Thanks to Laird for this great project, thanks to Rundown for that Dutch helmet file, and thanks to you for reading.
For more photos from this project: Dutch Helmet References pictures by ScaryMonkey75 - Photobucket , Dutch Helmet Process pictures by ScaryMonkey75 - Photobucket , Dutch Helmet Finished pictures by ScaryMonkey75 - Photobucket
Last edited: