You are using an out of date browser. It may not display this or other websites correctly.
You should upgrade or use an alternative browser.
You should upgrade or use an alternative browser.
Dune working uniform (2021)
- Thread starter Mister Chef
- Start date
smithjohnj
Sr Member
As neophyl suggested I took a closer look at the correct way to draft a standing collar. A rectangle is far too simple for a comfortable and accurate fit. Finding how to draft the collar on-line was easy but understanding the “why” behind it took some study. I could not find a meaningful explanations about why some dimension where given as constants or small ranges of values - without a reason or justification. The dimensions I am talking about is the amount to raise the draft line at the collar front and back. They are often just given as “constants” everyone should use. But why?
With observation, first we must raise the collar back enough to clear the highest vertebra which is the bump at the back of the neck. Some necklines are drafted with this as a measurement landmark and we want the collar to sit above, not on this point. The “higher” the back and longer the neck, the higher this “constant” needs to be raised.
Second it is easy to understand why a simple rectangle does not work. The human neck is not a cylinder but a conical shape – a larger circumference at the base than higher up. So when a rectangular strip of fabric or paper is wrapped around the neck, as it comes forward it drops lower. If the strip is long enough the ends cross as an “X” in the front. A rectangle will have straight lines but the front neckline is a curve. So we must curve the seam line of the collar up to match the neck line. (If we were matching a “V-neck” the straight lines could match). The amount we need to curve up depends on three factors; the curve of the front neckline (which I raised from the original pattern), the size of the neck, and the slope of the neck “cone”. This is an obvious modification necessary for someone with broad shoulders and well developed back and neck muscles (but not most of us.) So again a range maybe be “given” without any guidance as to how to select your “constant”. However with the muslin it is easy to drape a simple strip around the neck and find the measurement we need to raise the collar seam line at the center front and also approximately how far back along the neckline the curve should start. The curve starting point does seem to be “acknowledged” as the midpoint between the shoulder seam and the center front but other “constants” are also given. Finally in order to have the standing collar front edge be straight vertical, we square the collar edge to the curve at the center front.
The following is my draft. I also added the Barrel Cuff pattern. I have reduced the sleeve ease to narrow down to 12” (for me) at the sleeve hem. This hem circumference is large enough for me to easily slide my cupped hand in and out of the finished sleeve. Also to make the final sleeve length easy to fine-tune, I straighten the final 1” or so of the sleeves to be 12”. This way I can position the cylindrical cuff up and down slightly on a cylindrical sleeve end without needing to match a tapering sleeve. (Print on Legal size 8.5 x 14 inch paper.)
Attachments
smithjohnj
Sr Member
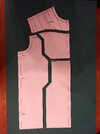
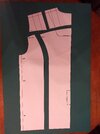
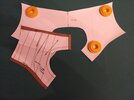
The Working Uniform pattern is produced from my modified S9091 pattern piece copies. The marked-up copy is split into the individual new pattern pieces. The original Front is split into Front Side, Chest, Abdomen, and the front portion of Yoke. The original Back is split into Back Side, Back, and the two partial back portions of Yoke. The original Upper Sleeve (not shown here) is split into Bicep, Elbow Pad, Left Lower Sleeve and Right Lower Sleeve.
The three portions of the Yoke are taped together and the pattern cleaned up. This includes truing the quilt lines and the outline of the Neck Ring for use later. Seam allowances are added where necessary. The grainline is added so the front of the Yoke will match the grainline of the Chest and Abdomen. The original dart from the back will be rotated and replaced by the seam between the back of the Yoke and the Back Side.
Seam allowances must also be added as necessary to the Front Side, Chest, Abdomen, Back Side, and Back. Also to Bicep, Elbow Pad, and both Lower Sleeve elements.
Attachments
smithjohnj
Sr Member
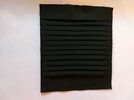
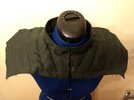
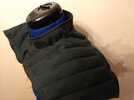
My construction journal continues. Since the Standing Collar was of my own original draft I started there. Cut 2 pieces of fabric. I originally thought I would interface the collar but the fabric I am using is stiff enough for a 1 1/2 inch Standing Collar. Also the Working Uniform needs comfort perhaps more than shape so I am not interfacing the collar. Stitch around the sides and top edges of the collar Right Sides Together (RST). I normally use a 2.5 mm stitch length. However I reduce the stitch length (to 1 mm) around the 90 degree collar front. Also instead of a 90 pivot at the corner point, you will actually get a better defined square corner if you pivot 45 degrees slightly short of the corner, stitch 2-3 short stitches to “cut the corner”, then complete the turn with another 45 degree pivot. Trim and turn the collar Right Side Out (RSO). I then top-stitched the outside collar edge. I also basted outside the collar stitch line to hold the edge together. This makes attachment to the yoke easier. Although I will not continue to repeat it – press everything at EVERY step. I am not a skilled sewer but my work improved greatly once I slowed down and actually took the time to press the pieces, set the stitches, and get each completed step looking as good as possible before moving forward.
Next the Yoke. This Yoke pattern is used to cut a Left and Right Outer Yoke. Having separate pieces allow each to follow the same grainline as the Chest in the front. The grainline of the back of the Yoke does NOT match the Back grainline but much of this difference, if it is noticeable, as well as the rear seam line, will be covered by the Neck Ring. I also made a Full Yoke pattern piece by taping a copy of the Left Yoke and Right Yoke together. I use this piece to cut the quilting batt which does not have a grain and the Inner Yoke which is not visible when the jacket is worn. For the Inner Yoke I match the Back grainline. Cut 3 pieces from fabric – 1 left side, 1 right side and 1 Full Yoke. Use the Full Yoke to cut 2 pieces of batting.
Join the Yoke left and right side along the rear seam line RST to produce a complete outside Yoke. Next clip about 3/8 inch deep into the sewing edge seam allowance of the collar about every 1/2 inch. Pin the collar to the Yoke neckline RST. You will find this task much easier if you realize you can straighten the Yoke neckline into almost a straight line. The bulk of the fabric will bunch-up away from the seam as you pin and sew but as you proceed just keep the Yoke and Collar aligned and remember the point where the pieces join is not the edge but the seam line 5/8 inch inside the edge. This is the line you want the fabric layers to lie smooth as you stitch. Baste the Collar to just the outside Yoke. After basting the pieces you can check to make sure the seam is smooth and the Yoke is not puckered. It is easy to clip and remove a few stitch and re-baste to get things correct.
Then taking the Outside Yoke/Collar piece, match the inside Full Yoke RST and baste them together. More experience sewers may be able to sandwich the collar between the two Yokes and baste them in one step. I take two steps to have better control to match my skill level.
On the inside of the Yoke/Collar sandwich, I trim the collar seam allowance bulk out from between the Yoke allowances. Then turn RSO. At this point some of the construction basting stitches may be visible. Use a seam ripper and tweezers to remove these threads from the inside and outside just to make everything appear neat.
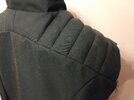
The second muslin taught some new lessons. One was not to cut corners by trying to eliminate the inside Yoke. To work properly the quilting requires fabric on both sides of the batt. Otherwise the thread sinks into the batt and the quilting does not loft. Also it is necessary to increase the thread needle tension to pull the quilting tight to emphasize the loft. The 4 ounce batt I was using was insufficient. Two layers are required. To keep the batts from shifting during construction I basted the two layers together all around the outside edges. I used a 3/4 inch allowance and then used the stitch line to trim off the excess so the batt will be out of the Yoke seam allowance.
Position the doubled batt into the Yoke/Collar assembly. I then baste the outside front edges and back edge to hold the batt into position prior to quilting. Pinning might work just as well to hold the batt but this approach works better to me. Mark the quilt lines on the outside Yoke with chalk. Stitch the quilt line closest to the neck on one side first. You need to manage the two layers of fabric and the batt with the goal of achieving a smooth sandwich and straight quilt line. Starting at the inside allows you to adjust the fabric and batt as necessary prior to each quilt. You then quilt each line moving to the outside. Repeat the process on the other side. Learn from my mistakes. I chalked the quilt lines from my pattern piece. That was fine for the first side but I should have used the actual appearance of the front stitch lines when I chalked the other side. My two side are not balanced at the front. I will see if I can correct this some how. I believe just ripping out one line of quilting will do the trick. Better you do it right the first time. Even my second muslin did not teach me this lesson.
When the Yoke is stitched to the front and back the basting stitches can be removed. The following documents my progress so far.
Next the Yoke. This Yoke pattern is used to cut a Left and Right Outer Yoke. Having separate pieces allow each to follow the same grainline as the Chest in the front. The grainline of the back of the Yoke does NOT match the Back grainline but much of this difference, if it is noticeable, as well as the rear seam line, will be covered by the Neck Ring. I also made a Full Yoke pattern piece by taping a copy of the Left Yoke and Right Yoke together. I use this piece to cut the quilting batt which does not have a grain and the Inner Yoke which is not visible when the jacket is worn. For the Inner Yoke I match the Back grainline. Cut 3 pieces from fabric – 1 left side, 1 right side and 1 Full Yoke. Use the Full Yoke to cut 2 pieces of batting.
Join the Yoke left and right side along the rear seam line RST to produce a complete outside Yoke. Next clip about 3/8 inch deep into the sewing edge seam allowance of the collar about every 1/2 inch. Pin the collar to the Yoke neckline RST. You will find this task much easier if you realize you can straighten the Yoke neckline into almost a straight line. The bulk of the fabric will bunch-up away from the seam as you pin and sew but as you proceed just keep the Yoke and Collar aligned and remember the point where the pieces join is not the edge but the seam line 5/8 inch inside the edge. This is the line you want the fabric layers to lie smooth as you stitch. Baste the Collar to just the outside Yoke. After basting the pieces you can check to make sure the seam is smooth and the Yoke is not puckered. It is easy to clip and remove a few stitch and re-baste to get things correct.
Then taking the Outside Yoke/Collar piece, match the inside Full Yoke RST and baste them together. More experience sewers may be able to sandwich the collar between the two Yokes and baste them in one step. I take two steps to have better control to match my skill level.
On the inside of the Yoke/Collar sandwich, I trim the collar seam allowance bulk out from between the Yoke allowances. Then turn RSO. At this point some of the construction basting stitches may be visible. Use a seam ripper and tweezers to remove these threads from the inside and outside just to make everything appear neat.
The second muslin taught some new lessons. One was not to cut corners by trying to eliminate the inside Yoke. To work properly the quilting requires fabric on both sides of the batt. Otherwise the thread sinks into the batt and the quilting does not loft. Also it is necessary to increase the thread needle tension to pull the quilting tight to emphasize the loft. The 4 ounce batt I was using was insufficient. Two layers are required. To keep the batts from shifting during construction I basted the two layers together all around the outside edges. I used a 3/4 inch allowance and then used the stitch line to trim off the excess so the batt will be out of the Yoke seam allowance.
Position the doubled batt into the Yoke/Collar assembly. I then baste the outside front edges and back edge to hold the batt into position prior to quilting. Pinning might work just as well to hold the batt but this approach works better to me. Mark the quilt lines on the outside Yoke with chalk. Stitch the quilt line closest to the neck on one side first. You need to manage the two layers of fabric and the batt with the goal of achieving a smooth sandwich and straight quilt line. Starting at the inside allows you to adjust the fabric and batt as necessary prior to each quilt. You then quilt each line moving to the outside. Repeat the process on the other side. Learn from my mistakes. I chalked the quilt lines from my pattern piece. That was fine for the first side but I should have used the actual appearance of the front stitch lines when I chalked the other side. My two side are not balanced at the front. I will see if I can correct this some how. I believe just ripping out one line of quilting will do the trick. Better you do it right the first time. Even my second muslin did not teach me this lesson.
When the Yoke is stitched to the front and back the basting stitches can be removed. The following documents my progress so far.
Attachments
MatterWiz
Active Member
As stated here I've now added the molds for the seperate, as well as the mirrored versions of the sigil. The files labeled "Costume" are for the screen accurate versions.The mold is for a "unified" version of the sigil as I'm making it as a single patch, but I'll be uploading the mold for the seperate pieces early next year, when I'm back home. I'll also add the correctly mirrored version then.
LINK
smithjohnj
Sr Member
After a break to work on other things, here is a little more on my Working Uniform Jacket project. The Back is joined on each side by a Side Back. Anytime I need to sew curved surfaces together I first baste the curve section of each piece along the seam line with a contrasting color of thread. This makes it easy for me to know how far I can safely clip into the seam allowances. It also makes it easier for me to see exactly where the two pieces must come together and where they must match under the needle as I sew. After sewing the seams the basting is removed. These long seam are then finished by serging, or with a zigzag or overlock stitch. The Back assembly is then stitched to the back of the Yoke. I make sure to pin the Back seam lines to align with the first quilt lines of the Yoke before sewing the seam to avoid the pieces shifting.
Since this is a working garment not a lot of effort would be expended on the inside appearance such as seam finishing. However I like to at least try to make the inside of the garment as neat as possible. One plan was to use enclosed French seams on the many straight line seams such as the sides and the Chest-Abdomen seam. When looking at the Chest-Abdomen pieces I realized I could save a some time and fabric by making this union what I will call a faux seam. Since the two pieces have already been split, I will spread them 1/2 inch apart and tape them back together. I draw a line bisecting this 1/2 spread making a faux 1/4 inch seam allowance on each piece. This new line is not cut in the fabric. I fold the Chest down over the Abdomen RST along this new dividing line. I then stitch parallel to this fold - 1/4 inch away from the fold. I use 1/4 inch (doubled to 1/2 for the spread) because I have a 1/4 inch edge guide presser foot which makes sewing a straight 1/4 inch sew line very simple.
When cutting the Front Side, Chest and Abdomen, I make the centerline and side seam allowance more generous than the pattern's 5/8 inch. This will allow a little flexibility when joining this combination to the Yoke if needed. Place the Chest/Abdomen RSU (Right Side Up). Add the front Side Right Side Down (RSD). On the back of the Front Side accurately mark the pivot points for each change in direction which is required to join the Front Side to the Chest/Abdomen. Again I use basting stitching with contrasting thread to make this marking easier. Clip both pieces into the seam allowance at the pivot points to allow you to manipulate the two pieces as you sew. Precise marking, clipping, pivoting, and sewing are necessary to achieve pucker-free jacket fronts. My muslin allowed me to refined the best points and angles for the clips to provide the neatest interior appearance.
There can be several ways to produce the Elbow Pad. It could be as straightforward as pleating the fabric like everyone now sees with face masks. However I prefer to have a smooth interior so my hand does not get caught in the folds when I slip in my arm. The easiest option to sew is to use tucks but this uses more fabric and produces a five layer thick pad. Perhaps that is not a bad thing for a real elbow pad. Twelve 1” tucks separated by 1/2” and folded flat, produces a 1/2” overlap on each flap. Both pads can be made at the same time as an oversize, double-wide assembly which is trimmed down when joined to the other sleeve pieces. Rather than mark the stitch lines I find it easier, faster and more accurate to make small snips into the left and right edges to fold the fabric -snip to snip - to make the tucks. For tucks, the snips on each edge start 2 inches from the bottom edge and again up another 2 inches. Matching the second set down to the first set and sew across the fabric from edge to edge – this will form the first tuck. The snips continue with a series of eleven more repeated sets – up 1/2” then up 2”. Again always matching the second snip down to the first. Add 1/2” beyond the final snip as a seam allowance.
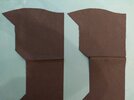
An alternate Elbow Pad approach is to stitch a pleated Pad Front onto a Pad Back. This uses less fabric as it is only four layers thick. This is the method I used. Again the component is made oversize and then trimmed down when joined to the other sleeve pieces. The Backing is 17 by 11 inch. The Pad Front is 17 inch wide by 22 inches long. Stitch lines will be located by making small snips into the left and right edges of both the Pad Front and Back to align the pieces and make the pleats. On the Pad Backing the 12 snips on each edge start 2 inches from the bottom edge and continue every 1/2 inch which will leave the last 3 inch of the edge unclipped. The 12 snips on each side of the Pad Front start 2 inches from the bottom edge and continues every 1 and 1/2 inches which will leave the last 2 inches unclipped. Starting at the bottom, match the first set of Pad Front and Backing stitch lines and sew from side to side. Continue matching and sewing until you complete all 12 stitch lines. I have included a simple illustration of the two approaches and the stitch points for each.
With either pad production approach, it helps to press each sew line and each pleat as you complete them. To hold the pleats before sleeve assembly, I basted from top to bottom along each side of the Elbow Pad inside the seam allowance and down the center of double-width pad. I then steam pressed the pad using a damp press cloth pressing from top to bottom.
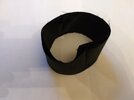
I am using a two piece cuff. Each piece is a simple rectangle, 2 inches high to match the hem of the jacket body and, for me, 12 inches long. This is large enough for me to easily slip my cupped hand in and out. One caution is to not make this type of barrel cuff too small since there is no opening placket. Also my sewing machine (Pfaff) allows me to remove an accessory box from the sewing bed to give me a free arm bed. This is perfect to sew small diameter cylinders like cuffs and sleeves but again only if the circumference is not too small. It is possible to top-stitch the cuffs and attach them to the sleeves without the benefit of a free arm but if your machine has the feature it makes the tasks much easier. Each cuff piece is stitch RST. One cuff is turned RSO which is slipped into the other which is RSI. Align the raw edges together but with the seam lines 180 degrees apart (to reduce bulk). One edge is stitched all around, seam allowances trimmed as necessary, turned right side out, pressed and top-stitched 1/4” from the edge. The other end is left unfinished until it is ready to be attached to the sleeve.
Since this is a working garment not a lot of effort would be expended on the inside appearance such as seam finishing. However I like to at least try to make the inside of the garment as neat as possible. One plan was to use enclosed French seams on the many straight line seams such as the sides and the Chest-Abdomen seam. When looking at the Chest-Abdomen pieces I realized I could save a some time and fabric by making this union what I will call a faux seam. Since the two pieces have already been split, I will spread them 1/2 inch apart and tape them back together. I draw a line bisecting this 1/2 spread making a faux 1/4 inch seam allowance on each piece. This new line is not cut in the fabric. I fold the Chest down over the Abdomen RST along this new dividing line. I then stitch parallel to this fold - 1/4 inch away from the fold. I use 1/4 inch (doubled to 1/2 for the spread) because I have a 1/4 inch edge guide presser foot which makes sewing a straight 1/4 inch sew line very simple.
When cutting the Front Side, Chest and Abdomen, I make the centerline and side seam allowance more generous than the pattern's 5/8 inch. This will allow a little flexibility when joining this combination to the Yoke if needed. Place the Chest/Abdomen RSU (Right Side Up). Add the front Side Right Side Down (RSD). On the back of the Front Side accurately mark the pivot points for each change in direction which is required to join the Front Side to the Chest/Abdomen. Again I use basting stitching with contrasting thread to make this marking easier. Clip both pieces into the seam allowance at the pivot points to allow you to manipulate the two pieces as you sew. Precise marking, clipping, pivoting, and sewing are necessary to achieve pucker-free jacket fronts. My muslin allowed me to refined the best points and angles for the clips to provide the neatest interior appearance.
There can be several ways to produce the Elbow Pad. It could be as straightforward as pleating the fabric like everyone now sees with face masks. However I prefer to have a smooth interior so my hand does not get caught in the folds when I slip in my arm. The easiest option to sew is to use tucks but this uses more fabric and produces a five layer thick pad. Perhaps that is not a bad thing for a real elbow pad. Twelve 1” tucks separated by 1/2” and folded flat, produces a 1/2” overlap on each flap. Both pads can be made at the same time as an oversize, double-wide assembly which is trimmed down when joined to the other sleeve pieces. Rather than mark the stitch lines I find it easier, faster and more accurate to make small snips into the left and right edges to fold the fabric -snip to snip - to make the tucks. For tucks, the snips on each edge start 2 inches from the bottom edge and again up another 2 inches. Matching the second set down to the first set and sew across the fabric from edge to edge – this will form the first tuck. The snips continue with a series of eleven more repeated sets – up 1/2” then up 2”. Again always matching the second snip down to the first. Add 1/2” beyond the final snip as a seam allowance.
An alternate Elbow Pad approach is to stitch a pleated Pad Front onto a Pad Back. This uses less fabric as it is only four layers thick. This is the method I used. Again the component is made oversize and then trimmed down when joined to the other sleeve pieces. The Backing is 17 by 11 inch. The Pad Front is 17 inch wide by 22 inches long. Stitch lines will be located by making small snips into the left and right edges of both the Pad Front and Back to align the pieces and make the pleats. On the Pad Backing the 12 snips on each edge start 2 inches from the bottom edge and continue every 1/2 inch which will leave the last 3 inch of the edge unclipped. The 12 snips on each side of the Pad Front start 2 inches from the bottom edge and continues every 1 and 1/2 inches which will leave the last 2 inches unclipped. Starting at the bottom, match the first set of Pad Front and Backing stitch lines and sew from side to side. Continue matching and sewing until you complete all 12 stitch lines. I have included a simple illustration of the two approaches and the stitch points for each.
With either pad production approach, it helps to press each sew line and each pleat as you complete them. To hold the pleats before sleeve assembly, I basted from top to bottom along each side of the Elbow Pad inside the seam allowance and down the center of double-width pad. I then steam pressed the pad using a damp press cloth pressing from top to bottom.
I am using a two piece cuff. Each piece is a simple rectangle, 2 inches high to match the hem of the jacket body and, for me, 12 inches long. This is large enough for me to easily slip my cupped hand in and out. One caution is to not make this type of barrel cuff too small since there is no opening placket. Also my sewing machine (Pfaff) allows me to remove an accessory box from the sewing bed to give me a free arm bed. This is perfect to sew small diameter cylinders like cuffs and sleeves but again only if the circumference is not too small. It is possible to top-stitch the cuffs and attach them to the sleeves without the benefit of a free arm but if your machine has the feature it makes the tasks much easier. Each cuff piece is stitch RST. One cuff is turned RSO which is slipped into the other which is RSI. Align the raw edges together but with the seam lines 180 degrees apart (to reduce bulk). One edge is stitched all around, seam allowances trimmed as necessary, turned right side out, pressed and top-stitched 1/4” from the edge. The other end is left unfinished until it is ready to be attached to the sleeve.
Attachments
Similar threads
- Replies
- 2
- Views
- 265