Christopher
Member
So I'm working on a Skyrim costume. Specifically an Iron helmet, iron gauntlets, iron grieves and studded leather armor. If I feel up to it I might even try to make a banded iron shield, and I'm still deciding if I want an amulet of talos or stendarr.
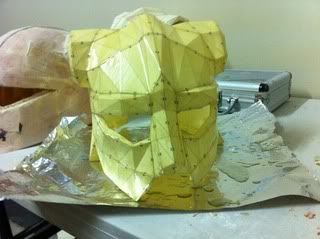
So far I've been working on the helmet. I've been using the pep file from Propzone. This is my first ever pep, and it seems to be going ok. It started out a bit wonky, but I was able to bend it once I fiberglassed it.
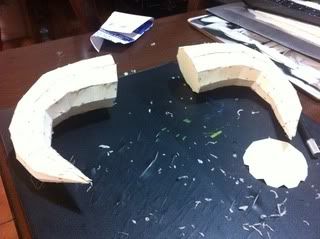


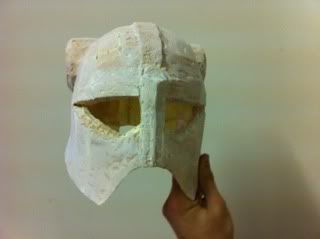
So this is where I'm up to at the moment.

This is the first time I've used filling putty to this extent. I'm excited to see the finished result.
also...
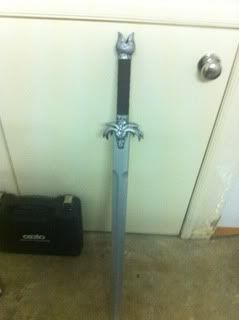
I wigged out and just bought a sword. I think it's supposed to be a Conan the barbarian sword or something, but I think it suits the Skyrim esthetic. I would have made my own using evilFX's eva foam techniques, but I wanted something that I'd be able to swing around and not break easily. Plus it was a steal at $30.
That's it for now, I'll update when I've made some real progress
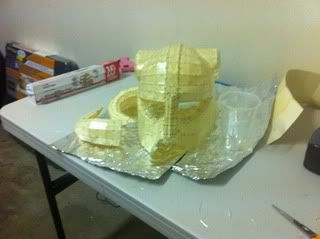
Update: Here we go. I've applied more bondo and have started to sand some of it back
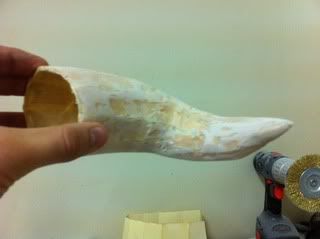

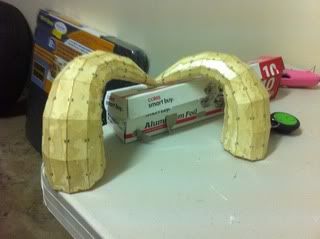
The horns are taking a nice shape. I really like the curve. I still need to apply another coat of bondo to buff out the pep lines, and to thicken it up so I can sand some ribs into it.
Same with the helmet. I need to finish the first coat and sand it back a little so I can apply a second coat to get rid of the pep lines. The second coat shouldn't need to be as thick I don't think
Any critique on what I'm doing would be great. This is my first time doing these techniques and while there are some great tutorials, a little guidance never went astray.
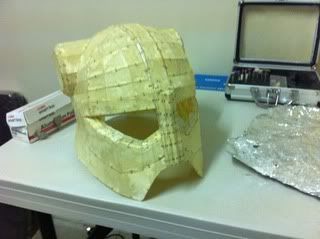
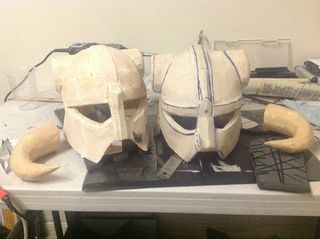
So after $40 worth of materials and a weeks worth of hard labor, I've come to the realization that my helmet just isn't right. Its not exactly the right design and its quite a bit too big. So I've ditched that one and got a new file from here Iron Helmet Papercraft DL by *z8-0 on deviantART. It looks much closer.
I'm going to keep the old horns. I like their shape and I'm pretty sure they'll be close enough to the right size.
I was able to construct the paper file in the space of a day, but it's still quite a bit too big (funny, because I've got quite a big head, so I'd hate to see the guy this one was originally designed for). So I'm in the middle of putting together another that's about 80% of the original size. Hopefully that'll be the right size. I'll post some pics tomorrow. with some comparisons.
Ugh. It was too small. I'm thinking about 86% of the original size will be about right. Maybe I'll go 88% just in case. I know I sure don't want to get it wrong and have to do it again, again
Update!
So I finally made one that's just about the right size.
(For anyone's reference I've got a pretty big head, I think around 42" around, and I had to reduce the size of that file by 10%. The earlier one was reduced by 19% and it fits on a girl of around 5'4'' height)
I managed to get a coat of fibreglass resin before bed. I'm looking forward to getting some bondo on it and giving it some detail.
If you notice, I haven't attached the back flap that is featured on this file. I'm not positive but I think that flap is supposed to be part of some sort of inner lining, in which case I'm going to be making it out of fabric, probably the same stuff that I'm going to use for the leather on the studded armor.
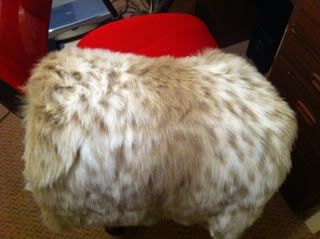
I also picked up some fur the other day. This is going to be used for the waist section, just under the belt.
Finally, here's my gf being a cutie in my 3rd failed attempt

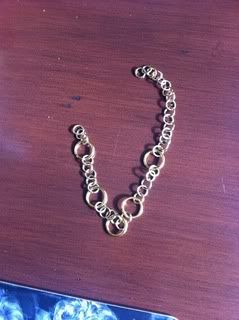
Just whipped together the chain of an Amulet of stendarr. I was a couple of rings short, but not to worry. I'm not sure how I'm going to go about making the actual pendant though. Hmm...
Another quick update. Just got some bondo on the helmet") I should have it completely covered by the end of the day
I should have it completely covered by the end of the day

Update!
Finally a new update!
I'm back on the horse with Halloween coming up. I figure I won't have enough time to start a mass effect costume so I'm gonna get this one finished.
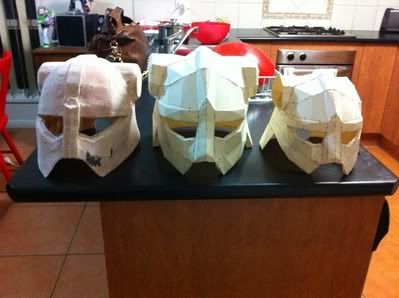
Here's a pic of the current helmet next to the old one. It's the only current pic I have of it
Still a little detailing to go before I paint it.
And this is what I've been working on recently. The details to the horns


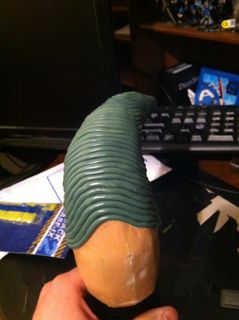
It's looking a bit like an alien penis at the moment, but once it's painted the bone colour and shaded a little bit I think it will come up good. I'm using green stuff to do it, a modeling putty that many war gamers use, since I'm not sure of any other material to use to get this effect.
Hopefully I'll have the horns finished and attached soon!
Update!
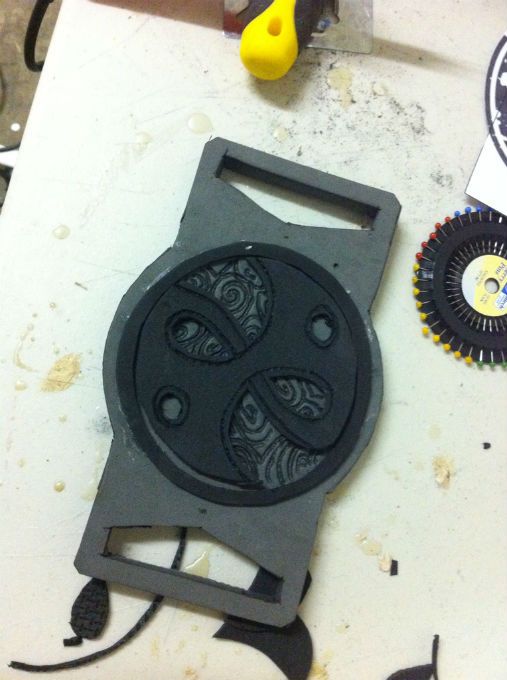
Ok! I've got 24 days to get this costume finished before I head home for a Halloween party. I've got both the horns done and next I have to attach them to the helmet next. I've also made my shoulder guard and the buckle that sits on the chest of the studded armor.

To my knowledge there isn't a good template for the shoulder guard around so I whipped one up just using the game as a reference. Its not exactly right but I think it's pretty close.
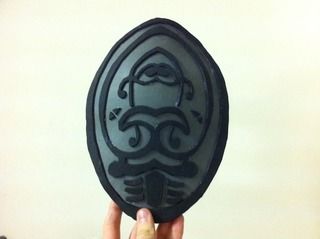
I dont love the emblem in the buckle from the game and thought I'd give it my own spin... by using a different games logo. It's the hero guild symbol from the fable games.
I've also started on the boots. I picked up some leather boots from an op shop. And then added the fur to the top.

Funnily enough they're ladies boots (I couldnt find anything remotely close in a men's), but they fit perfectly. Lucky a tall lady didn't need 'em anymore.
I've also done most of the fur for the waist of the costume, but don't have any good photos of it yet, so will post when I have some
Ok! I'm going out tomorrow to try to find some gloves, that should be the last part I need to get till I can put it all together.
Quick Update
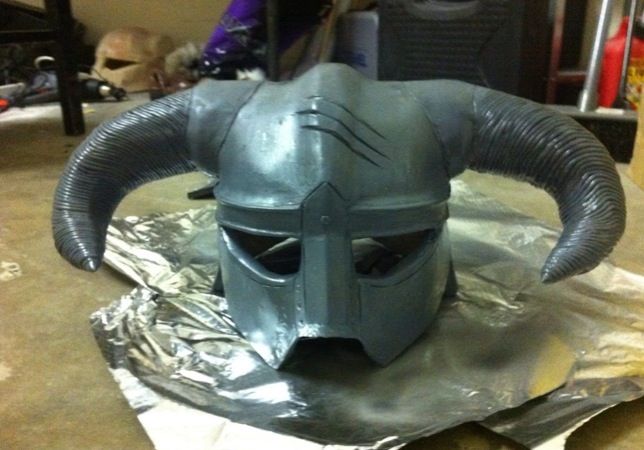
Here she is, primed and ready to be painted. I've missed out on a lot of details like rivets and lines on spots that I really would have liked to have done, but I've spent too much time as it is on this helmet and have a lot of other things to get done in only 17 days. That said I'm really happy with how it's turned out so far.
Yet another Quick Update! 10/10/12

Just about finished painting, I just want to touch up the horns. Then I'm gonna line the inside with a bit of felt just for a little bit of protection and comfort and then I'm done!
I am making progress with the rest of the costume, but nothing really worth showing yet cos its all in pieces. Will do another update when there's something else to look at.
So far I've been working on the helmet. I've been using the pep file from Propzone. This is my first ever pep, and it seems to be going ok. It started out a bit wonky, but I was able to bend it once I fiberglassed it.
So this is where I'm up to at the moment.
This is the first time I've used filling putty to this extent. I'm excited to see the finished result.
also...
I wigged out and just bought a sword. I think it's supposed to be a Conan the barbarian sword or something, but I think it suits the Skyrim esthetic. I would have made my own using evilFX's eva foam techniques, but I wanted something that I'd be able to swing around and not break easily. Plus it was a steal at $30.
That's it for now, I'll update when I've made some real progress
Update: Here we go. I've applied more bondo and have started to sand some of it back
The horns are taking a nice shape. I really like the curve. I still need to apply another coat of bondo to buff out the pep lines, and to thicken it up so I can sand some ribs into it.
Same with the helmet. I need to finish the first coat and sand it back a little so I can apply a second coat to get rid of the pep lines. The second coat shouldn't need to be as thick I don't think
Any critique on what I'm doing would be great. This is my first time doing these techniques and while there are some great tutorials, a little guidance never went astray.
So after $40 worth of materials and a weeks worth of hard labor, I've come to the realization that my helmet just isn't right. Its not exactly the right design and its quite a bit too big. So I've ditched that one and got a new file from here Iron Helmet Papercraft DL by *z8-0 on deviantART. It looks much closer.
I'm going to keep the old horns. I like their shape and I'm pretty sure they'll be close enough to the right size.
I was able to construct the paper file in the space of a day, but it's still quite a bit too big (funny, because I've got quite a big head, so I'd hate to see the guy this one was originally designed for). So I'm in the middle of putting together another that's about 80% of the original size. Hopefully that'll be the right size. I'll post some pics tomorrow. with some comparisons.
Ugh. It was too small. I'm thinking about 86% of the original size will be about right. Maybe I'll go 88% just in case. I know I sure don't want to get it wrong and have to do it again, again
Update!
So I finally made one that's just about the right size.
(For anyone's reference I've got a pretty big head, I think around 42" around, and I had to reduce the size of that file by 10%. The earlier one was reduced by 19% and it fits on a girl of around 5'4'' height)
I managed to get a coat of fibreglass resin before bed. I'm looking forward to getting some bondo on it and giving it some detail.
If you notice, I haven't attached the back flap that is featured on this file. I'm not positive but I think that flap is supposed to be part of some sort of inner lining, in which case I'm going to be making it out of fabric, probably the same stuff that I'm going to use for the leather on the studded armor.
I also picked up some fur the other day. This is going to be used for the waist section, just under the belt.
Finally, here's my gf being a cutie in my 3rd failed attempt
Just whipped together the chain of an Amulet of stendarr. I was a couple of rings short, but not to worry. I'm not sure how I'm going to go about making the actual pendant though. Hmm...
Another quick update. Just got some bondo on the helmet
I should have it completely covered by the end of the day
Update!
Finally a new update!
I'm back on the horse with Halloween coming up. I figure I won't have enough time to start a mass effect costume so I'm gonna get this one finished.
Here's a pic of the current helmet next to the old one. It's the only current pic I have of it
Still a little detailing to go before I paint it.
And this is what I've been working on recently. The details to the horns
It's looking a bit like an alien penis at the moment, but once it's painted the bone colour and shaded a little bit I think it will come up good. I'm using green stuff to do it, a modeling putty that many war gamers use, since I'm not sure of any other material to use to get this effect.
Hopefully I'll have the horns finished and attached soon!
Update!
Ok! I've got 24 days to get this costume finished before I head home for a Halloween party. I've got both the horns done and next I have to attach them to the helmet next. I've also made my shoulder guard and the buckle that sits on the chest of the studded armor.
To my knowledge there isn't a good template for the shoulder guard around so I whipped one up just using the game as a reference. Its not exactly right but I think it's pretty close.
I dont love the emblem in the buckle from the game and thought I'd give it my own spin... by using a different games logo
. It's the hero guild symbol from the fable games.I've also started on the boots. I picked up some leather boots from an op shop. And then added the fur to the top.
Funnily enough they're ladies boots (I couldnt find anything remotely close in a men's), but they fit perfectly. Lucky a tall lady didn't need 'em anymore.
I've also done most of the fur for the waist of the costume, but don't have any good photos of it yet, so will post when I have some
Ok! I'm going out tomorrow to try to find some gloves, that should be the last part I need to get till I can put it all together.
Quick Update
Here she is, primed and ready to be painted. I've missed out on a lot of details like rivets and lines on spots that I really would have liked to have done, but I've spent too much time as it is on this helmet and have a lot of other things to get done in only 17 days. That said I'm really happy with how it's turned out so far.
Yet another Quick Update! 10/10/12
Just about finished painting, I just want to touch up the horns. Then I'm gonna line the inside with a bit of felt just for a little bit of protection and comfort and then I'm done!
I am making progress with the rest of the costume, but nothing really worth showing yet cos its all in pieces. Will do another update when there's something else to look at.
Last edited: