Dr. Who - Key to Time - Clear resin cast

Dalex

Active Member
Hello all,

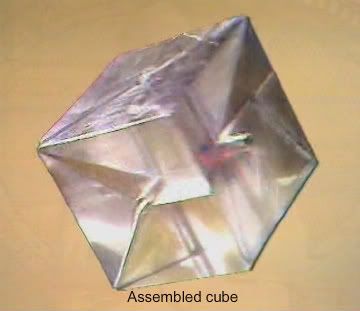
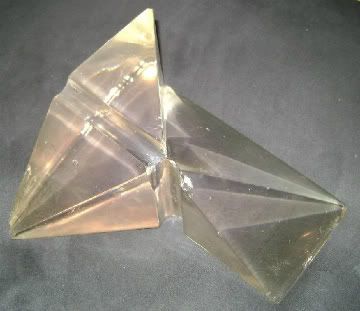
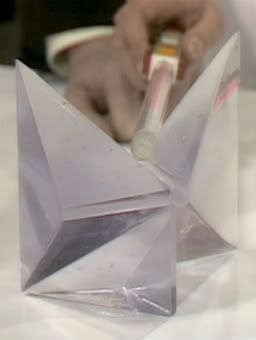
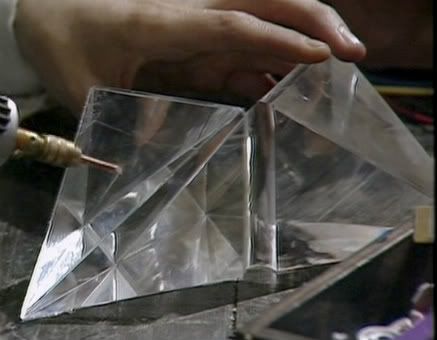
New guy here! I've recently decided that I'd like to make an accurate replica of the Key To Time prop from Doctor Who. For those unfamiliar with the Key to Time, it is a 6" cube made of solid crystal-clear plastic, subdivided into six segments to form a 3D puzzle:

Assembled_Cube.jpg
6th_Segment.jpg

1st_Segment.jpg
4th_Segment_1.jpg


As far as I can tell, no one has yet been able to make one that truly looks like the on-screen prop. The attempts I've found online are either not to scale, or are rough around the edges and heavily tinted yellow.

I have absolutely no experience in prop making, but I have a strong desire to learn. I am going to share my experience from start to finish with everyone here. Along the way I am sure I'll have lots of questions and hopefully I'll get lots of advice from other members. Hopefully I won't embarrass myself too much! :lol I'll only be working on this in my spare time so I don't know how fast this project will progress, but I promise not to abandon this thread.

After talking to the extremely helpful and knowledgeable staff at Sculpture Supply Canada here in Toronto, I've decided to try carving the individual pieces out of plaster, rather than wood. This way I should be able to shape all the pieces by hand with just a coping saw and sandpaper. And plaster is cheap, which is good because I know I'll make lots of mistakes! If this ultimately doesn't produce satisfactory results, I'll switch to wood.

I have yet to decide what to cast this in. Smooth-On Crystal Clear looks like the best candidate, but I'm worried it may be too expensive. I'll probably do some small test casts using different products to see what gives the best results. I know I still have a big learning curve ahead of me. :rolleyes

I've done some research on the Key to Time prop, including discussions on other forums about other people's attempts at making this prop. I'll post a summary of what I've found, in case anyone's interested.

Alex
 
I have a lot of experience with smooth-on crystal clear.

A few things I do that allows me to get perfect castings:

If you want it clear, the surface of the master has to be perfectly polished when you make your mold. This will be a consideration on your master material. You can go through a step process, plaster master, mold, cast a resin piece, polish that, mold it again. You can also paint your master and polish that painted surface. Your goal is to make it a perfect surface. Completely smooth. IE, garbage in, garbage out.

You will need to degass your rubber.

Don't use any mold release.

You will need to post-cure your silicone in the oven for several hours.

You will need to pre-heat your mold before pouring.

Don't use any release.

You will need to pressure cast it.

If all that comes together, your castings should be great, clear inside and on the surface. (inside is easy, surface is hard to get clear)

If that fails, you can sand and polish the material to a perfect glass-like surface. Something you'll need to do on the part sprue anyway...
 
Hey guys,

Thanks for the responses so far! Before we go much further I just wanted to post what I've found so far through googling. It's a bit long and boring, but I figured it might be useful to have all these links in one post, just in case anyone is interested.

So here goes...

At least two castings were done of the original Key to Time segments. Some of the original pieces still exist today and are in private collector's hands. Here is one segment (scroll down midway):

Doctor Who Props

That website also has a useful description of how the prop was made. Basically, the segments were constructed in wood and then moulded in silicon rubber. The extreme heat generated by the catalyst for the resin required that each segment be cast in a number of layers (which are visible in the original) but I'm hoping that things have changed since the 70s and that will no longer be required today.

Another good view of an original Key to Time segment:

The Doctor Who Collection of Derek Rushton

Not much info on that site, but the photo is the best example of what one of the segments looks like today.

Next we have some screen captures of the various segments, taken from DVD:

Doctor Who: The Key To Time

I find those photos give the best idea of what the Key to Time segments should ultimately look like. It's worth pointing out here that the production team also created a rather cheap-looking perspex box version of the Key to Time, seen at the bottom of that page. Obviously the prop I'll be making will not be that!

Another very useful resource is a paper cut-out of the Key to Time that someone did back in the 90s:

Bjellis Blog » Blog Archive » The Key to Time

It has subsequently been determined that this is not an accurate representation of the pieces. Fortunately it was not too hard to modify the original postscript so that the segments would match their on-screen counterparts.

Now let's move on the various attempts to re-create this prop. By far the biggest discussion can be found on the Tardis Builders website, in a thread from 2008:

the Key to Time?

That thread shows the reasoning people went through to figure out the size and shapes of the pieces, so I highly recommend taking a look at it. Among other things it contains corrections to the paper cut-out, and the deduction that the same segment was used on-air for both the 2nd and 4th segments, meaning there's a "mystery" segment that was clearly part of the original prop but never used on-screen.

Throughout the thread, "Darksyde" led the discussion and actively worked on recreating one of the pieces. One of the most useful things he did was create a Google SketchUp model of the Key to Time, which you can find here:

Key to Time 5 inch by Darksyde - Google 3D Warehouse

I found that model extremely useful in Google SketchUp, as you can rotate it and see any of the segments from any angle.

Getting back to the Tardis Builders discussion, the thread above dies however a new thread is created by Darksyde where he showcases the creation of one of the segments:

My Key to Time

His piece was cut out of foam and cast in acrylic. The result is encouraging, but falls short of recreating the on-air prop. The edges are rough and the plastic too yellow. Unfortunately, as far as I can tell Darksyde never gets back to this project, and the thread basically dies at this point.

There is another thread on Tardis Builders where someone creates a scaled-down version of the Key to Time with a rapid prototype machine, and mentions casting it in resin, but I don't think they ever do. There's not that much useful info there, but here's the link anyway:

The Key to Time

There's also been some discussion here on the Replica Prop Forum, but nothing too useful:

http://www.therpf.com/f9/key-time-dr-who-armageddon-factor-83227/
http://www.therpf.com/f9/dr-who-key-time-locater-115948/

There are other people who have tried to recreate the Key to Time prop but without much background information about how they did it. For example, this guy:

Doctor Who Cosplay and Costuming - 1st segment of the Key To Time
Doctor Who Cosplay and Costuming - Improved First Segment Of The Key To Time

Again, an impressive attempt but still short of looking like the original crystal-clear prop.

There's also a miniature version that someone did and was offering for sale:

dr who KEY TO TIME REPLICA by ~Hordriss on deviantART
dr who key to time II by ~Hordriss on deviantART

Looks really nice, but not being to scale is a big no for me. Plus the comments indicate that the "idea needs to be developed a bit".

One final interesting thing I found was a comment on this page, where someone was showing their paper cut-out:

The Key To Time

An anonymous poster claims: "I've made a full set of primary blocks for casting the pieces. There are 6 in total. And they fit together nicely." This was written January 2012, but unfortunately there has been no follow up and I can find no other info on this guy.

And that's pretty much it!

Alex
 
I have a lot of experience with smooth-on crystal clear.

A few things I do that allows me to get perfect castings:

If you want it clear, the surface of the master has to be perfectly polished when you make your mold. This will be a consideration on your master material. You can go through a step process, plaster master, mold, cast a resin piece, polish that, mold it again. You can also paint your master and polish that painted surface. Your goal is to make it a perfect surface. Completely smooth. IE, garbage in, garbage out.

Yep, I'm definitely going to try my best to have a perfectly polished master. I think I'll take the route of "paint your master and polish that painted surface". I was thinking of spraying the finished plaster pieces in several coats of acrylic. Do you think that would result in a smooth enough surface? In any case, I plan on trying a bunch of different methods on practice pieces of plaster, until I find what works best.

You will need to degass your rubber.

Don't use any mold release.

You will need to post-cure your silicone in the oven for several hours.

Would a small kiln work for this? I don't have one yet, but my wife's been hinting she would like one for doing pottery, so this may be a good excuse to buy one! :)

You will need to pre-heat your mold before pouring.

Don't use any release.

You will need to pressure cast it.

If all that comes together, your castings should be great, clear inside and on the surface. (inside is easy, surface is hard to get clear)

If that fails, you can sand and polish the material to a perfect glass-like surface. Something you'll need to do on the part sprue anyway...

Excellent advice, thank you. And yeah, I'm curious to see how hard it would be to sand and polish the finished cast. I'll definitely be doing a lot of small test casts to practice on.
 
Hydin and his crystal team would be able to make one in real crystal..

Yeah, I saw the Superman crystals, they look amazing!

How is that done? I tried looking through some of the earlier posts, but didn't find the exact details. I guess I should contact Hydin and ask him about it.
 
Any plans for a run of these in the future?

If it's something I'm able to do, then sure. I'm still new to all this, so I'd be a bit afraid of the responsibility. But I would be more than happy to do whatever I can to share this with others -- if what I do is ultimately successful. :)
 
Heheh. I actually am in the process of finishing up a key to time set. I agree that the 3d darksyde model is correct, though we used a 6 inch width. I did actually send Hydin the 3d model for the pieces to possibly cast in crystal, but he never got back to me with an estimate (hi hydin!). We went with wood sculpts done by a woodworker in mdf. I'm hopeful to have the first casts in the next couple weeks (done by another person, not myself). If the casts come out nicely, we will be offering sets.

Your comments about the paper design and the corrections are correct. You're also correct about the 2nd and 4th pieces aired being the same piece.

I'm still hoping that someone can make a quality tracer. We haven't started tackling that part yet. We do have the buttons (from newark electronics, honeywell style switches) though.

Cool to see you tackle it too! The whole prop community benefits from multiple people trying to solve this.
 
I would love to see this happen, and it's REALLY great to see all the awesome technical and process information being shared here. This thread is a wealth of knowledge, as casting in clear/transparent/translucent resins is often a topic of conversation.

Though it's already been said, I feel it's worth repeating: You seek Hydin! He is THE crystal expert here on the RPF, and has all the right contacts and pipeline in place. I would definitely recommend reaching out to him again and prodding, especially if you've already got a 3d drawing available. Sounds like a slam dunk.
 
Shrug. I sent them to him and the company had trouble reading the files. I also pursued CNC options. We'll see how these casts come out. What's nice is that the wood method is the way they used originally, so it should be closer to "true." CNC and crystals would be more "perfect" but likely less screen accurate.
 
Heheh. I actually am in the process of finishing up a key to time set. ...

Doh, if only I knew this before I started! :rolleyes A large part of my motivation has been looking at previous attempts and thinking "Surely I can do better..."

You obviously have a lot more experience than I (well, pretty much everyone on this forum has more experience than me!) and you're much further ahead -- So if your prop turns our well, I'll probably just get in on the run.

In the meantime I'll still play around with trying to do a plaster version of the first segment, just to see how it turns out. I already have an idea of how to do it and I've already bought the necessary supplies, so I may as well put them to use! :)
 
It's good practice at any rate. It's not that I have any experience in professional looking props, but that I've been hunting down the right people for over a year now :)
 
What are you casting in? Smooth-On Crystal Clear looks like the obvious choice to use for something like this, but I hadn't yet decided what I would use.
 
Alex,

As Phil pointed out in his excellent post on clear casting, you will need a vacuum chamber to degass the silicone and a pressure pot to cast the clear resin.

These are very expensive pieces of equipment, so I'm guessing that you would actually need to find someone else to cast the master for you to get the results you are looking for.
 
So I got in contact with Hydin about the Key to Time and we discussed the feasibility of doing something like this in crystal. (Very nice and helpful guy!) It's certainly possible, since the design of the segments lends itself nicely to the process the factory uses. But there are a few considerations to worry about:


  • Crystal is susceptible to scratching and denting if you bang pieces of it against one another. Given that the Key to Time is essentially a 3D puzzle, I can see that being a big problem.


  • It's heavy. A small 9cm cube that Hydin did recently weighed about 5 lbs. So a full Key to Time would be about 25 lbs!


  • It's expensive. Particularly if there's drilling involved, which there would be for the tracer holes. So we'd definitely need to get a run of these to bring the price down.

Despite all that, I am still quite intrigued by the idea of doing part or all the Key to Time in crystal. In may not be technically accurate to what was used on-screen, but you could certainly argue that its appearance is what the production team would ideally have envisioned the Key to Time to really look like.

Another possibility is to simply cast one segment in crystal (presumably the most interesting looking one, which IMHO is the 1st). That could look pretty cool on its own sitting on a shelf.

In any case, I'm going to wait and see how Kestre's project turns out before doing anything crystal related.

In the meantime I'll continue on with my plaster model, as I'm curious to see how that turns out, even if it's just for my own fun.
 
Another possibility is having a single set made in crystal then molding and casting from there. No idea what the numbers would need to be to offset the cost.

I'll let everyone know if we get a good pull. Our guy has the wood pieces in hand now. I assume resin weighs less than crystal but I actually don't know how much the cube would weigh in resin. Any guesses, folks? And sorry Dalex, I don't know what resin he's planning to use.
 
As Phil pointed out in his excellent post on clear casting, you will need a vacuum chamber to degass the silicone and a pressure pot to cast the clear resin.

These are very expensive pieces of equipment, so I'm guessing that you would actually need to find someone else to cast the master for you to get the results you are looking for.

Yeah I haven't quite decided what I'm going to do once I get to that stage. I figured it's not something I need to worry about yet. Right now I'm just going to concentrate on making a nice master with surfaces as smooth as possible.

Speaking of which, I still need to determine the best way to do that. Assuming I've sanded down the plaster to be as smooth as I can get it, would a few coats with an acrylic varnish spray be suitable for getting a near-glass-like surface? Or is there a better way? :confused
 
This thread is more than 10 years old.

Your message may be considered spam for the following reasons:

  1. This thread hasn't been active in some time. A new post in this thread might not contribute constructively to this discussion after so long.
If you wish to reply despite these issues, check the box below before replying.
Be aware that malicious compliance may result in more severe penalties.
Back
Top