DopamineDoc
New Member
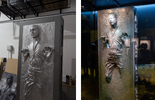
After building an all metal R2-D2 build, I wasn’t really looking for another project… until I saw some amazing Han Solo in Carbonite replicas. This was one of my favorite Star Wars toys as a kid and I always drooled over the life sized versions. With a little reading I discovered that there were excellent resources available to build one at home (box build kits from Tom Blatt/custom3dstuff.com, HiC casts from Wes Coke, lighting kit from Fettronics, upgrade kit from SirCharles77, etc.). I also noticed many of these appeared more screen accurate than commercial versions at a much lower cost. I pulled the trigger and ordered the initial kit!
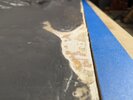
The parts have arrived from -Zenix on RPF (Carbonite Build Parts and Kits) This saves a lot of time and effort due to the odd angles/lengths of the box and is absolutely worth the price. It tapers from toe to head, as well as back to front. At this part of my project, I had planned on buying the pieces of Han Solo (head/torso/feet) and creating my own carbonite texture using spackle (you can see two pink lid containers of it in the back left). Much like other steps of the project along the way, I changed plans as I became more interested in maintaining details consistent with the original prop.

Using wood glue and a brad nailer, we started by putting together the frame of the box and adding side paneling to the interior sides (they give some strength, but importantly this is where the side panels attach). My dad is much more skilled in woodworking than I am so I was happy to get his assistance.


Lots of wood glue, lots of nails, and lots of clamping.


I added a layer of thin paneling (the same paneling that was used on the interior sides) in order to add more height to the anterior recessed portion. I love how clean it looks at this point.

The parts have arrived from -Zenix on RPF (Carbonite Build Parts and Kits) This saves a lot of time and effort due to the odd angles/lengths of the box and is absolutely worth the price. It tapers from toe to head, as well as back to front. At this part of my project, I had planned on buying the pieces of Han Solo (head/torso/feet) and creating my own carbonite texture using spackle (you can see two pink lid containers of it in the back left). Much like other steps of the project along the way, I changed plans as I became more interested in maintaining details consistent with the original prop.
Using wood glue and a brad nailer, we started by putting together the frame of the box and adding side paneling to the interior sides (they give some strength, but importantly this is where the side panels attach). My dad is much more skilled in woodworking than I am so I was happy to get his assistance.
Lots of wood glue, lots of nails, and lots of clamping.
I added a layer of thin paneling (the same paneling that was used on the interior sides) in order to add more height to the anterior recessed portion. I love how clean it looks at this point.