You are using an out of date browser. It may not display this or other websites correctly.
You should upgrade or use an alternative browser.
You should upgrade or use an alternative browser.
Done! Scratch Build 85%-Scale R2-D2 from Sheet Insulation and Foamcore
- Thread starter Snow Builder
- Start date
Wow, this is incredible work!! I'd never guess it's foam and cardboard. It really looks great!
Looks great! Keep up the good work!
Wow, this is incredible work!! I'd never guess it's foam and cardboard. It really looks great!
Thamks
Busy weekend so far. Got the front skin mounted on the body. Built the insets for the back skin and got them attached, and built R2’s bottom.
We’re getting dangerously close to assembly....
Very productive weekend!
Shoulders and bottom built and attached.

Weathered the back skin and got it attached

Got the legs permanently attached


Have to admit, he looks a little weird without a head -I hope to get that started on over the next couple of days.
I think I may have made a mistake on measurements for the body height -he looks a little stumpy to me; we'll see if that impression stays once he has a dome.
At the moment, the entire piece weights about 8 lbs -the trashcan he's built around weighs about 2 lbs. So far he can easily be picked up with one hand.
Shoulders and bottom built and attached.
Weathered the back skin and got it attached
Got the legs permanently attached
Have to admit, he looks a little weird without a head -I hope to get that started on over the next couple of days.
I think I may have made a mistake on measurements for the body height -he looks a little stumpy to me; we'll see if that impression stays once he has a dome.
At the moment, the entire piece weights about 8 lbs -the trashcan he's built around weighs about 2 lbs. So far he can easily be picked up with one hand.
Put together costs for this little project. I think the $$ are a little overstated because a good number of the supplies (adhesive, paint, blades) I already owned -but I wanted to give an accurate estimate for anyone else that is thinking they'd like to try this.
| R2D2 Price Sheet | |||
| Item | Quantity | Price | Total |
| Craft supplies | $ 17.00 | ||
| Mod Podge | 1 | $ 6.00 | $ 6.00 |
| Exacto blades (set of 15) | 1 | $ 7.00 | $ 7.00 |
| Box cutter | 1 | $ 3.00 | $ 3.00 |
| Foam Paint brush | 1 | $ 1.00 | $ 1.00 |
| Adhesives supplies | $ 25.00 | ||
| Wood glue | 1 | $ 6.00 | $ 6.00 |
| Tacky glue | 1 | $ 3.00 | $ 3.00 |
| Spray adhesive | 1 | $ 10.00 | $ 10.00 |
| Hotglue | 1 | $ 6.00 | $ 6.00 |
| Materials | $ 88.00 | ||
| 19" Black Trashcan | 1 | $ 18.00 | $ 18.00 |
| 1" Sheet insultation | 1 | $ 20.00 | $ 20.00 |
| 1/2" Sheet Foamcore | 2 | $ 7.00 | $ 14.00 |
| 1/4" Sheet Foamcore | 1 | $ 3.00 | $ 3.00 |
| Extra thick white posterboard | 7 | $ 3.00 | $ 21.00 |
| 1" foam dowel | 1 | $ 4.00 | $ 4.00 |
| 1/4" foam dowel | 1 | $ 4.00 | $ 4.00 |
| 1/4 foam square dowel | 1 | $ 4.00 | $ 4.00 |
| Paint | $ 19.00 | ||
| Purple acrylic paint | 1 | $ 3.00 | $ 3.00 |
| Blue acrylic paint | 1 | $ 3.00 | $ 3.00 |
| White latex paint | 1 | $ 10.00 | $ 10.00 |
| Black Acrylic paint | 1 | $ 3.00 | $ 3.00 |
| Total | $ 149.00 |
I think the proportion look perfect. I think it just looks off without the dome.
Started working on the dome.


Filled in the rest of the dome. This was a fairly serious pain in the rump. Once the glue dries I’ll shape and sanding the surface smooth.


Good progress on the dome. Got it shaped and covered with paper mache.


Spent the weekend working on the dome. It’s been a challenge....
Added several more layers of paper mache, used body filler to round out flat areas and deformities, laid out panel templates, added panels and finally got it primed for final paint.


Added several more layers of paper mache, used body filler to round out flat areas and deformities, laid out panel templates, added panels and finally got it primed for final paint.
Need to put down a base of purple before laying down blue. I think this is an interesting look.


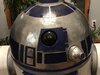
Final dome paint done! Laid down the blue, then masked, couple of light layers of chrome paint, then an unmask.
Need to do the eye, lights and readouts (plus lots of weathering) but it's definitely starting to look like R2.


Need to do the eye, lights and readouts (plus lots of weathering) but it's definitely starting to look like R2.
Now we’re talking. Made the radar eye out of EVA and a plastic tree ornament.
Holoemitters made from Ornaments, craft
foam, and a foam dowel.
Hit the dome with a few washes to bring down the shine and add the grime.


Holoemitters made from Ornaments, craft
foam, and a foam dowel.
Hit the dome with a few washes to bring down the shine and add the grime.
Attachments
Got the hoses attached to the feet. Thought it would be as easy as a couple of minutes to hot glue. Nope.
Neither hot glue nor rubber cement would adhere. Had to cut out insertion holes then glued in place with a combination of wood and super glue.


Neither hot glue nor rubber cement would adhere. Had to cut out insertion holes then glued in place with a combination of wood and super glue.
Man, it looks so good I would never guess it's foam. Really impressive work. I'm so jealous!!
Thank you!Man, it looks so good I would never guess it's foam. Really impressive work. I'm so jealous!!
Re-did the holo-emitters to make them a wider diameter with larger lenses. Also cut out the dome areas to fit in the read outs.
Last edited:
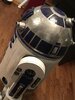
R2D2 is done! All dome readouts have been added. Overall, I'm happy with him. The dome was killer and I probably should have done it with fiberglass instead of paper mache. But every project is a learning opportunity.


You did a fantastic job. Its been fun watching this build.
Similar threads
- Replies
- 12
- Views
- 1,057
- Replies
- 1
- Views
- 504
- Replies
- 4
- Views
- 778