Doctor Who Yellow Space Helmet

Engineermaker

New Member
I've been 3D-modeling and printing the parts that go on this helmet for a couple of years now in my free time.
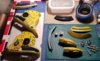
Recently I started playing around with painting and weathering the pieces, starting with one of the ear piece detail panels.
20190217_125242.jpg


My idea is to make them look like metal with worn off paint, imagine it being used for a long time, not just in space but in various hostile environments. An old workhorse for frontier work.
 
Last edited:
Any further progress on the helmet?

I've finished all the 3D modeling and have only a few parts left to print. Some insert parts had too tight a fit and needed a bit of work to fit in their slots which took up a bit of extra time and effort but it turned out nice.

Comicon Stockholm is in a few weeks and I'm trying to get it finished for that but it may be a bit rushed. LED lights and battery packs are all wired. So maybe? Theres this Doctor Who Con a month later that I really want it done for though.

Progress so far is having both ear pieces assembled and attached to the helmet. This means I can start on attaching the rubber bellows.
A lot of acetone smoothing of parts and painting still remains though.

20190727_212623.jpg
 
Very cool. Did you start with the Tornado helmet as a base?

Yes I did. :)
The base is the Scott Procap FH6 welding Helmet, I started with an FH61 and removed the outer visor. All procap helmet variants look/are the same for build purposes, some use material that's more chemically resistive, and they come in white or black.
It uses the Scott Tornado Respirator system.
Some shops sell the helmets simply as "Tornado helmets" even though that's just the respirator model it's compatible with. ;)

Worth noting for build interest is that the helmet itself is not that expensive, about $100-200, the respirator and hose go for around $150 but the rechargable long life battery can be quite expensive ($500?) Unless you find a bargain on ebay...

The helmet has a complex multi-curvature shape behind the ear so I scanned the side of the helmet and made a CAD cutting body to shape the ear pieces so they fit perfectly without a gap.
I also figured out how to move the mechanically locking jointed air coupling up the back of the head as they did for the helmets on the show. It requires some new parts that I modeled and printed.

I'll show everything in detail when the helmet is finished.
 
Last edited:
Worth noting for build interest is that the helmet itself is not that expensive, about $100-200, the respirator and hose go for around $150 but the rechargable long life battery can be quite expensive ($500?) Unless you find a bargain on ebay...
Good to know. I haven’t found a decent set up for under $400 yet. I check eBay sporadically, but these helmets seem to be pretty rare nowadays. This is quickly becoming my Holy Grail prop.... I must be cautious.
 
The helmet is coming along nicely.

I'm building everything now to get it all put together, then disassembling it, sanding, smoothing and painting the printed parts for final assembly. The rubber bellows isn't attached yet just rolled up for a mockup shot.

20190901_032030.jpg

There is two things I'm not content with on it, the dimensions of the top lantern.
I'll just make one slightly wider lantern and less tall to replace it with later. The second thing is the chin light, I need to remodel it entirely to make it screen accurate. I have a lens same as on the lantern but it's really supposed to be a cast transparent blue tinted cube with LEDs set in it. I can use the same housing though.

I also have unwanted extra holes in the helmet top from changing placement of some of the parts, I have spare tops so I can paint another one up and replace it with later.I'll fix all this when there's no rush. Did I mention I'm making another one, the second one will be perfect and I can give this one to my Brother, he's wating for my old space suit too as soon as I finish my new one in the same Cordura material used in the show. ;)
 
Last edited:
The last of the LED lights are now soldered with splices and secured with shrink tubing.
Chin light at the top, with attached standard dimmer and 9v battery holder.
The lower cables are the side face lights inside the helmet.

I have ready made cable forks to connect between these and the lantern light as well. Everything is in replaceable sections and uses sturdy male/female connectors.
I'll probably connect a separate dimmer for the face lights so I can adjust outer and inner lights independently.20190904_000007.jpg
 
That looks amazing! Well done! Though I'm not a Doctor Who fan, I am a big fan of large , bubble space helmets. And in yellow?! Double plus good!

Thank you Funky. :)

Space suits builds are addictive so I might make more.
Expanse comes to mind as they are also built on existing respirator helmet systems which make them more wearable for Cons and so does the Tintin moon trip (orange deep diver-like armorbuild with Ironman style chest light AND fishbowl helmet).
 
Almost finished for Comicon Stockholm tomorrow.
Basic paint job w/o complete weathering, I'll work on it more at leisure when there's no rush.
Just about to mount the ladt few pieces that are dry enough now. Took the photos before that.

Then I'm letting the paint dry overnight then wrapping it in fabric and packing it in my con kitbag for travel.

20190913_002003.jpg20190913_002547.jpg
 

Your message may be considered spam for the following reasons:

If you wish to reply despite these issues, check the box below before replying.
Be aware that malicious compliance may result in more severe penalties.
Back
Top