You are using an out of date browser. It may not display this or other websites correctly.
You should upgrade or use an alternative browser.
You should upgrade or use an alternative browser.
District 9 Bunraku
- Thread starter Temperance
- Start date
Temperance
Well-Known Member
More sculpting... Shaping the head has been surprisingly fun. I'm really looking forward to adding the MNU stencil to his head 

Detailing the clay a bit more around the face... the pock marks were done with 5 toothpicks cut in half and taped together.

Also painted the eyes.. this was the easy part. Two 1-1/2" acrylic cabochons with the backs painted. I make these all the time with mascot costumes.

I am ready to start casting, but I am hesitant to jump in. I will probably wait a few days and look at him again in case any details pop out that I missed.
Detailing the clay a bit more around the face... the pock marks were done with 5 toothpicks cut in half and taped together.
Also painted the eyes.. this was the easy part. Two 1-1/2" acrylic cabochons with the backs painted. I make these all the time with mascot costumes.
I am ready to start casting, but I am hesitant to jump in. I will probably wait a few days and look at him again in case any details pop out that I missed.
Temperance
Well-Known Member
Thanks Fevereon. I love your leatherwork >_<
Actually I've been working on this guy for awhile... unfortunately I only get to work on him between projects, so he's been in my house for months in various stages of completeness).
Yay Molding process has begun. It's nice to get this alien torso out of my house T_T
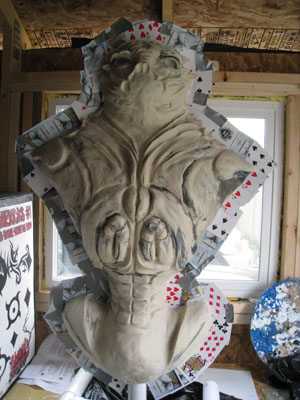
Now to the shed he goes! I am using the super handy playing card method to bisect the torso in half
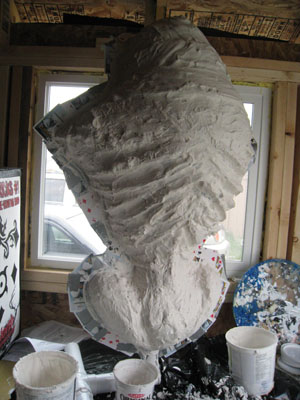
I'm doing the back first (if I make a mistake, it won't be as easily seen since most of the back will be hidden against my body). One coat of thin plaster... followed by thicker ones... this is stage two... more casting to come. :I
Actually I've been working on this guy for awhile... unfortunately I only get to work on him between projects, so he's been in my house for months in various stages of completeness).
Yay Molding process has begun. It's nice to get this alien torso out of my house T_T
Now to the shed he goes! I am using the super handy playing card method to bisect the torso in half
I'm doing the back first (if I make a mistake, it won't be as easily seen since most of the back will be hidden against my body). One coat of thin plaster... followed by thicker ones... this is stage two... more casting to come. :I
simul8r
Member
Yay Molding process has begun. It's nice to get this alien torso out of my house T_T
Now to the shed he goes! I am using the super handy playing card method to bisect the torso in half
Very interesting work and approach for a costume. I'm very much a noob with mold making and I'm about to embark on my first. I've read up on a few tutorials but not familar with the playing card method. Would you have a suggestion where I could study up on the technique?
Rysjin7717
Well-Known Member
This is an amazing build bra!!!! I haven't seen th' movie but I have seen alot of stuff about it I'd like ta see it finished though excellent sculpting skills.. I've seen ya frenzy that ya built that was awesome!!!
Temperance
Well-Known Member
Very interesting work and approach for a costume. I'm very much a noob with mold making and I'm about to embark on my first. I've read up on a few tutorials but not familar with the playing card method. Would you have a suggestion where I could study up on the technique?
This is where I learned to do most of my casting from: http://www.bioweapons.com/HOW_TO_CASTING_1.htmHonestly I can't remember where I first heard of the playing card method. It's a ghetto approach if you don't like the clay barrier method, and can't aford the sheet metal method.
Captain Needa
New Member
This is a great build! I can't wait to see more progress!
Temperance
Well-Known Member
Phew! This was really stressful. Your sculpt may look totally awesome, but if you screw up the cast, you are basically back to square one, and will most likely have to re-sculpt the whole damn thing.
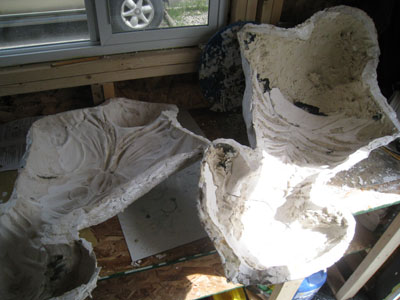
Lucky lucky... the cast opened and there was only minor cosmetic touch-ups to fix.
Gee... I guess adding 1" of plaster casting around a good 50 lb. sculpture was a bit much for my PVC stand.... The thing cracked the second I put it on the floor. Not surprising though, I could barely lift it myself T_T
I dragged/rolled out out of the shed and into the yard.

To aid in splitting the two halves (despite a GENEROUS) amount of Vaseline to the edge, I used a Dremmel to widen the spaces between the sections. I have to thank my hubby for this suggestion... there would have probably been a lot more rage and weeping otherwise.
Mold split and clay removed... I'm going to have to go in with a tool and clean it out better... this is what I could dig out with my fingers....
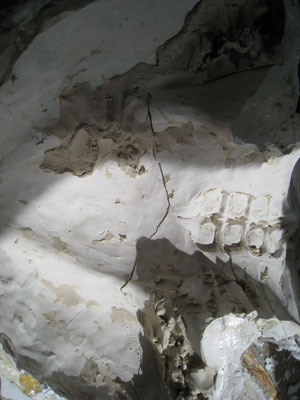
Fffffff...! A crack in the groin area.... it's okay, fortunately the crack isn't all the way through, so it's merely cosmetic. I can patch it.
Still, all and all, the torso split better than I hoped...
From here, once I clean out the molds better, I will be adding rubber latex in many small coats to the inside of both halves. Then when satisfied with the thickness, I will put the two pieces together and fill the hollow cavity with osft expanding foam to make a huggably squishable prawn. >_<
Lucky lucky... the cast opened and there was only minor cosmetic touch-ups to fix.
Gee... I guess adding 1" of plaster casting around a good 50 lb. sculpture was a bit much for my PVC stand.... The thing cracked the second I put it on the floor. Not surprising though, I could barely lift it myself T_T
I dragged/rolled out out of the shed and into the yard.
To aid in splitting the two halves (despite a GENEROUS) amount of Vaseline to the edge, I used a Dremmel to widen the spaces between the sections. I have to thank my hubby for this suggestion... there would have probably been a lot more rage and weeping otherwise.
Mold split and clay removed... I'm going to have to go in with a tool and clean it out better... this is what I could dig out with my fingers....
Fffffff...! A crack in the groin area.... it's okay, fortunately the crack isn't all the way through, so it's merely cosmetic. I can patch it.
Still, all and all, the torso split better than I hoped...
From here, once I clean out the molds better, I will be adding rubber latex in many small coats to the inside of both halves. Then when satisfied with the thickness, I will put the two pieces together and fill the hollow cavity with osft expanding foam to make a huggably squishable prawn. >_<
Rysjin7717
Well-Known Member
Nice work!!! More updates!!!!
Temperance
Well-Known Member
Phew! *dusts off my journal* It's been awhile since I updated my bunraku progress....
Why? Layers and layers of latex of course!

I normally like to do slush casts, but due to it's size, I thought it best to add several layers of latex, to both halves, then sandwich them together. After MANY layers of latex, the pieces are finally ready to put together. I added a generous amount of latex all around the edges of the two halves, then smushed them together. Then, I went over the cracks with more latex to make sure the two layers are sealed.

It will take a couple of days for the latex along the seams to cure. Then I will fill the hollow interior with soft expanding foam.
Why? Layers and layers of latex of course!
I normally like to do slush casts, but due to it's size, I thought it best to add several layers of latex, to both halves, then sandwich them together. After MANY layers of latex, the pieces are finally ready to put together. I added a generous amount of latex all around the edges of the two halves, then smushed them together. Then, I went over the cracks with more latex to make sure the two layers are sealed.
It will take a couple of days for the latex along the seams to cure. Then I will fill the hollow interior with soft expanding foam.
pandatrooper
Well-Known Member
Wow, awesome! Can't wait to see it!
Kavan
New Member
Thanks Fevereon. I love your leatherwork >_<
Actually I've been working on this guy for awhile... unfortunately I only get to work on him between projects, so he's been in my house for months in various stages of completeness).
Yay Molding process has begun. It's nice to get this alien torso out of my house T_T
Now to the shed he goes! I am using the super handy playing card method to bisect the torso in half
I'm doing the back first (if I make a mistake, it won't be as easily seen since most of the back will be hidden against my body). One coat of thin plaster... followed by thicker ones... this is stage two... more casting to come. :I
HA! I never thought of using playing cards. This is looking great!
Zaxmon
Well-Known Member
HA! I never thought of using playing cards. This is looking great!
Cut up soda cans work well too.
Gallifreyan
New Member
Soooo cool. Can't wait to see it all finished!
Temperance
Well-Known Member
Sorry for the lack of updates, aside from work (which limits the amount of time I have to devote to this guy)... a lot of the process of cleaning the seams after removing the torso from the cast is slow; a little bit of work on the seams... fill some gaps with latex... wait for a day or two for latex to cure... do a little bit more work.
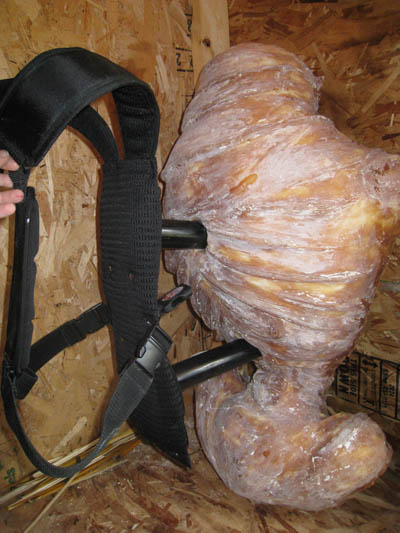
So! I now have a torso. The inside is filled with expanding foam (there are sections I hollowed out, as I noticed even with light foam, he is still pretty heavy). PVC tubing was inserted in key points in his back, his which were then attached to a harness.
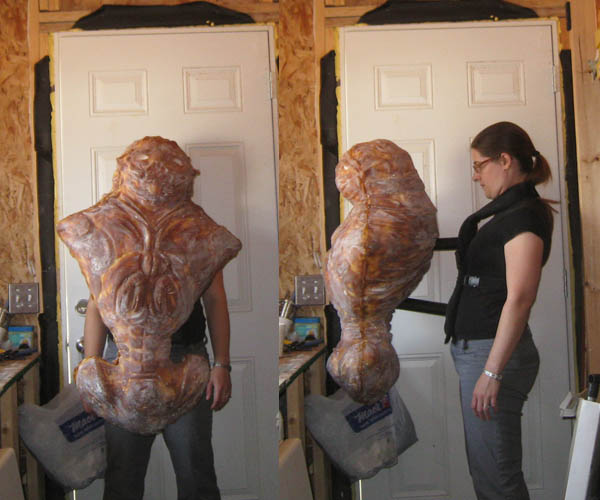
The harness itself has an acrylic sheet for a base, then wrapped in the backing of a backpack I dismantled. I chose the backpack material since it has nice airflow and a little bit of padding... it should keep me from getting too sweaty, but stay comfortable. Right now the shoulder part of the harness is a little high, so I have a lot of weight pressing on my upper shoulders/neck area. I may move these shoulder straps lower so they rest on my shoulderblades. I'll give him a few more test runs to find the best location to distribute his weight.

So! I now have a torso. The inside is filled with expanding foam (there are sections I hollowed out, as I noticed even with light foam, he is still pretty heavy). PVC tubing was inserted in key points in his back, his which were then attached to a harness.
The harness itself has an acrylic sheet for a base, then wrapped in the backing of a backpack I dismantled. I chose the backpack material since it has nice airflow and a little bit of padding... it should keep me from getting too sweaty, but stay comfortable. Right now the shoulder part of the harness is a little high, so I have a lot of weight pressing on my upper shoulders/neck area. I may move these shoulder straps lower so they rest on my shoulderblades. I'll give him a few more test runs to find the best location to distribute his weight.
That is just crazy! CRAZY AWESOME!!! You'll have to shoot some video when you get him walking around.
Similar threads
- Replies
- 4
- Views
- 188
- Replies
- 68
- Views
- 5,585