District 9 AR "Re" Build, v2

scornflake

Active Member
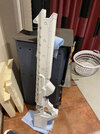
A year ago I build a D9 AR from a model I found (this one: 3D Printable District 9 Alien Assault Rifle by Tim Jardim).
That came out well; and I had a bunch of fun doing it ... well; apart from the sanding. so. much. sanding.

So much fun, I decided to do another one.
Now; I *could* just go a by a more accurate kit. Yes. I could do that. Or, I could better my OnShape skills and build it from scratch. Yes, this later approach seems *far* more sensible (cut to now: 40 hours later).

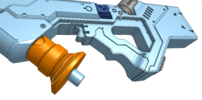
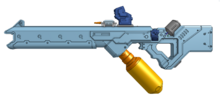
I've remodelled the gun in OnShape.

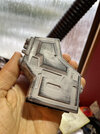
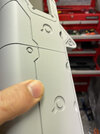
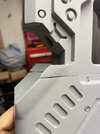
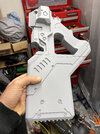
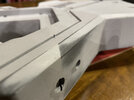
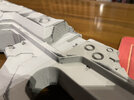
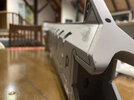
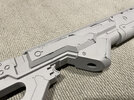
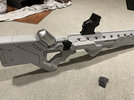
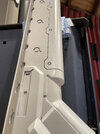
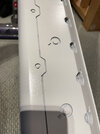
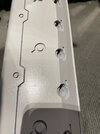
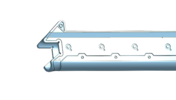
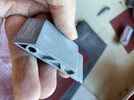
It's mosty accurate to the original now, apart from the lower screws on the barrel, the greebly bits are different, and the 24 cylinders on top don't have a 0.5mm inset around their mounting points.

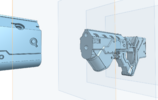
I added some more screws beneath the stock line, as I saw another model that I liked that had them. I thought it added a bit more interest to the model.

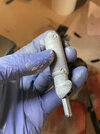
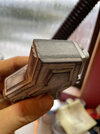
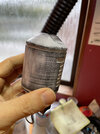
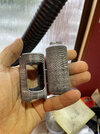
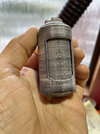
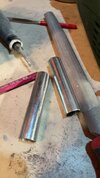
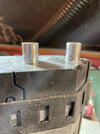
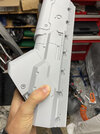
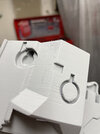
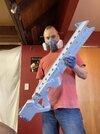
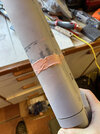
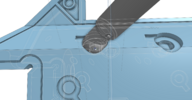
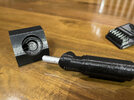
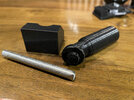
The cylinders have 70mm steel rod inserts. Should be able to fall over and be no worse off (instead of snapping off).
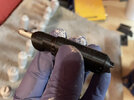
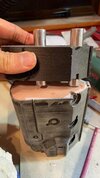
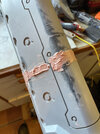
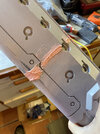
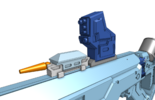
Each piece of the cut-up gun uses 2x 16mm steel dowels when glued together.

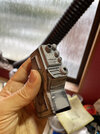
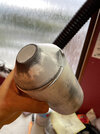
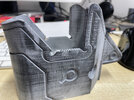
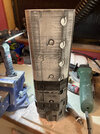
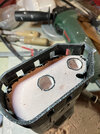
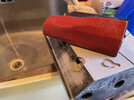
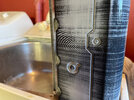
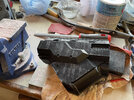
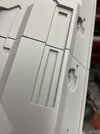
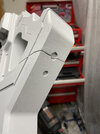
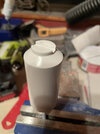
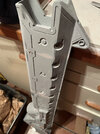
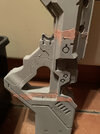
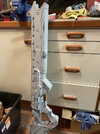
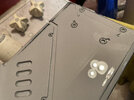
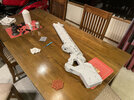
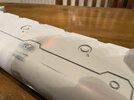
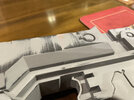
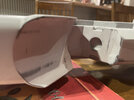
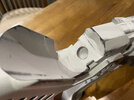
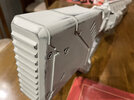
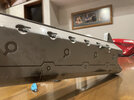
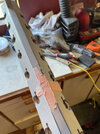
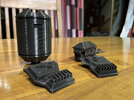
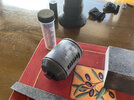
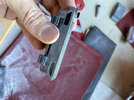
Pics below; currently printing it.
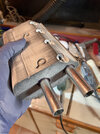
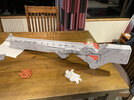
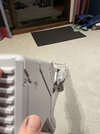
I've done some small parts and will post some pics of the build as I go.
Having built one already; this time I separated a few more of the parts to make sanding/painting a bit easier.
 

Attachments

  • Canister and grip.png
    Canister and grip.png
    898.8 KB · Views: 137
  • Cut for printing and dowels.png
    Cut for printing and dowels.png
    518.7 KB · Views: 132
  • Full Side.png
    Full Side.png
    510.9 KB · Views: 127
  • Side.png
    Side.png
    160.7 KB · Views: 128
  • Top cylinders.png
    Top cylinders.png
    757.1 KB · Views: 123
  • Top scope-y bits.png
    Top scope-y bits.png
    652.5 KB · Views: 116
  • Underneath the grip.png
    Underneath the grip.png
    463 KB · Views: 112
Messing around with different putty/filler primer types; to find something I like working with. On my first build I didn't use a filler primer... just rustolean paint (which was thick; but nothing like as thick as an actual filler primer).

The putty (kneadable), seen on the first cylinder, was too hard to work into the piece.
The bodyfiller (ados plastic putty, pink, on the 2nd pic - larger cylinder) was good for larger pieces; but still harder to work with than I'd like.
The filler primer looks good. I'm brushing it on for now. I still requires a number of coats/sands, but I think I can get to a smooth finish at this point which will drastically reduce the painting coats I'm going to need to do.
 

Attachments

  • IMG_7280.jpeg
    IMG_7280.jpeg
    3 MB · Views: 107
  • IMG_7281.jpeg
    IMG_7281.jpeg
    3.3 MB · Views: 125
  • IMG_7283.jpeg
    IMG_7283.jpeg
    3.1 MB · Views: 116
  • IMG_7284.jpeg
    IMG_7284.jpeg
    3.9 MB · Views: 110
  • IMG_7287.jpeg
    IMG_7287.jpeg
    2.3 MB · Views: 128
  • IMG_7290.jpeg
    IMG_7290.jpeg
    1.8 MB · Views: 119
  • IMG_7293.jpeg
    IMG_7293.jpeg
    1.6 MB · Views: 122
I tried using filler primer directly on the 3d print (the cylinders). Silly me didn't actually TEST that this would be a great idea. It ... works, but not that well. Looks like its better to file the item first; the prime it; then sand/prime until smoother.

Good thing I've another 12 cylinders to do :)
 

Attachments

  • IMG_7298.jpeg
    IMG_7298.jpeg
    3.3 MB · Views: 103
  • IMG_7299.jpeg
    IMG_7299.jpeg
    2.4 MB · Views: 115
  • IMG_7308.jpeg
    IMG_7308.jpeg
    1.9 MB · Views: 109
Another method I've recently used in prepping 3D prints is brushing a coat of 3D printing resin on to the prints. I've had mixed success with this method. Its a lot easier compared to XTC 3D. You can find a number of tutorials on this method on YouTube.
 
Another method I've recently used in prepping 3D prints is brushing a coat of 3D printing resin on to the prints. I've had mixed success with this method. Its a lot easier compared to XTC 3D. You can find a number of tutorials on this method on YouTube.
intersting idea, thanks. how would you compare it to sanding filler primer? is it considerably harder?
 
I should mention: These are 0.3mm prints (0.4noz). I decided to ignore the longer print times; in the hope that my diagnoals will have a little more resolution.

Did some more prep today. I'll mist these when it's a bit warmer in the garage; just to see where they need more work.
Process so far is to roughly file the surfaces (which is pretty quick), wet sand with 80, then wet 150. I'm putting the filler primer on in 2 coats; 2nd coat pretty thick and "messy", looking for where there are dips/lines in the print specifically.
 

Attachments

  • 64965392258__F6137D8F-062E-451E-99A5-8434A23CD5DA.jpeg
    64965392258__F6137D8F-062E-451E-99A5-8434A23CD5DA.jpeg
    1.2 MB · Views: 91
  • IMG_7314.jpeg
    IMG_7314.jpeg
    1.9 MB · Views: 88
  • IMG_7315.jpeg
    IMG_7315.jpeg
    1.6 MB · Views: 87
  • IMG_7316.jpeg
    IMG_7316.jpeg
    1.4 MB · Views: 92
  • IMG_7317.jpeg
    IMG_7317.jpeg
    1.9 MB · Views: 90
  • IMG_7318.jpeg
    IMG_7318.jpeg
    1.6 MB · Views: 108
  • IMG_7319.jpeg
    IMG_7319.jpeg
    1.7 MB · Views: 97
  • IMG_7320.jpeg
    IMG_7320.jpeg
    1.9 MB · Views: 90
  • IMG_7321.jpeg
    IMG_7321.jpeg
    1.7 MB · Views: 105
Oh; forgot this one. First part of the gun. Same process as described above. You can see its not baaaaaad - but there's still some lines to be cleaned up. Still, it would have taken much longer to get to this point on sanding alone I think.
 

Attachments

  • IMG_7325 2.jpeg
    IMG_7325 2.jpeg
    3.7 MB · Views: 74
  • IMG_7326 2.jpeg
    IMG_7326 2.jpeg
    2.4 MB · Views: 86
Bit of a prob with a print. Had a jam @ 80%. Having a go to see if I can fix it; since I've got various fillers around. I've made up a new piece to "finish off" the old one; and the rods just have to be extended another 40-50mm into the new piece. To line it up I printed a "cage" around where the join is. Placing one piece on the other (with the cage) I then marked / sprayed where the holes should go, and did some manual CNC :)

I lucked out on the 16mm rod clearance. I used 0.1mm, and even at 0.3 layewr height, it's OK. I have to file the plastic a tiny amount, but then the rods insert very nicely, and work very well as alignment/guides. Very happy with that part!

Looks like it'll work out.
 

Attachments

  • 2D973822-67F2-4FE0-A8FB-C813BBA79EF9_1_105_c.jpeg
    2D973822-67F2-4FE0-A8FB-C813BBA79EF9_1_105_c.jpeg
    190.7 KB · Views: 106
  • IMG_7334.JPG
    IMG_7334.JPG
    271.6 KB · Views: 98
  • IMG_7336.jpeg
    IMG_7336.jpeg
    2.2 MB · Views: 93
  • IMG_7337.jpeg
    IMG_7337.jpeg
    2.1 MB · Views: 93
  • IMG_7339.jpeg
    IMG_7339.jpeg
    2.3 MB · Views: 88
  • IMG_7340.jpeg
    IMG_7340.jpeg
    2.1 MB · Views: 104
  • IMG_7341.jpeg
    IMG_7341.jpeg
    2.4 MB · Views: 104
Also; did some more filing/sanding as parts come of printer. I'm going to try spraying the primer next (I'll prob have to thin it a little; since I've only a 1.5mm nozzle on the gun I have). Then I'll re-prime all the larger parts of the gun in one hit (at least twice, I think)
 

Attachments

  • IMG_7327.jpeg
    IMG_7327.jpeg
    3.1 MB · Views: 86
  • IMG_7328.jpeg
    IMG_7328.jpeg
    3.4 MB · Views: 82
  • IMG_7329.jpeg
    IMG_7329.jpeg
    4.6 MB · Views: 93
  • IMG_7330.jpeg
    IMG_7330.jpeg
    4.7 MB · Views: 86
The spraying went pretty good.
First pic is me! Gun isn't glued; it's just held together with hope and 16mm galv steel rods.

The top/front pieces have had more work done on them than the lower parts. I'm @ about 300 grit on top right now (probably 6+ layers of prime/sand), and still at 150 on the lower parts. You can see the stock has more coats to be done (but to be fair; its only had 2).

This last spray I put on about 3 coats with 2-3m between each (I did 2 joined sections of the gun at a time). That's what you see in the pics. Pre sanded primer.

I think I'm at the point now where I want to epoxy the entire thing together, so that I can begin work on the joins.
The "wings" surronuding the upper canister lifted off the print bed. You can see a gap that you can fit a bus through on those two pieces :) Easy enough to fix tho! Yay for filler; files; and sandpaper.
 

Attachments

  • IMG_7449.JPG
    IMG_7449.JPG
    1,022.4 KB · Views: 139
  • IMG_7458.jpeg
    IMG_7458.jpeg
    1.4 MB · Views: 137
  • IMG_7459.jpeg
    IMG_7459.jpeg
    1.7 MB · Views: 113
  • IMG_7460.jpeg
    IMG_7460.jpeg
    1.7 MB · Views: 99
  • IMG_7462.jpeg
    IMG_7462.jpeg
    1.7 MB · Views: 104
  • IMG_7464.jpeg
    IMG_7464.jpeg
    1.7 MB · Views: 111
  • IMG_7466.jpeg
    IMG_7466.jpeg
    1.7 MB · Views: 86
  • IMG_7468.jpeg
    IMG_7468.jpeg
    2 MB · Views: 99
  • IMG_7469.jpeg
    IMG_7469.jpeg
    1.9 MB · Views: 99
  • IMG_7470.jpeg
    IMG_7470.jpeg
    1.6 MB · Views: 148
You mean the XTC3D method? or filler primer method?
Sorry- I do the slather on resin and cure 54 times method. It really does well to smooth the filament print lines.

Last part I did it on was the Rogue One Marine cap radio.

I was going to post a photo but I guess I deleted it.
 
Sorry- I do the slather on resin and cure 54 times method. It really does well to smooth the filament print lines.

Last part I did it on was the Rogue One Marine cap radio.

I was going to post a photo but I guess I deleted it.
if you can find a link; keen to see (I don't search/hang out much so I've not seen it so far myself)
 
Initial glue; filler & first filler-sand (tm) is done. Still some small areas that need detailing, before I 150 sand the whole thing and re-prime.

Also in shot is the topmost/front cylinder (inner). Showing that I've got it to "hey! you can't see lines anymore!" stage (yeh; there's dust/stuff on that piece because I'm sanding RIGHT NEXT TO IT. cos thats ..... sensible)

I wonder how many faces there are on this thing? Man, around the trigger/hand area... that's SLOW to sand. So. Many. Small. Faces.
But hey; still great! Loving it. Very happy to be sanding & listenening to Jazz while I "sand" away the hours :)
 

Attachments

  • EA48E105-098D-4CD8-9FE9-2E61E0045D23_1_105_c.jpeg
    EA48E105-098D-4CD8-9FE9-2E61E0045D23_1_105_c.jpeg
    189.4 KB · Views: 76
  • EB4CD116-95B9-4B71-9DFB-9707CE87D3B6_1_105_c.jpeg
    EB4CD116-95B9-4B71-9DFB-9707CE87D3B6_1_105_c.jpeg
    319.4 KB · Views: 84
  • F3D8EFFF-DBBA-4748-AA77-EEB18A37B963_1_105_c.jpeg
    F3D8EFFF-DBBA-4748-AA77-EEB18A37B963_1_105_c.jpeg
    215 KB · Views: 95
  • DB7213C5-2A25-46FC-878C-BEF89BA5C837_1_105_c.jpeg
    DB7213C5-2A25-46FC-878C-BEF89BA5C837_1_105_c.jpeg
    205.1 KB · Views: 79
  • 5660D75B-C16B-420F-B98C-F2C5942BCA66_1_105_c.jpeg
    5660D75B-C16B-420F-B98C-F2C5942BCA66_1_105_c.jpeg
    277.3 KB · Views: 99
woot. The first 240 grit sand, of the full gun (after another prime) is done! The gun is now "a thing", complete. Together.
The 240 is my second full pass over the fully glued model. First was pretty rough. This is much finer and detailed.

There's some small bits of filler around the grip area that are not quite ... right. I'm going to leave them there and use them as "detail" during the weathering phase. Should add some "bump" to the paint/dirt in the grip area.

From here I'll probably put another primer coat on, as in looking at the photos in detail I still see some lines. They are pretty minor; but one of the goals on this build was to be... how do I say... obsessive? I'd like for the base model/object to be clean, before I start my colour (yes, I spelt it right) coats.
 

Attachments

  • IMG_7492.JPG
    IMG_7492.JPG
    856.3 KB · Views: 94
  • IMG_7502.jpeg
    IMG_7502.jpeg
    3.3 MB · Views: 110
  • IMG_7504.jpeg
    IMG_7504.jpeg
    3.7 MB · Views: 77
  • IMG_7505.jpeg
    IMG_7505.jpeg
    3.4 MB · Views: 82
  • IMG_7506.jpeg
    IMG_7506.jpeg
    3.4 MB · Views: 85
  • IMG_7507.jpeg
    IMG_7507.jpeg
    3.3 MB · Views: 85
  • IMG_7508.jpeg
    IMG_7508.jpeg
    3.2 MB · Views: 81
  • IMG_7509.jpeg
    IMG_7509.jpeg
    3.5 MB · Views: 81
  • IMG_7510.jpeg
    IMG_7510.jpeg
    2.9 MB · Views: 71
  • IMG_7511.jpeg
    IMG_7511.jpeg
    3.4 MB · Views: 92
  • IMG_7512.jpeg
    IMG_7512.jpeg
    3.3 MB · Views: 72
  • IMG_7513.jpeg
    IMG_7513.jpeg
    3.2 MB · Views: 78
  • IMG_7514.jpeg
    IMG_7514.jpeg
    3.2 MB · Views: 82
  • IMG_7517.jpeg
    IMG_7517.jpeg
    3.5 MB · Views: 104
OK. Since last update: sanded and painted *another* 12 very. small. oww. my. hands. hurt. now. cylinders.
65066785146__28B82F14-2ADC-4DEC-AD53-5CB25EEF79A6.jpeg

Photo is of after 120 grit dry sand.

The sanding of those cylinders is sloooooow. yet the work pays off. I think the extra time I've spent trying to remove the layer lines here will mean I only have to prime once and paint 3-4 times. Sanded to 150 wet the did both prime/no prime. No prime is worse. While it's doable (after all I did the entire 1st gun without primer) it means I'l have to put about 12 coats or more to cover the lines. Primer seems like more steps; but the result is much cleaner. Still needs sanding; repaint; etc etc, but its nicer.

Sanded & re-primed the gun; and resanded @ 600.
Waited a day. Ish. Looked over it again and tidied up some small parts; I think it's now ready for top colour.
IMG_7519.jpegIMG_7521.jpegIMG_7522.jpeg
What's maybe hard to see and appreciate in pics is how "single" its looking now (apart from the 'attention' areas). It's smooth; very few defects. I didn't need to go to this level, but I figure "I'll know", so I'm spending as much time here as I want; to get it very good. It's still not PERFECT, but at this point I'm breaking out fine files and filing 3mm areas. It's down to that kind of thing.

I'm "pondering" primer again; but i'm not sure I need to. Last time I used a million cans of the same white paint I'm about to use for topcoat; as primer. That worked fine. So, I figure putting this as topcoat + a liiiiiiitlebit of fill is going to be just fine.

Also did some more on the front cylinders.
IMG_7525.jpegIMG_7526.jpeg

The table of "somewhat finished parts" is getting larger!

Oh; and EWWWWW. After only a few days (I replaced my filters a few days back)... note diff in colour between rim and inner part.
IMG_7527.jpeg
 

Attachments

  • IMG_7520.jpeg
    IMG_7520.jpeg
    4 MB · Views: 86
  • IMG_7523.jpeg
    IMG_7523.jpeg
    2 MB · Views: 90
  • IMG_7524.jpeg
    IMG_7524.jpeg
    4.3 MB · Views: 76
So there's a problem. Paint is bubbling/splitting at a join. I'm thinking there was prob some moisture there as I was wet sanding. While I had let it dry in a warm room... who knows. Anyway, decided it was "Dentist Time".

Dremelled out a V around the split, and refilled with ADOS plastic putty. Then resanded; re primed; and re sanded.
I put LOTS of filler on, then later turned into "filler clouds" and small piles of dust :)

IMG_7547.jpeg

Thinking it looked OK, decided I might as well put a test white coat on top, just to see (and cos, I'm getting carried away. TOP coat? So soon? How COULD I?). There's still a slight line; as you can see in the photo. That's OK, as long as it stays that way. I can fill it. If it cracks however; that's "less ok".

IMG_7552.jpeg
 

Attachments

  • IMG_7543.jpeg
    IMG_7543.jpeg
    1.7 MB · Views: 65
  • IMG_7544.jpeg
    IMG_7544.jpeg
    1.5 MB · Views: 79
  • IMG_7545.jpeg
    IMG_7545.jpeg
    2 MB · Views: 84
  • IMG_7546.jpeg
    IMG_7546.jpeg
    1.6 MB · Views: 91
  • IMG_7549.jpeg
    IMG_7549.jpeg
    2 MB · Views: 84
  • IMG_7550.jpeg
    IMG_7550.jpeg
    1.8 MB · Views: 83
  • IMG_7551.jpeg
    IMG_7551.jpeg
    1.8 MB · Views: 74
  • IMG_7553.jpeg
    IMG_7553.jpeg
    2.2 MB · Views: 99
It cracked.
The gun is joined with epoxy; and I think this is inteferring with the paint layers.

So I went full dentist; and v'ed out ALL of the joins (after sanding back).

then...

a) applied a rub through epoxy primer. and let it cure. reasonably complete sand.
b) reapplied filler. twice cos I didn't get it all the first time. sanding.
c) another layer of expoxy rub through, left to cure. very very light sand.
d) re primed entire gun with filler primer (after 320 grit sand)

After letting (d) go off; I put another "first" layer of white on.
Unfortauntely I seem to have some bum cans. Sometimes they spray speckled which is VERY annoying.
Anyway; that seems to have worked OK. No cracks. The pics with it painted at 3 days after painting.

Just taken it back @ 320 again; to smooth; for the next and hopefully subsequent few coats of first colour.
Looking good! (crosses fingers that no cracks show).
 

Your message may be considered spam for the following reasons:

If you wish to reply despite these issues, check the box below before replying.
Be aware that malicious compliance may result in more severe penalties.
Back
Top