Dishonored 2 Elite Guard Uniform

TheSpaceMongol

New Member
Hello!

I thought I'd make a thread for this build as I think there will be some interest among the fans of Dishonored franchise for this one. I've started patterning for the full costume of the red- uniformed Elite Guards/ Watch Officers in the game. I found the cut and details of the uniform to be really visually pleasing and thought about how I could make this piece a reality- I weighed my options on what techniques and tools to use and decided I should go with "real" materials as much as possible, since those are what I'm most familiar with. I lack 3D printing capacity and skills, but I can weld and work metal professionally and have a sewing machine. So, dark brown leather boots, high- waist, pleated beige military pants, red jacket with a white high collar undershirt plus metal helmet are what I need.

ImpSuitRef1.jpg

ImpSuitRef2.png

First off I checked the references and whether I could find any items that might work for the costume as is or with minimal modding- always better if you can get a decent base to work from instead of doing everything from scratch. Turns out, I did find a couple of items:

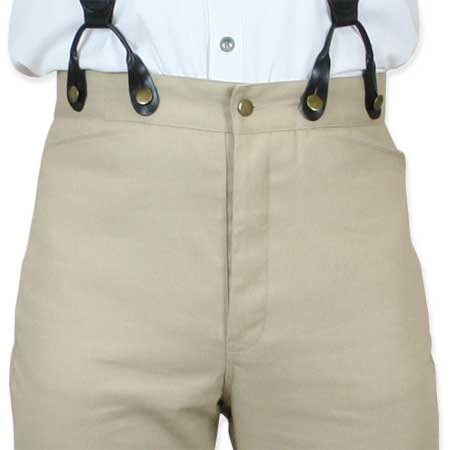
For the pants, I found these reproduction german military WWII workpants. Just your general issue high- waist pants in a correct enough color that'll work for the costume with some modifications. The buttons for the front pouches should be replaced with lighter color ones or removed (the elite guard pants don't seem to have front pockets, but this seems a minor enough issue to overlook. They also need flaps for the rear pockets, I just need to source some similar enough fabric for them. These pants only have one rear pocket so the other flap will just be cosmetic. Some ironing and starch, small mods and there you go, guard pants.


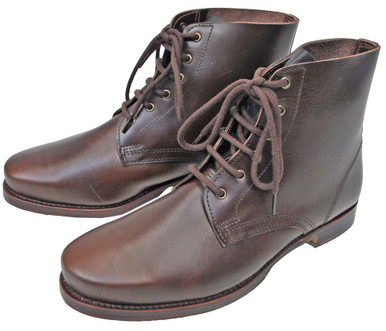
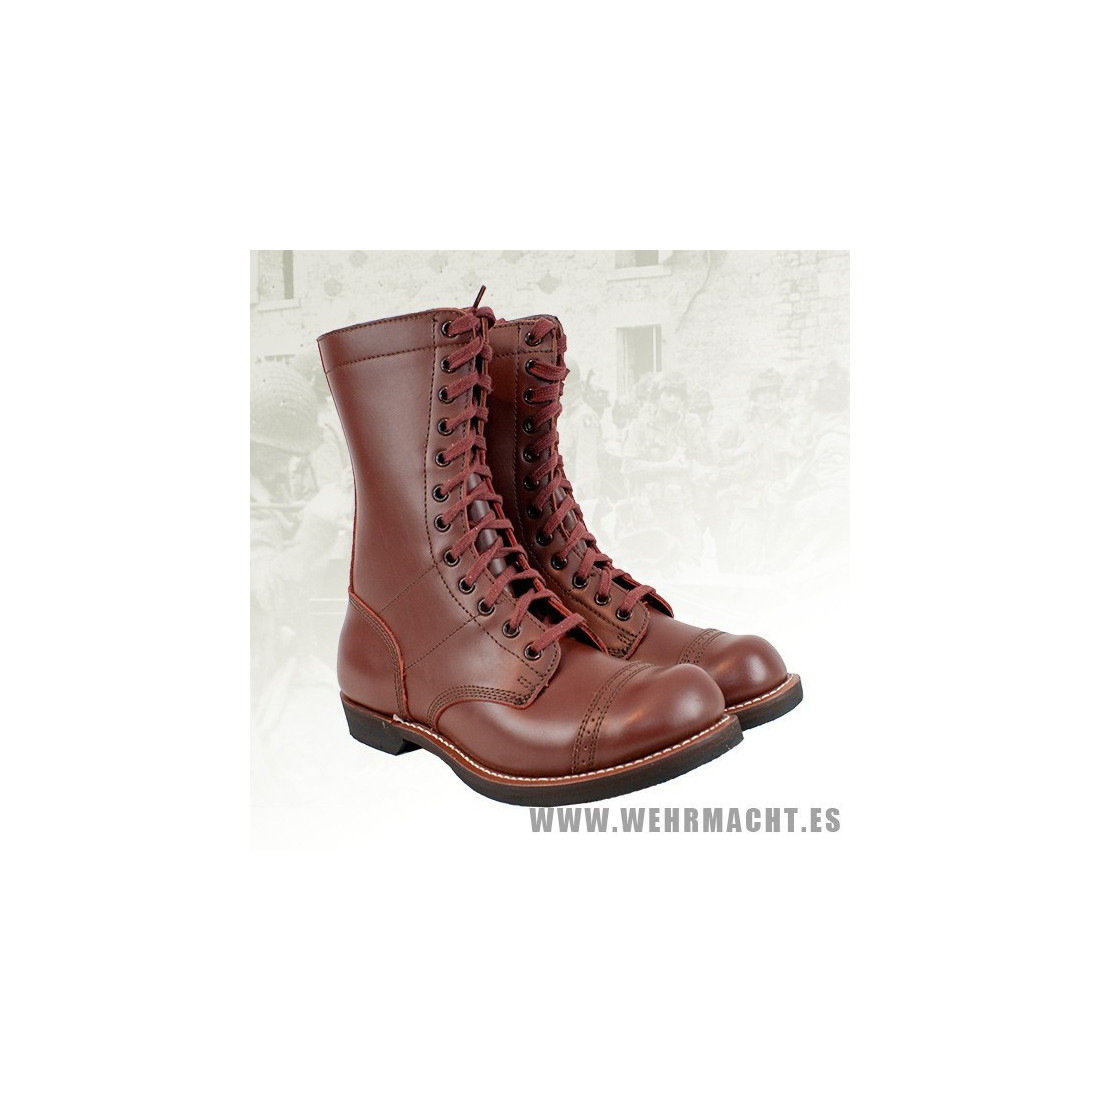
As for the boots, I found them to look quite similar to the WWII US paratrooper jump boots, with some minor differences in the cut and shaping of the toe section (the in- game boots are more angular and flat). Now, shoemaking is beyond me so this is probably the most affordable and looks wise closest choice of footwear for the guard outfit. Some weathering perhaps and actual everyday use and shoepolish should do the trick and make these a good fit for the uniform. The white spats that come with them seem simple enough to make by myself, couldn't find any in a similar angular cut.


I also have an old surplus Bundeswehr parade/ honor guard belt with all the fittings and an over the shoulder strap included. It looks usable for this build, I'll just need to see if it can be modded enough to work for the costume. It primarily needs a new buckle, but the one on the guard uniform looks easy enough to fabricate so it should be no problem. I might still need to do the whole belt system from scratch, but we'll see. There's also some old leather pouches that are a similar size amd shape to the one seen in game, but I'll need to paint them white and maybe replace a strap or two. The high collar undershirt might be possible to mod out of an existing shirt.

Other than that, I don't think I'll be able to acquire any major ready made or surplus parts. The jacket has a very unusual cut and the fabric needs to have the right look and weight to it (probably heavy twill or tweed in red). That leaves the helmet as the last piece and the one I'll start out with. I took some references from the game, made line drawings, printed them out and took measurements for the patterns. The patterns are ready at this point and I just need to cut some steel pieces and start banging them into shape. The construction will be relatively simple, it's basically like a medieval skullcap or chapel-de-fer with a funky brim. I decided to go with a dome welded from four separate pieces to make the process easier- this is for a costume so no need to think about strength requirements as with armor pieces. Relatively thin materials for the most part, only a few pieces need to be thick to achieve a good look. The helmet liner can also be seen in-game and it is exactly the same type as the WWII german helmet liners so no need to make that by myself, fortunately.

ImperialHatRef1.jpg

ImperialHatRef.jpg

Patterns!.jpg

So that's it for starters, let's see how this proceeds from here!
 
I got the helmet constuction started for the uniform. The pattern had some amount of excess to it, just in case I made a mistake somewhere when measuring the lengths. I began construction with the lower half of the helmet and the brim and managed to get the general shape of the brim quite close to the in- game one. I used a cheap method in shaping the brim, I just removed some material where the brim needs to slope down more as I lack access to a forge large enough to fit something this size. Next I'll probably fine tune the shaping on the lower part, tucking the back of the helmet in slightly and shaping the top bowl for the helmet. Some of the height might also need to be trimmed from the lower part, but we'll see how it looks once the top is on. Once that's done and tacked on, I'll TIG-weld the basic constuction together both inside and out. There's also the cheek pieces on the table there in the first pic:

ImpHelmet01.jpg
ImpHelmet02.jpg
ImpHelmet03.jpg
ImpHelmet04.jpg


Looks pretty rough now, I know! Mild steel is a great material though as you can nearly endlessly mold and shape it with minimal chance of completely ruining the piece as it is very forgiving. Once properly assembled and polished this thing will look fit for an elite guardsman.

I also looked more into the boots I'd like to use for this and I was bothered somewhat with the separate toe cap on the US Para boots, that seam is something not seen on the boots of the guardsmen in dishonored. Also, the profile of the shoe could be more flat and the toes more angular but those are details I'm willing to overlook as long as the boots generally "look right", i.e. are the right color, old style military boots with no separate toe cap. I did find some surplus south african boots that would work nicely, but I can't source any from the usual places (ebay and other auction sites, milsurp stores etc.) instead I only found them on some south african surplus store's website but can't order any from there.

These would fit really nicely with the costume:

https://www.armystores.co.za/wp-content/uploads/2014/03/used-army-boot.jpg

Unless there's someone from Pretoria here willing to go buy me a couple of pairs of these, I might just have to wait and see if any similar ones appear on the market somewhere I can buy them.
 
Continuing with the helmet construction.

I started fitting the top of the bowl on the lower part of the helmet and pretty soon decided it'd be much easier to make in two halves instead of one piece, so I cut the top in the middle. Here I'm just roughly fitting on the back portion to see where to shape it next:

ImpHelmet05 (1).jpg


After both halves were roughly shaped to fit in place, I checked the height of the helmet and noticed it needed a bit of trimming. I removed 5mm ( 2/5") after checking and calculating from the reference image (this image taken before the trimming):

ImpHelmet06.jpg


Here the back half has already been tacked on, and the shape of the helmet looks pretty close to the in- game model:

ImpHelmet07.jpg


Fitting the front half on was a more complex process than the back, I had to go back and forth, tacking a well- fitting portion on and hammering forward along the edge to get it in line with the other pieces. A lot of material was removed at this point as you can see from the edge that's been marked with the pen here:

impHelmet08.jpg


The top is now fixed on and the edges between the top and bottom sections have been hammered to a smooth, close fit and any larger gaps were welded shut.

ImpHelmet09.jpg


Next I'll proceed with welding all the seams completely on both sides, grinding them flat and planishing the top of the bowl to take out the bumps. There's also some fabrication questions I need to look into, for example I need to determine the best way to fix the top crest on the helmet as in- game there's no indication how exactly it's attached. I'll try to use a method which will provide the closest approximation in terms of looks but still be sturdy. Attaching the liner on the inside will also need some thinking, I'll probably use a similar method to the WWII german helmet and conceal the three attaching rivets with the white leather band running along the brim.
 
A bit of progress on the helmet. I've welded all the seams from the outside, but there's still a lot of work to be done until I can get to making all the extra bits that go on this helmet base.

ImpHelmet10.jpg


Here's the helmet with the front part already planished to an acceptable level. Although I could make it smoother with just hammering, there's a balance to be struck with planishing or just grinding away material to make it smooth.

ImpHelmet11.jpg


At this point I had already grinded away most of the larger seams and the planished top surface. I also noticed the brim to be a bit unsymmetrical, with the front left being wider, probably a made mistake on the plasma cutting. In any case, I'll need to confirm whether to cut away excess on the left side or add more to the right to match the in- game model. Both are pretty straightforward processes so shouldn't cause any big problems for the project.

ImpHelmet12.jpg


The helmet in it's current form. I got to this point in grinding away the seam on the top of the helmet bowl and just thought it'd be easier to fill in the rest of the seam and smooth out the result, so that's in store for the next time.

ImpHelmet13.jpg


This pic shows the dents and seams to be filled in well. Just a lot of small fixes all over essentially.

ImpHelmet14.jpg
 
With steel, did some small fill welds so I didn't need to grind away too much material. Here's the result:

ImpHelmet15.jpg


I also widened the brim all around after having looked at the in-game model more extensively and figured that the brim must be wider in places. I still need to change the shape of the brim by cutting excess away in places and making it completely symmetrical but for now I'll leave it as it is until I have added all the extra bits: the crest, the Karnacan coat of arms and the cheek pieces.

ImpHelmet16.jpg
 
I made some progress today with the smaller parts. First, I made the top plate and crest:

ImpHelmet17.jpg


The profile is starting to get there when you view the helmet with the cheek piece:

ImpHelmet18.jpg


Next, I'll concentrate on making the Karnacan coat of arms and the adjecent parts that will go on the front of the helmet. I'll need to look at the references carefully and make a stencil for carving the lines using a dremel rotary tool. This will probably be the most painstaking part of the helmet with lots of fiddly work and lots of steps until it's complete. The coat of arms will also need a thick, raised edge.

ImpHelmet19.jpg
 
I haven't updated this project in a while, so here goes. I got to attaching the extra plate and crest on top of the helmet and ground the weld flush. The result was pretty close to the in game model, though not exact.

ImpHelmet20.jpg


There's a bit of a gap between the top plate and the helmet visible here. It's not much, but I think I'll have to fix that at some point. Also, I got around to making some of the parts that go on the front, here I am testing how they'll look once attached.

ImpHelmet21.jpg


Next on the list was starting the carving of the coat of arms on the front. This is how it looks in-game, that's a lot of very fiddly work to be done:

ImperialHatRef2.jpg


The method is simple enough, draw the necessary pattern onto the blank and veeery slowly grind each line with a tiny diamond tip. I would've used a stencil if I had a stencil cutter but haven't got one unfortunately. This piece looks to have quite deep grooves in-game and I suspect this type of part would be made as a casting in real life, but since this is just a one off so doing it this way will probably save time.

ImpHelmet22.jpg


And here's where I left it for now. the lines are still pretty rough not to mention a few mistakes here and there on the pattern but could've been much worse. I'll still need to grind each line deeper and cleaner to make it work as I am planning to use heat discoloration to make the lines dark. I'll heat the piece with a propane torch until it reaches a nice dark color, let it cool and then re-polish it, leaving the pattern darker than the rest. It give a pretty similar effect to the one in-game.

ImpHelmet23.jpg
 
The main build for the helmet is nearing completion. All the parts, or at least blanks for the final parts have been made, just a bit of carving and polishing to be done. Rest of the metal parts can be seen in this photo:

ImpHelmet24 (2).jpg


The brim was cut down to size at this point, carefully measured to be symmetrical this time. I also attached all of the small front end decorative plates on the helmet and grinded the weld seams flush. Now the helmet is really starting to have the right profile when viewed from all angles.

ImpHelmet24 (1).jpg


I'll still need to fit an inside liner into the helmet, get the white leather band running along the brim and bring all surfaces to a nice satin finish.

ImpHelmet24 (4).jpg
 
I hadn't updated this in a while it seems. Time for an update then!

I'm now at a point where all the main parts have been fixed to the helmet and all the decorative parts have also been done. The result looks satisfactory in my opinion:

ImpHelmet28.jpg


I trimmed the brim in places more after consulting a lot of reference images of the in-game model, now I have the silhouette probably as accurate as I can make it.

ImpHelmet29.jpg


There's still the fitting of an inside liner for the helmet, which I'll have to order. Other than that, I also needed to change the color of the helmet, as the in-game model has a greyish tint to it. So I set about to heat the piece with a propane torch to bring it up to 300 C or so to bring out a greyish finish across the whole surface. At a point the helmet looked like one of the golden helmets of the veteran guardsmen in Dishonored:

ImpHelmet30.jpg


In the end though, the available propane torch wasn't able to heat the piece up to 300 C, only to around 260 C or so which left it with a coppery finish. Pretty cool but not what I'm after. You can actually see the greyish color I'm after in the small decorative plates and the top crest here. I'll have to crack out the old Oxy- Acetylene torch and carefully go over it again. Emphasis on carefully, as the Oxy- Ace can just melt the thin mild steel in seconds. So I'l have to heat it from some distance away and check if it has attained the right color- once that's done, I'll very lightly polish it with a polishing cloth to give the grey a bit of a sheen and then seal it with wax, probably.

ImpHelmet31.jpg
 
Looking awesome, can't wait to see the finished product!

The boots are square toe, right? Maybe like this, sans the toe stitching?
050K68_EK_P1.JPG
 
Thanks for your kind words and interest.

I've finished treating the outside of the helmet, now it has a dark patina on it, although it is a bit uneven in places. Also, I discovered a massive mistake I made early on and it was mistakenly using stainless steel for the construction! I thought I had a scrap piece of mild steel since I had stored it where I keep pieces of mild steel and it had rust on it, but it turned out it was in the wrong place. So now the helmet is mainly stainless, welded together with regular steel material. No wonder the surface was hard to oxidize as stainless resists oxidization very well.

So, that sort of threw the process out of whack, as you can't really make an even heat blued surface on stainless, much less on a piece with mixed materials. Hot blueing is the only process you can use on stainless, so that effectively prevented the use of a cold-blueing chemical solution on this piece.

The only way forward from that realization, in my opinion was to use the patina already on the helmet and just proceed with carefully scrubbing the surface with a polishing cloth and see what the result is- and here it is:

ImpHelmet32.jpg


I think it turned out much better than I'd hoped for, after that unfortunate realization. The surface looks darker and weathered, with the decorations retaining a lot of the darker finish on them, making them pop from the background. Looks just like a helmet fit for the Serkonan Grand Guard. A little sidenote though, I think the helmet looks slightly less dark in real life, but it's hard to take a good picture of this kind of surface.

ImpHelmet34.jpg


It'll still need the liner and headband, but I'll see about those when I get there.

Now then, I'll start with the next piece of equipment for the Guard officer, the pistol:

PistolRef10.jpg


This one will have much more work to it but it's mostly easier, smaller parts so I expect it to be much less problematic. Here's a 1:1 scale schematic I made based on the in- game screenshots. The pistol will be suprisingly large, around 45 cm or so in lenght (just shy of 18"), but this seems accurate based on the size seen in- game. The steel tube on top is the base for the barrel, it'll need to be machined to octagonal- it'll take a while to get the required bits for the machine, so the next update might still be on the helmet. We'll see.

Pistol1 (1).jpg


Utri Yes, that's pretty much exactly the kind of shoe I'm looking for, shapewise. I wonder if I could mod that to work for this costume, maybe take out the stitching on it? Where did you find them, if I might ask? Can they be bought somewhere?

In my search for the right kind of shoes I found these, but they're not as accurate with the toe shaping and could be taller:

 
I've made some small amount of progress on this project after a while of slumber. First off, I started making the Grand Guard pistol. Lots of tiny bits of steel are needed for the clockwork mechanism on the side. I say clockwork mechanism because while it looks like a wheellock mechanism, it can't be because it's missing springs and parts that would actually make it function as one. The guns in Dishonored have cartridges with metal casings so the actual mechanism must be something like a concealed hammer inside the frame and I assume the clockwork parts are just a vestigial, aestethic greeblies. Here are the parts done so far, arranged on the 1:1 scale pattern:

Pistol02.jpg


The parts still need welding, drilling and polishing but we're getting there...
Pistol01 (1).jpg


In other news, I found a good source for accurate looking shoes:


And also a better source for the khaki pants and high collar shirts for the uniform:

 
Very cool! I'm just playing through these after I got them in the last Steam sale. I just finished Dishonored 2 and am halfway through Death of the Outsider.
 
Thanks Sluis! They are really great games!

Some more progress on this project, got my hands on some walnut for the guard pistol's stock. Here's the initial blank cut from the plank:

Pistol 03 (1).jpg


After some rough cutting and sanding with a large belt sander, the basic form starts to show. There's also the 25mm thick walled steel pipe to be machined into the octagonal barrel on the desk:

Pistol 04.jpg


Next, some rough work with rasps to refine the shape:

Pistol 05.jpg


This bulb on the end of the grip was a bit difficult to get right, but I think I managed it decently:

Pistol 06.jpg


For a fantasy design, this pistol fits quite well in the hand. I have to say it does look smaller in- game due to the stylized proportions of the character models in Dishonored, this real- world version is pretty hefty, you could use it as a makeshift club easily:

Pistol 07.jpg


After sanding the walnut to 600 grit, the grip and back end start to look ok -ish.

Pistol 08.jpg


Next up is the patterned silver wire inlay on top of the grip, which is by far the hardest part in this piece. This is the reason I didn't want to refine the stock any further at this point because if I mess this up I might as well toss it in the trash. This is how the inlay looks like in- game:

PistolRef14.jpg


I think you can see there's plenty of chances to mess up that pattern up- the wire looks thick and the pattern is quite intricate. I might go for a little thinner wire for the inlay just to minimize the chances of messing this up as I don't want to chip the wood. We'll see. In other news, my shoes finally arrived! Here they are:

Pistol 09.jpg


I'm quite pleased with these, the shape and details match well with the ones used by the guard officers in- game. They are of a slightly different color however, but I don't want to weather them by painting or anything like that. Instead what I think I'll do is use them on a couple of hiking trips and get a bit of darker polish on them once they are a bit worn. I'll start on the spats now that I have the shoes, too.
 
Time for updates.

The project is advancing steadily, thus far I've managed to acquire correct the khaki pants and shirt and also almost finished the spats. They would've already been done but I'm waiting on some small parts still. More on those later.

Right now I'm focusing on the officers pistol, and there's been quite a lot of undocumented progress. I know it doesn't look like much but making stuff from metal is quite hard and time-consuming relative to other methods of fabrication(I just like the real feel and heft it brings!).

Here's the almost finished left side mechanism for the pistol, lots of tiny parts that needed cutting, filing, welding and polishing but here we are:

IMG_20210409_180043.jpg

Here's an overview of some of the parts. The barrel has been machined octagonal and the wood stock has been shaped further, adding the groove for the barrel to sit in as well as shaping the front part. The front is very delicate and there's actually not a lot of wood around the barrel. There are some details that will need to be sunk into the wood still so there's a lot of carving to do.

IMG_20210409_184309.jpg


Oh and of course the biggest thing that happened between now and october was that I remade the helmet completely! I wasn't happy with the size so I improved the pattern and made a new, approximately 10% smaller version with improved shaping and better surface finish:

IMG_20201227_152544.jpg


I think it looks quite nice and pretty spot on in terms of looks when compared to the game.

I'll add more updates on the different parts later once I can have a proper test fit of the set so far: shoes, spats, pants, suspenders, shirt and helmet. Jacket, belt and sword are still to be started but we're getting there.
 
Some progress on the gun, did most of the work on the steel fittings near the midpoint of the barrel. It's fairly time-consuming going back and forth between the metal parts and the wood stock, filing a bit here and a bit there to make them fit exactly but it is worth the effort to ensure a good fit.

IMG_20210416_184540.jpg


The gun is coming together nicely. I'll still have to plan where to put the screws that will hold the wood and metal parts together, which parts will be removable etc.

IMG_20210416_181710.jpg
 
I'm now at a point with the gun where things are starting to come together. Most of the large metal fittings have been done, the barrel is ready. Now I just need to figure out where to place all the small screws that hold the metal and wood together. I could simply attach everything with epoxy and call it a day but that seems kind of wrong somehow- I would like it if the gun could be taken apart. Here's some pics of the major components fitted together:

IMG_20210515_175513.jpg

The back end of the barrel is finished and cleaned up:
IMG_20210515_175629.jpg

From the top:
IMG_20210515_175646.jpg

The whole thing is pretty big and heavy when when completely assembled, some 46 cm in lenght and weighing some 2 kilos. It's a veritable hand- cannon! This is also a bit of a problem considering the original in- game design of the "holster" or maybe more accurately a "holder" which just kind of holds the gun on a metal plate horizontally behind your back without any noticeable straps or connections(I think it's supposed to be magnetic or something along those lines). I don't think I can make it work in real life so I might have to make something different based on official concept art of the game but more on that when I get there.
IMG_20210515_175612.jpg
 

Your message may be considered spam for the following reasons:

If you wish to reply despite these issues, check the box below before replying.
Be aware that malicious compliance may result in more severe penalties.
Back
Top