FrozenCapsicle
New Member
How's it going internet! On a whim while out at lunch with my woman we came up with the idea to build a functional flag from crucible:

So from there we made a hardware store run and the adventure begins!
We decided to use 2" PVC pipe as it's cheap and easy enough to work with and find fittings that would suit our purpose. We also got a length of 1/2" PVC pipe for internal mechanics in the flags themselves. We realized quickly that complete accuracy would be extremely difficult to achieve while also being fully functional, so don't expect 100% accuracy.
Here is the rough blueprints for the build and mechanics for a pressure plate at the base to drop the flags:

We decided on an 8 foot main pole to start, we can hack off more if we feel it's too tall later on.

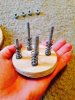
I got some machine screws for the pipe caps on the top to suspend the middle pipe that will be holding the flags, obviously you'll need to drill pilot holes for them as they don't have piercing capabilities, but this also means that they wont dig into the suspended pipe and you can use a nut to really secure it:


After that I drilled a hole in the middle of the suspended pipe for a rope that will be the link between the pressure plate at the bottom and the flags at the top.
Then I drilled 1/2'" holes at the ends of the main cross bar to get a Jigsaw blade in and cut a long slat to allow the flag to drop. I didn't cut all the way to the end so that the pipe would maintain some form of structural integrity, then smoothed the edges with a dremel so the slats would be uniform and not have an edge that might rip/cut/destroy the banners coming down or going back up.


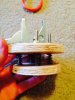
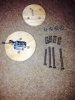
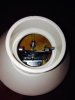
As for the pressure plate at the bottom I thought long and hard about how to best do this mechanism that will work consistently and can take abuse without breaking. I still need to get a few more materials to continue work on it, but so far i have cut a base out of 3/4" plywood and screwed a gate latch to the center of it, with a 1/2" hole below the edge of the latch, which I'll have something coming up to release the latch, I'm still working on what i can use, perhaps a screw. but I'll be returning to this very soon.

So from there we made a hardware store run and the adventure begins!
We decided to use 2" PVC pipe as it's cheap and easy enough to work with and find fittings that would suit our purpose. We also got a length of 1/2" PVC pipe for internal mechanics in the flags themselves. We realized quickly that complete accuracy would be extremely difficult to achieve while also being fully functional, so don't expect 100% accuracy.
Here is the rough blueprints for the build and mechanics for a pressure plate at the base to drop the flags:
We decided on an 8 foot main pole to start, we can hack off more if we feel it's too tall later on.
I got some machine screws for the pipe caps on the top to suspend the middle pipe that will be holding the flags, obviously you'll need to drill pilot holes for them as they don't have piercing capabilities, but this also means that they wont dig into the suspended pipe and you can use a nut to really secure it:
After that I drilled a hole in the middle of the suspended pipe for a rope that will be the link between the pressure plate at the bottom and the flags at the top.
Then I drilled 1/2'" holes at the ends of the main cross bar to get a Jigsaw blade in and cut a long slat to allow the flag to drop. I didn't cut all the way to the end so that the pipe would maintain some form of structural integrity, then smoothed the edges with a dremel so the slats would be uniform and not have an edge that might rip/cut/destroy the banners coming down or going back up.
As for the pressure plate at the bottom I thought long and hard about how to best do this mechanism that will work consistently and can take abuse without breaking. I still need to get a few more materials to continue work on it, but so far i have cut a base out of 3/4" plywood and screwed a gate latch to the center of it, with a 1/2" hole below the edge of the latch, which I'll have something coming up to release the latch, I'm still working on what i can use, perhaps a screw. but I'll be returning to this very soon.