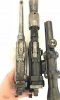
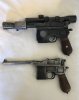
Over the past year, I’ve been heavily inspired by Scottjua’s builds of the variations in DL-44 and just shy of a year ago, I decided to look at building one myself. I managed to source a gold MGC in the U.K in August 2017 and was thrilled to pick up a set of Steel DEC parts in january. Hours of sandblasting and sanding later and I had my ‘grail’, or so I thought.....
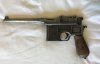
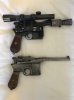
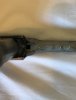
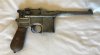
Last week I was contacted by a relative (who is also a firearms dealer in the U.K, specialising in Historic firearms) saying he had managed to get his hands on a fairly reasonably priced deactivated Mauser C96 for me. Just a month after I thought I had finished my DL-44, I found myself back in it all. The pistol just arrived and I’m pretty thrilled with it! As there aren’t any deactivated builds (from what I could find) I thought I’d start up a thread and hopefully inspire others how members on here have inspired me!
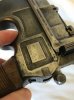
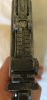
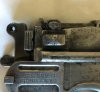
The Mauser is in pretty good condition, with general light pitting all over and some particularly heavy spots, mainly on the front magwell (helpfully covered by the pistons) and sight. I plan on replacing the sight with another, in better condition, which will thus solve the problem. The rest of the body will be lightly sanded and then cold blued. I don’t want to make it ‘new’, just remove a lot of the surface problems. I’ll need to be careful not to sand out the deactivation stamps, or I’ll have to get them re-done! They’ve also cut out some parts to meet deac specs, I’ll aim to fill these in and sand them down, perhaps paint and graphite just to finish off. They’re on the underside of the barrel and most are covered by the bull barrel.
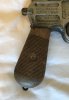
The wooden grips aren’t too bad but I’ll need to look how to go about cleaning up and perhaps restoring a little? What’s people’s thoughts?
The barrel will have to be filed slightly, like the live fires, to get the sleeve over nicely.
The sight rail holes will need to be drilled and tapped, shouldn’t be too bad to do on my mill/pillar drill.
When I can, I’ll post on here the work I’ve done and slowly turn it around!
P.S, they’ll be a nice ‘ready to go’ MGC for sale at the end of this all....
Last week I was contacted by a relative (who is also a firearms dealer in the U.K, specialising in Historic firearms) saying he had managed to get his hands on a fairly reasonably priced deactivated Mauser C96 for me. Just a month after I thought I had finished my DL-44, I found myself back in it all. The pistol just arrived and I’m pretty thrilled with it! As there aren’t any deactivated builds (from what I could find) I thought I’d start up a thread and hopefully inspire others how members on here have inspired me!
The Mauser is in pretty good condition, with general light pitting all over and some particularly heavy spots, mainly on the front magwell (helpfully covered by the pistons) and sight. I plan on replacing the sight with another, in better condition, which will thus solve the problem. The rest of the body will be lightly sanded and then cold blued. I don’t want to make it ‘new’, just remove a lot of the surface problems. I’ll need to be careful not to sand out the deactivation stamps, or I’ll have to get them re-done! They’ve also cut out some parts to meet deac specs, I’ll aim to fill these in and sand them down, perhaps paint and graphite just to finish off. They’re on the underside of the barrel and most are covered by the bull barrel.
The wooden grips aren’t too bad but I’ll need to look how to go about cleaning up and perhaps restoring a little? What’s people’s thoughts?
The barrel will have to be filed slightly, like the live fires, to get the sleeve over nicely.
The sight rail holes will need to be drilled and tapped, shouldn’t be too bad to do on my mill/pillar drill.
When I can, I’ll post on here the work I’ve done and slowly turn it around!
P.S, they’ll be a nice ‘ready to go’ MGC for sale at the end of this all....
Attachments
-
 3F72CB45-C30B-45E3-9C86-7F9762D45B0D.jpeg610.7 KB · Views: 632
 -
 8751A6C1-99A1-4E06-AF62-978870FE1660.jpeg505.7 KB · Views: 736
 -
 1BE7F950-C876-4D6B-8646-E34048DF35B7.jpeg480.3 KB · Views: 672
 -
 3C54B2A9-2B16-4399-AA15-B7BA185E1A53.jpeg446.1 KB · Views: 710
 -
 F48A7792-0664-4605-87E4-850E6ED2A9FE.jpeg501.3 KB · Views: 586
 -
 52CF0A47-7712-4477-9AF3-A753041B61F3.jpeg624.2 KB · Views: 588
 -
 B517B5E1-8AF1-49B5-BB8C-C6B9B687D697.jpeg530.2 KB · Views: 586
 -
 267114F5-D43C-40BD-BAC9-9935F1D8A5D4.jpeg690.3 KB · Views: 591
 -
 EFB1BCAE-1558-45DB-A749-080C7F0E7F39.jpeg830.1 KB · Views: 592
 -
 3A954CD7-DF70-47B9-9AF2-61A75725684E.jpeg787 KB · Views: 626

")
