TheRealTalon
New Member
(This is my "making of" post, if you want to see my finished pictures, check out my "finished" post: Finished Court of Owls Talon Cosplay )
So I've looked around the internet and haven't found many Talon suits or cosplays, even though I think the court is definitely one of Batman's deadliest enemies. This is my very first cosplay or suit of any kind so I Have decided to be the first good Talon and I've been putting a lot of work into this suit so I hope you guys enjoy!
I had a backup failure so I've lost almost every picture I had during the making of my muscle suit(I only have a few of the back) and all of the pictures from the first half of my gauntlet but I will post what I have below.
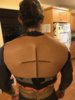
Here's the few pics of the back that I have:


Here's the finished muscle suit, it's made of layered 4mm EVA foam and about 4 litres of contact cement, attached to a spandex bodysuit that I got off amazon:


Here's the muscle suit with the wetsuit on top:


The knee high socks are just neoprene ankle socks I bought off amazon and then added extensions to.


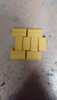
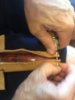
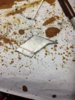
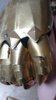
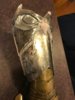
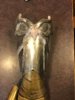
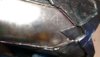
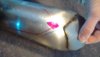
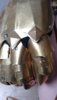
Here is the second half of the gauntlet( the owl on the vambrace.) You might see some of the hand, which I did in brass sheet. The finger lames are all identical, and the finger tips were bent to shape and soldered along the inside to give me nice claws, or talons if you will. they are all riveted to a strip of leather and then epoxied to the glove. the hand pieces were all riveted loosely to each other so they can move with my hand. Feel free to ask about any of the stuff I did, I'd be happy to talk about it. As for the owl, it's made from a few layers of steel plate that I've shaped by hand to fit perfectly over each other, then welded together and to the gauntlet. There was a bit of shaping to do after this with a grinder, removing the scale, smoothing out the edges (particularly around the eyes) and doing the angles on the beak, then I painted it to match the brass on the hand. It's hinged on one side and laced up on the other side. I also added a strap and buckle, mostly for looks. At one point, messed up the beak, but was able to fix it with some bondo as I was pressed for time and couldn't get to the metal shop for more steel.


I'll post the rest in separate replies because I've reached the max photo number")
So I've looked around the internet and haven't found many Talon suits or cosplays, even though I think the court is definitely one of Batman's deadliest enemies. This is my very first cosplay or suit of any kind so I Have decided to be the first good Talon and I've been putting a lot of work into this suit so I hope you guys enjoy!
I had a backup failure so I've lost almost every picture I had during the making of my muscle suit(I only have a few of the back) and all of the pictures from the first half of my gauntlet but I will post what I have below.
Here's the few pics of the back that I have:
Here's the finished muscle suit, it's made of layered 4mm EVA foam and about 4 litres of contact cement, attached to a spandex bodysuit that I got off amazon:
Here's the muscle suit with the wetsuit on top:
The knee high socks are just neoprene ankle socks I bought off amazon and then added extensions to.
Here is the second half of the gauntlet( the owl on the vambrace.) You might see some of the hand, which I did in brass sheet. The finger lames are all identical, and the finger tips were bent to shape and soldered along the inside to give me nice claws, or talons if you will. they are all riveted to a strip of leather and then epoxied to the glove. the hand pieces were all riveted loosely to each other so they can move with my hand. Feel free to ask about any of the stuff I did, I'd be happy to talk about it. As for the owl, it's made from a few layers of steel plate that I've shaped by hand to fit perfectly over each other, then welded together and to the gauntlet. There was a bit of shaping to do after this with a grinder, removing the scale, smoothing out the edges (particularly around the eyes) and doing the angles on the beak, then I painted it to match the brass on the hand. It's hinged on one side and laced up on the other side. I also added a strap and buckle, mostly for looks. At one point, messed up the beak, but was able to fix it with some bondo as I was pressed for time and couldn't get to the metal shop for more steel.
I'll post the rest in separate replies because I've reached the max photo number
Attachments
-
 IMG_20190409_212952103.jpg204.3 KB · Views: 432
 -
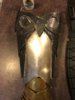 image5-2.jpeg574.7 KB · Views: 432
 -
 IMG_0487.jpeg2.1 MB · Views: 244
 -
 IMG_0485.jpeg2.1 MB · Views: 245
 -
 IMG_20190413_145123855-2.jpg2.3 MB · Views: 229
 -
 IMG_20190311_171448167.jpg2 MB · Views: 212
 -
 IMG_20190409_212939319-2.jpg1.5 MB · Views: 220
 -
 IMG_20190409_212952103-2.jpg1.5 MB · Views: 223
 -
 IMG_20190315_164915151_HDR-2.jpg1.5 MB · Views: 228
Last edited: