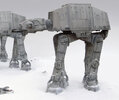
Looking great Dan!. It will really looks the part with the snow accents in just the right spots.
I thought of another possible method for the snow. Dabbing PVA white glue where you want the snow to sit & then sprinkle the baking soda over it. The glue dries clear & the baking soda would be well secured. The glue wouldn't affect the model surface & could also be peeled off when dry if not likeable.
Stu
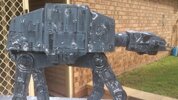
") Apart from that; great build/paint job
Apart from that; great build/paint job