I just looked back at my first attempt of this mold. No wonder it turned out rubbish :/ but you learn from mistakes.
Here is V.2. Much better in my opinion.
Prepped and ready to go. The master had a liberal coating of mold release.
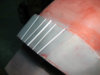
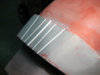
First layer of silicone is thinned down, to capture the detail. I used a disposible brush to dimple into all the recesses to ensure there were no air bubbles trapped. I allowed this layer to dry, then applied another couple of layers at normal viscosity.
I've mentioned this trick before, but I will mention it again, as it is an amazing money saver. Silicone is very expensive, but when a mold is kaput it can be used as filler for other molds, reducing the amount of fresh silicone you need to use. For the bush on stuff I chop it up with a herb slicer and mix it up with fresh silicone, about 60 fresh, 40 chopped and apply it. This is a great way of packing a mold. it doesn't look pretty, but it works. a final layer of thickened silicone will reduce the harsh texture.
Paper template for the outer frame, best to test the theory before cutting. Here you can see the recycle silicone.
A spot of trimming around the opening, and applied the reg keys, using thickened silicone to hold them in place.
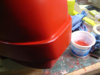
Frame pieces cut from hardboard and fixed together with bolts and wingnuts, for easy open/close, and the Plasti-Paste outer applied.
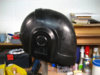
Once set, the outer is removed and the master is released from the mold.
The mold looks great, no air pockets or weak spots. ready for casting.
First pull is a complete success. extremely happy with the results, my best mold to date.
")