Hey guys, I just want to share my latest project. As a long time lurker here other build logs have been a HUGE help so far and maybe I can help some of you out there.
I was inspired by Volpin's helmet (just like everyone else out there) and have been following the steps in his build log pretty closely, but he doesn't show EVERY step, so I'll try to name anything I used and what I did in as much detail as possible. Otherwise, ask me questions.
STEP 1: Making the Mother Helmet
So the first thing I did was download the 3d model from here and messed around with it in Autodesk Inventor and Photoshop to make different sized profiles so I could decide on a size that I wanted, which ended up having a base of 7 3/4'' by 12." Since I have about zero experience sculpting, I wanted to make it as easy as possible for myself when carving the helmet, so I made a pretty extensive wooden frame to build on.


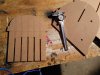
The next step was to make the main skeleton out of MDF. I started by cutting out the two main profiles and cutting slots in both so they slid together (pictures help this make sense), which also helped get an idea of the volume of the helmet.


Then I made the same paper cutouts for different profiles of the helmet, each exactly 1.2 in apart from each other (1 in foam + 0.2 in of MDF). I cut out 2 of each profile and added them to the main two profiles.


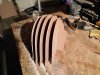
Once I had the wooden frame, I glued 1'' thick insulation foam from home depot in between the MDF panels.


For the outside foam pieces I cut the shape of the ears out before gluing them on, just to save work later and have a point of reference.


It got a little messy in the shop...

Then I started carving and sanding out the basic shape of the helmet. It's essential to get the proportions of the helmet right here, but the MDF frame helped A LOT with this, as I only had to worry about the foam between each wood layer. The I used a hand saw to take off the bigger chunks, a belt sander and orbital sander to cut out more detail, and finally hand sand paper and various files to get the corners/edges.


And now the most exciting step (jk): Bondo! Obviously this step takes the longest, but also decides how nice the finished product is. I spent about 2 months (5-6 hours a day) just bondo'ing and sanding, trying to satisfy the perfectionist inside of me, and while it isn't perfect, I'm very happy with it.
IMPORTANT: Remember to paint the pink foam with an OIL-BASED PAINT, otherwise the Bondo will melt away the foam. It's nasty stuff, so also have lots of ventilation (I used my garage and a fan).

I was inspired by Volpin's helmet (just like everyone else out there) and have been following the steps in his build log pretty closely, but he doesn't show EVERY step, so I'll try to name anything I used and what I did in as much detail as possible. Otherwise, ask me questions.
STEP 1: Making the Mother Helmet
So the first thing I did was download the 3d model from here and messed around with it in Autodesk Inventor and Photoshop to make different sized profiles so I could decide on a size that I wanted, which ended up having a base of 7 3/4'' by 12." Since I have about zero experience sculpting, I wanted to make it as easy as possible for myself when carving the helmet, so I made a pretty extensive wooden frame to build on.
The next step was to make the main skeleton out of MDF. I started by cutting out the two main profiles and cutting slots in both so they slid together (pictures help this make sense), which also helped get an idea of the volume of the helmet.
Then I made the same paper cutouts for different profiles of the helmet, each exactly 1.2 in apart from each other (1 in foam + 0.2 in of MDF). I cut out 2 of each profile and added them to the main two profiles.
Once I had the wooden frame, I glued 1'' thick insulation foam from home depot in between the MDF panels.
For the outside foam pieces I cut the shape of the ears out before gluing them on, just to save work later and have a point of reference.
It got a little messy in the shop...
Then I started carving and sanding out the basic shape of the helmet. It's essential to get the proportions of the helmet right here, but the MDF frame helped A LOT with this, as I only had to worry about the foam between each wood layer. The I used a hand saw to take off the bigger chunks, a belt sander and orbital sander to cut out more detail, and finally hand sand paper and various files to get the corners/edges.
And now the most exciting step (jk): Bondo! Obviously this step takes the longest, but also decides how nice the finished product is. I spent about 2 months (5-6 hours a day) just bondo'ing and sanding, trying to satisfy the perfectionist inside of me, and while it isn't perfect, I'm very happy with it.
IMPORTANT: Remember to paint the pink foam with an OIL-BASED PAINT, otherwise the Bondo will melt away the foam. It's nasty stuff, so also have lots of ventilation (I used my garage and a fan).
Attachments
Last edited:


