so, after seeing The Wolverine... I finally narrowed down what I wanted to do for Halloween. It was between Robocop and this new version of the Silver Samurai from the movie, The Wolverine.
I polled my friends and Silver Samurai was the victor. This was great with me as I was kinda leaning toward that one anyway. However, the problem was there were no Pepakura files for SS. Robocop, I could find.
So..was I really going to attempt this, my second build, without a pep file. Could I really pull an image from a 2d photograph into a 3d costume? We were about to find out. angel
angel
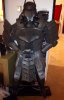
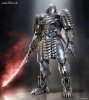
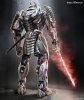
First, I had to find good pictures of the suit from the movie..i found two really good ones. I also found some pics from the outdoor premier that had the life size replica out front. But i mostly concentrate on the first two photos i found. Im using EVA foam rolls found at my local Big Lots for 18.00.
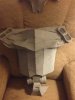
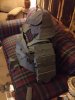
I started, as i did last year on the Iron Man replica I built, with the helmet. Letting it be the piece from which i would base the remainder of the proportions from.
I had to start over a couple of times before i got exactly what i was looking for.
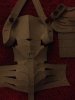
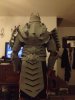
After the helmet was assembled.. i moved on to the chest piece. I knew this had to be right as, other than the helmet, its gonna be direct line of sight.
I was quite pleased with my result.
I then moved on to the back. It was quite the challenge getting the shape and dimensions just right.
After the back was assembled, and the velcro closures attached, it was time to move on to arms.
The hardest part of arms and legs, i think, is getting them to be identical. Mine are not. There are slight variations. Hopefully too slight to be outwardly noticeable.
Moving on to the lower body, i then cut out and made the girdle portion. Instead of cutting each individual piece, i opted to cut out one large piece, remove the middle sections and using and exacto, carve the grooves in to simulate individual pieces.
It was now time for the "try on". See, i have a really bad habit of relying on my sense of self..meaning i know what size i am, and will often times, when building or sewing, cast off actually measuring and just cut and glue or cut and sew.
I cant tell you the number of times that habit has come back to haunt me.
In this case, lady luck was on my side..and i felt well on my way to a good finished product.
It was now time to do the lower body. Now for me, legs always seem to be the hardest. Getting the knee joint correct can be a nightmare.
Luckily, i wrote down all the things i did wrong the year before and vowed to correct them this time around.
I reinforced the knee thigh connection with plaster bonding tape on the inside.
Legs done. As well as feet.. Took me a few days. Again, they are not identical, but close enough.
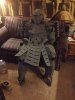
I used Pod Modge as a sealer. It gave the suit a very gray metal appearance.
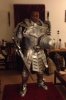
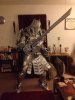
After a few coats of silver metallic paint.I had almost what i was looking for. One clear coat of resin hardner ( purchased from Michaels) and it was off to dry for 24 hours before i could finally put the whole costume on.
once dry..i cant say how happy i was with the final result.
My co-workers were amazed. (Somehow, the resin coat on the foam...when rubbing together had a very metallic sound..So it sounded like a suit of armor...I love HALLOWEEN!!!.
I polled my friends and Silver Samurai was the victor. This was great with me as I was kinda leaning toward that one anyway. However, the problem was there were no Pepakura files for SS. Robocop, I could find.
So..was I really going to attempt this, my second build, without a pep file. Could I really pull an image from a 2d photograph into a 3d costume? We were about to find out.
angelFirst, I had to find good pictures of the suit from the movie..i found two really good ones. I also found some pics from the outdoor premier that had the life size replica out front. But i mostly concentrate on the first two photos i found. Im using EVA foam rolls found at my local Big Lots for 18.00.
I started, as i did last year on the Iron Man replica I built, with the helmet. Letting it be the piece from which i would base the remainder of the proportions from.
I had to start over a couple of times before i got exactly what i was looking for.
After the helmet was assembled.. i moved on to the chest piece. I knew this had to be right as, other than the helmet, its gonna be direct line of sight.
I was quite pleased with my result.
I then moved on to the back. It was quite the challenge getting the shape and dimensions just right.
After the back was assembled, and the velcro closures attached, it was time to move on to arms.
The hardest part of arms and legs, i think, is getting them to be identical. Mine are not. There are slight variations. Hopefully too slight to be outwardly noticeable.
Moving on to the lower body, i then cut out and made the girdle portion. Instead of cutting each individual piece, i opted to cut out one large piece, remove the middle sections and using and exacto, carve the grooves in to simulate individual pieces.
It was now time for the "try on". See, i have a really bad habit of relying on my sense of self..meaning i know what size i am, and will often times, when building or sewing, cast off actually measuring and just cut and glue or cut and sew.
I cant tell you the number of times that habit has come back to haunt me.
In this case, lady luck was on my side..and i felt well on my way to a good finished product.
It was now time to do the lower body. Now for me, legs always seem to be the hardest. Getting the knee joint correct can be a nightmare.
Luckily, i wrote down all the things i did wrong the year before and vowed to correct them this time around.
I reinforced the knee thigh connection with plaster bonding tape on the inside.
Legs done. As well as feet.. Took me a few days. Again, they are not identical, but close enough.
I used Pod Modge as a sealer. It gave the suit a very gray metal appearance.
After a few coats of silver metallic paint.I had almost what i was looking for. One clear coat of resin hardner ( purchased from Michaels) and it was off to dry for 24 hours before i could finally put the whole costume on.
once dry..i cant say how happy i was with the final result.
My co-workers were amazed. (Somehow, the resin coat on the foam...when rubbing together had a very metallic sound..So it sounded like a suit of armor...I love HALLOWEEN!!!.
Attachments
-
 b.JPG796.2 KB · Views: 162
 -
 w.JPG1.1 MB · Views: 134
 -
 x.JPG763.5 KB · Views: 148
 -
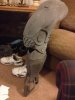 photo 1.JPG1.2 MB · Views: 136
 -
 g.JPG1.4 MB · Views: 160
 -
 1383843_10202273883716845_1843398617_n.jpg74.5 KB · Views: 159
 -
 ss4.jpg9.5 KB · Views: 257
 -
 ss5.jpg10.3 KB · Views: 146
 -
 1391909_10202397656771094_375928413_n.jpg33.6 KB · Views: 184
 -
 539767_10202211429755535_1580570874_n.jpg86.8 KB · Views: 138
 -
 1234154_10202224927092960_286548253_n.jpg71.2 KB · Views: 128
 -
 1374727_10202224927452969_725149502_n.jpg66.8 KB · Views: 150
 -
 ss11.jpg41.7 KB · Views: 230
 -
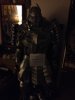 photo.JPG893.5 KB · Views: 123