Critique my '68-85 comic Iron Man please, and tips on 3 min. skit?

Marthony

Active Member
Greetings humans that prefer to appear otherwise!

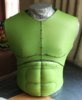
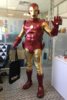
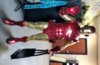
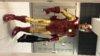
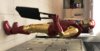
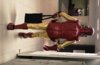
My production of '68-85 comics Iron Man was a success! Now comes the upgrade stage before late April's Calgary Comic Expo. I am thinking I should compete with a 3 minute skit in it. While I'd been thinking I'd have better odds upgrading my Iron Giant for same, I won there in the Walk-on category this year as I.G. already and I'd guess the audience might enjoy something new instead?

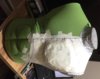
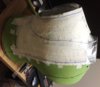
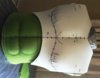
1. I'm interested in your opinion of how best to upgrade this suit. I don't intend to do a muscle suit yet, but will continue to do bicep curls 3 days/wk so my upper arms look better. =) In these pics I put on the parts without a mirror; the codpiece is normally centered and doesn't show any hint of the body suit between gaps. Already on the agenda is to:
- Replace the neck wrap with a taller version to cover more of my neck, that would also be pinned over the rear-top of the golden bodysuit.
- Replace or edit the hip pods so they sit vertically.
- Add a tether so the calf-wrap zipper tops are reliably hidden.
- Replace the repulsors' LED's with brighter versions; presently 4x yellow 5000mcd LED's that could be replaced with brighter white ones plus yellow finish on the housing.

2. Curious to suggestions for 3 minute skit material? This is a new thing for me, and I cannot enter the walk-on again having won it once. Adding an infinity gauntlet doesn't really match with this vintage. Perhaps go with the humor angle and bring on props from the '80's..?

Thanks for any suggestions!
 

Attachments

  • IMG_1546.JPG
    IMG_1546.JPG
    1.9 MB · Views: 461
  • IMG_3022.jpg
    IMG_3022.jpg
    1.5 MB · Views: 405
  • IMG_4102.jpg
    IMG_4102.jpg
    797.8 KB · Views: 314
  • IMG_4105.jpg
    IMG_4105.jpg
    664.2 KB · Views: 301
  • IMG_4107.jpg
    IMG_4107.jpg
    353 KB · Views: 275
  • IMG_4109 - Copy.jpg
    IMG_4109 - Copy.jpg
    484.1 KB · Views: 275
I know you are looking to bulk up your arms naturally, but that kind of mass you need is going to take quite a while (years). I would suggest a simple arm-only muscle suit. You can attach upholstery foam muscles to a cheap compression shirt. For less than $20 in materials you can make the muscle suit and get the superhero look of the original comic suit. Bonus, you can create the definition that will show through the gold spandex.

Does the skit have to be a full 3 minutes? That is really long. You could do a wrestling style into music of AD/DC or Led Zeppelin which is appropriate and recognizable. Maybe then do a voice over of an Avengers recruitment pitch. You could make it serious of funny. You could list all the faults of the other Avengers that you want to avoid in any "New Hires". Tony has a pretty high opinion of himself so that would be very on-brand. Exit to the Avengers theme music.
 
It’s a great suit, well done! My suggestions would be a light padded suit under to give the bulk you want until your training catches up. I also think you need the shorten the length of the gold legs and stirrup them to keep them pulled down and avoid the elephant knees. Also, don’t wear boxer briefs - you’ve got major lines. Get a dance belt or at least go for a supporter and running tights under the gold leggings. You’ll be amazed how much it will smooth out all the ‘messy bits’ around the ‘messy bits’. ;)
 
Thanks for the comments folks!

Montysaurus, I don't have a good sewing approach to get rid of the wrinkles, but the next comments might help there - stirrups for the legs and under-suit muscles for the arms.

Psicorp7 & SMP Designs, I'll start looking into the foam muscle angle, purchasing or making from scratch. I've a few months to tackle this new concept.

SMP Designs, thanks for these tips! Will shop for these accessories.
 
Love the suit,M :cool: Thank you for sharing this adventure and I wish there were more unique concepts made these days instead of what is trending.

Points of criticism though, since you asked:
-Abs section seems to bulge a bit compared to the rest of the suit and thus distort proportions
-Hip pods bound tighter to the hips
-Muscle suit underneath as suggested, because you cannot rely solely on workouts; one cold and your posture collapses
Either a muscle suit or foam arms/legs would be my suggestion too
-For your consideration (correct me if I'm wrong anybody) : Shoe covers including shins one piece 2mm (for flexibility) with velcro instead of 6mm shins separate from shoe covers where you can see the ankle gaps

Sorry if I am being too critical or forward
 
Thanks! Not at all George, this is the kind of critique I'm looking for. It is by refining such points that we progress. I also would have accepted 'the grooves on the rear of the codpiece appear uneven/wavy; consider replacing with grooves that look more parallel'. =)

- Stomach - Bugger here is, I simply don't have a flat stomach like the character. My duct tape dress form tells no lies! I might be able to redo and get 1/4" tighter but that's about it. I considered using 1/4" EVA vs. 3/8" but thought my back-cuts for the muscle features would be hard to do without poking through. The stomach wrap is 4 pieces as flipped-pairs front & back, so the center line of muscle is easy, The upper torso was made a thickness away from my body to counter this. How might you approach this?

- Indeed, the tilt-out is distracting. I need to re-engineer these but retain their function as pockets unless I can create such elsewhere on the suit (I've a couple recessed spots within each forearm, 1/4" deep, but not big enough for an old iPhone5 to carry to maintain basic comms during a Con event with wife & daughter. At the very least I need to make them sit vertical, but will try to do tighten them as well.

- Will research partial muscle suit angle. While I understand they can be purchased, learning is the common feature I seek to retain in this hobby; I'd prefer to only purchase in 'crisis'. We'll see if I can create a decent version.

- The shoe covers & calf frustums are a tough one to change to a thinner foam in my opinion. I'm concerned the thickness of the foam will look out of proportion with the rest of the suit's thickness if I reduce it. Regardless of proportion however, I don't think I can retain the line grooves with a thinner foam than this 1/4". My technique involved scoring halfway through the black foam & hitting the flexed-open grooves with a heat gun.

I agree the shoe covers might look better if smaller & the gap wasn't there. I could use some of the metallic red fabric there, same as on my neck, but think that might be more distracting than the black is? I think my best bet might be to acquire some thinner foam and try to make connecting/concealing pieces with it.


Another detail on hand here is that I'm about to transition finishing techniques: away from sealing with water-based contact cement (though an excellent Segway) and rattle-can spray paints to sealing with Rosco Flexbond & painting with acrylic via air gun. Problem with that is, I don't think I can salvage some of the rattle-can Duplicolor Metallic Red to use in a air gun method to make matching replacement parts? This is relevant in the sense that ankle-gap covers would flex a lot, and my existing finishing technique has that paint job cracking a lot...

Thanks!
 

Attachments

  • IMG_7186.JPG
    IMG_7186.JPG
    296.9 KB · Views: 175
-Yes, scratch the abs section since your posture is as it is.I should have realized that before I posted the question.Sorry to confront you with that.I didn't understand your remark about the upper part of the torso though.

-Embarrassing I never noticed the hip pods utilized as pockets ! ~ funny & genius.
How about a double layer though? Like an actual pocket,but vertical instead of diagonal?

-You don't need an entire muscle suit.I'm confused as to why you didn't use the arms and legs provided with the suit files? Or even body parts from an existing dummy/3d anatomy model.Just a thought

-How about shoe covers entirely of 2mm for flexibility, but with double layers where needed to decorate (double layer to replace grooves) or compensate thickness? They only need to be thin/flexible at the toes and ankles

-I learned of a non-toxic, non-cracking paint method once by a (former?) member called Cyehra. She used acrylic gel to seal the armor parts (deluted/mixed with white woodglue/pva if flexibility was needed) and then paint with acrylic paint.For your consideration.I don't know whether her tutorial still is on youtube or whether she is still active on the forum
 
Last edited:
- No worries! it is what it is! =) What I mean for the upper torso is, I my process started by making a base-layer down to the end of my rib cage on the dummy. Next I added a 'pectoral muscle' on the preferred side and patterned onto those parts for the actual upper torso, which now also extended over the top of the stomach wrap. The base layer was both to create a ventilation airspace the thickness of 1 layer of foam and to counter for the stomach wrap being a bit out from where the upper torso would otherwise be. Pic was the 1st outer torso; had to make a 2nd for edits.

- Thanks! I was lacking for a good way to carry a phone/camera and the hip pods were the simplest thing. There were no reasonable spaces in the upper torso, and the stomach wrap is snug. I did create 2x3" slats 1/4" deep in both forearm frustums by cutting away pieces of the 1/4" foam under the 3/8" belts, and added short nylon loops with hot glue, so I can ring-in keys or cash on a clip. The hip pods just have a piece of nylon hot-glued to the inside of the shaped circle, with Velcro first sewn to the nylon. I need to rig a tensioner system or something.

- Initially I didn't look to other parts of the Pepakura file as only the helmet was the design type I wanted. I also expected the arms would be bulky based on another cosplayer's build pics of it - I wanted maximum mobility. Moving forward I will look at the files again and see what might be done, though I still don't want EVA muscles for Iron Man - this might be more valuable for Martinex.

- Will consider if I find a good source of 2mm EVA, but to be honest I'm not sure I want to fight with thin EVA for this section. Will keep it on the list and let the ideas develop over time. We shall see!

- I now have Rosco Flexbond to seal EVA with and will be focusing on it as my main sealing method moving forward. I'll run tests on scrap to see if I can sand down, add this, and repaint with acrylic via air gun. It would mean a full repaint mind you.

Thanks!
 

Attachments

  • IMG_7233.JPG
    IMG_7233.JPG
    722 KB · Views: 196
  • IMG_7262.JPG
    IMG_7262.JPG
    552.1 KB · Views: 182
  • IMG_7264.JPG
    IMG_7264.JPG
    452.7 KB · Views: 178
  • IMG_7287.JPG
    IMG_7287.JPG
    524.3 KB · Views: 169
Michaels has 2mm rolls of EVA in black and white. I'm also in Calgary and I've used them quite a bit, plus they are quite cheap (~$6) if you use the 50% off coupons that are almost always available if you ask the cashier.
 
This thread is more than 4 years old.

Your message may be considered spam for the following reasons:

  1. This thread hasn't been active in some time. A new post in this thread might not contribute constructively to this discussion after so long.
If you wish to reply despite these issues, check the box below before replying.
Be aware that malicious compliance may result in more severe penalties.
Back
Top