Samyth1206
Jr Member
From the remains of the Emilio Ruíz del Río model, I decided to build a model as similar as possible to Emilio's, but also as similar as possible to the original wheel of pain that appears in the John Milius film.
Years ago, I bought the original remains of the authentic Wheel of Pain that appears in the film and since I have many original parts it was easy to reduce the measurements.
Image of the plan with the measurements taken to start the model.

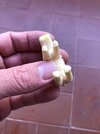
First I decided to make the top ornament consisting of four Viking-inspired heads with a wild animal on top, a wild boar?
Here you can see the modeling process of the plasticine figure.
Little by little all the most important details are being made.


The next thing is to make a mold of this figure and then get a plaster copy equal to it, the purpose of this plaster reproduction is to be able to improve the details.


Once the figure is made in plaster, the details are worked on to leave it almost finished, such as the typical cracks in wood, etc ... In plasticine, such small details are very difficult.
.JPG")
.JPG")
.JPG")
Then we make another mold again and then make a final copy in polyurethane resin. The polyurethane resin gives a very good result, the figure is very strong and solid and it can also be carved to finish it.


We do the same again for the wild boar figure until we get the final copy in polyurethane resin.


.JPG")
.JPG")
We couple the two figures as they are in the original Wheel of Pain.


The next thing is to paint the figure so that it imitates wood as best as possible.

Another laborious process is adding the strings.
They are rolled up little by little until they cover the piece just like they are in the film.

Other details are also added such as the star-shaped poles that can be seen in the film and the fixings for the support of the bridge.


Finally we add a layer of transparent varnish to give greater firmness and make the whole set more compact.
And we already have the first part.
.JPG")
.JPG")
.JPG")
.JPG")
.JPG")
.JPG")
.JPG")
.JPG")
.JPG")

Years ago, I bought the original remains of the authentic Wheel of Pain that appears in the film and since I have many original parts it was easy to reduce the measurements.
Image of the plan with the measurements taken to start the model.
First I decided to make the top ornament consisting of four Viking-inspired heads with a wild animal on top, a wild boar?
Here you can see the modeling process of the plasticine figure.
Little by little all the most important details are being made.
The next thing is to make a mold of this figure and then get a plaster copy equal to it, the purpose of this plaster reproduction is to be able to improve the details.
Once the figure is made in plaster, the details are worked on to leave it almost finished, such as the typical cracks in wood, etc ... In plasticine, such small details are very difficult.
Then we make another mold again and then make a final copy in polyurethane resin. The polyurethane resin gives a very good result, the figure is very strong and solid and it can also be carved to finish it.
We do the same again for the wild boar figure until we get the final copy in polyurethane resin.
We couple the two figures as they are in the original Wheel of Pain.
The next thing is to paint the figure so that it imitates wood as best as possible.
Another laborious process is adding the strings.
They are rolled up little by little until they cover the piece just like they are in the film.
Other details are also added such as the star-shaped poles that can be seen in the film and the fixings for the support of the bridge.
Finally we add a layer of transparent varnish to give greater firmness and make the whole set more compact.
And we already have the first part.
Attachments
Last edited:
