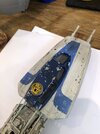
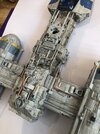
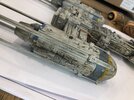
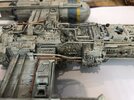
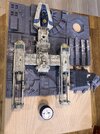
**COMPLETED** Y-Wing 1/48 resin model

At any rate, I started painting the bottom of the cockpit today. Attacked it with the dremel first, and then did some detail painting with a brush. Then some black in the airbrush. I need to let all this dry before adding some rusty washes to it, as well as a few more things. Also added decals today. Didn't get a photo of that, though.

IMG_5988.jpg


I'm also re-printing the canopy, as I don't like the shape of the Bibby canopy. I found the DaveG canopy for his open-source studio scale model (thanks!) and scaled it to the appropriate size. Hopefully I can finesse it to fit once it's printed.

Anyway, thanks for looking!

SB
 
Curious about what aspect of the canopy shape you don't like and the differences between the Bibby version and the DaveG version you are looking at. I might be able to easily modify the Bibby version to capture what you are looking for and have something that will still be a tailored fit for what you (and me too) are building.
 
That's a good question. I always thought the Bibby canopy was a bit too boxy looking. In my mind, it just didn't look right. It looked more like a Revell version or something. I didn't notice how "off" it looked until I lined it up next to the DaveG version in my slicer. Bibby on the right, DaveG on the left:

Screen Shot 2021-03-12 at 8.53.50 AM.png


Screen Shot 2021-03-12 at 8.54.01 AM.png


Screen Shot 2021-03-12 at 8.54.16 AM.png


Screen Shot 2021-03-12 at 8.54.35 AM.png


Looking at a few studio scale models, the canopy frames looked beefier than the ones on the Bibby canopy. And it seemed too angular, as well. You'll also notice how many of the panel lines are missing. So that's just what I noticed while dry-fitting it and having a good look at it. I am putting a lot of work into this build, and I don't want it to look wonky just because I didn't want to reprint something. I want it to look like a miniature SS build, you know? That might be a bit presumptuous of me to say, but I want this to look as close as I can. And if something as defining as the canopy looks off, then it throws off the whole presentation, you know?

SB
 
Awesome comparison shots. Thank you! I see what you mean. The DaveG example is much better proportioned with better lines and has more of a forward sloped top that makes it look sleeker. That alone might fix much of the "boxy" look. Shouldn't be too hard to adjust and add in the missing panel lines. I'll take a look this weekend and see what aspects of the Bibby version need to be retained to integrate with the rest of the model. The Bibby is wider than the DaveG version at the back end which would require adjustments of the Y-Wing head and cockpit which I'm not sure I want to get into rebuilding at this time. Might be able to capture a good look and feel and still have it fit.

Interesting when you really start getting into the details of the files all the possible adjustments you find. The bigest mod is having the required clearance between interfacing surfaces. I find you need at least 0.2mm of design clearance between flat surfaces to get a perfect FDM print fit. I'm finding this to be true on a lot of the STL files I recently purchased but they are a great start and a far better starting point than scratch. The ability to modify STL's as if they were a native file is invaluable here.
 
Thats one of the things that SciFi models updated on the Bibby model that I'm painting, yours will be excellent with Dave G's

Love the chipping, great job StevenBills

J
 
Thanks Jaitea. Just hoping mine can somehow magically turn out how yours are! They're beautiful!

Awesome comparison shots. Thank you! I see what you mean. The DaveG example is much better proportioned with better lines and has more of a forward sloped top that makes it look sleeker. That alone might fix much of the "boxy" look. Shouldn't be too hard to adjust and add in the missing panel lines. I'll take a look this weekend and see what aspects of the Bibby version need to be retained to integrate with the rest of the model. The Bibby is wider than the DaveG version at the back end which would require adjustments of the Y-Wing head and cockpit which I'm not sure I want to get into rebuilding at this time. Might be able to capture a good look and feel and still have it fit.

Interesting when you really start getting into the details of the files all the possible adjustments you find. The bigest mod is having the required clearance between interfacing surfaces. I find you need at least 0.2mm of design clearance between flat surfaces to get a perfect FDM print fit. I'm finding this to be true on a lot of the STL files I recently purchased but they are a great start and a far better starting point than scratch. The ability to modify STL's as if they were a native file is invaluable here.

I wish I had any inkling or knowledge of how to do any of what you have said, but I don't, sadly. Not really versed in 3D software, other than just what I've been exposed to through basic 3D printing. But I'll let you know how the DaveG canopy fits on the Bibby head. I know there will be some sanding done to get it flush, so we'll see.

SB
 
Where can I get the DaveG canopy? I found the open source google drive but I'm not seeing the canopy. I want to use it as a reference for blending the two. One thing I can see right off is that the panel lines will not match up anymore with the first separation between the windscreen and the cockpit hatch.
 
Ah! Found it! All set to do a little 3D surgery this weekend. Would there be any bad ramifications to posting my result for download and use by the community when I'm done?
 
So I got home from work and removed the supports from the new canopy. Looks like it was under-supported, as it warped a bit in the back. But that's okay, because the fit isn't quite right in the back, as you can see in the below photos. It does, however, fit snug against the body of the cockpit, so that's good news:

IMG_5992.jpg


IMG_5993.jpg


I scaled it so that it matched as closely as I could to the Bibby canopy, and then it ended up being a bit too tall. So I went into the slicer and scaled each dimension separately, by only about a millimeter or so, and I'll give that a test print tonight.

It's crazy to see how different the profiles are:

Screen Shot 2021-03-12 at 5.23.51 PM.png


So based on MY build (which I'm scaling the entire Bibby model up to 133%), then this new second test canopy is scaled to these settings in PrusaSlicer:

Screen Shot 2021-03-12 at 5.25.47 PM.png


So I'll run this print off tonight and see how it fits tomorrow! This is an interesting thing to run into at this point in the build, but I'm sure glad I did!

SB
 
Agreed. Looking very nice indeed. The new canopy makes a huge difference. The effort to make it work is well worth the outcome. Deffinetly has inspired me to make STL file modifications.
 
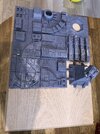
Looking great, StevenBills! In the continuing saga of my Y-wing the cockpit lights appear to have stopped working again, which is a real bummer. Likely a loose connection inside the body, so nothing can be done about it. Never mind, I started painting mine, and have also started printing Death Star tiles (and a turbolaser turret) to put on the base.
44B7939B-D0BD-499D-B3CB-FC22C62074D9.jpegDB14ED12-BD13-4D69-B554-FB2001AAE7A1.jpeg42BD7E70-4D7F-47D7-ADAC-5B2639FCEBD2.jpeg37E16658-4EA2-4856-A8CE-1F1BF6CEC9B9.jpegC6222223-4851-4F7C-B9F6-6D31F17A8747.jpeg0786275E-2AFC-46F5-B5B1-1458E6DA4BF1.jpeg
 
Jimw100 I LOVE the blue scheme!! :love: Those pics don't really do justice to how big these things are at 1/48. I also like that you added glass to the canopy. I have thought about doing that as well. Did you just use clear styrene? I think it adds a nice look to this model.

I'm taking a break while I wait for some more paints in the mail. In the meantime, I'm doing a quick build of the old AMT Naboo Starfighter. Hoping to do it justice.

SB
 
I also like the glass in the canopy and the blue scheme.
Along the lines of adding glass to the canopy, is there glass at the rear? My best guess is that it is just before the rear bulkhead. The DaveG canopy version has some frame protrusions on the inside at the back of the canopy that I'm figuring would be the location.
 
Jimw100 I LOVE the blue scheme!! :love: Those pics don't really do justice to how big these things are at 1/48. I also like that you added glass to the canopy. I have thought about doing that as well. Did you just use clear styrene? I think it adds a nice look to this model.

I'm taking a break while I wait for some more paints in the mail. In the meantime, I'm doing a quick build of the old AMT Naboo Starfighter. Hoping to do it justice.

SB
Thanks guys! Yeah, I went for a sort of “blue squadron”-esque color scheme. Love Rogue One. I know even the blue squadron Y-wings in Rogue one had the yellow colour scheme, but I don’t mind mine being non-cannon.

I actually used very thin plastic from (I think) an action figure box for the windows. It’s really easy to cut to shape, and when I tried .5mm clear acrylic (not 100% sure it’s acrylic actually) it just looked a bit too thick. I used micro crystal clear to glue it in. One of the side windows actually came out when I took the masking tape off the canopy, so I’m (not) looking forward to gluing that back in from the outside.

There is glazing at the rear of the canopy, it’s a small trapezium shaped bit.
 
Okay, I got some paint in the mail, so I did some more work on the Y this afternoon, and I streamed it again, if anyone cares to watch the process. You can see that here:


I turned the audio off so I could listen to some music while I worked :D

I worked on the top of the cockpit. First I attacked it with the dremel to give it some physical damage, and then went back in and touched some of those damaged areas up with a fine brush and XF-53 neutral gray. Then out came the airbrush. I tried some XF-69 Nato Black, but it was spurting weird through my airbrush, so I dumped that and went with a highly thinned XF-1 mixture. Anyway, it looks a bit too stark and contrasty now, I think. The paint that I got is a Vallejo rust wash, which I have never used before, but I quite like it. I looked at reference photos of Gold Leader and applied some rust in the appropriate places, and then some. Also notice the decals that were added to the top of the cockpit as well as the body itself. I took some liberties with those as well.

IMG_6016.jpg


IMG_6018.jpg


I looked at some more reference and hit some of the pipes on the body with the rust wash as well. It's still wet here, and from what I understand it'll look a little different when it dries. So we'll see about that.

IMG_6019.jpg


IMG_6017.jpg


So that's where it's at for now. It's fun to see it with a bit of color on the body, rather than just light gray. Makes it look a bit used.

Thanks for looking!

SB
 
Last edited:
Okay, I got some paint in the mail, so I did some more work on the Y this afternoon, and I streamed it again, if anyone cares to watch the process. You can see that here:


I turned the audio off so I could listen to some music while I worked :D

I worked on the top of the cockpit. First I attacked it with the dremel to give it some physical damage, and then went back in and touched some of those damaged areas up with a fine brush and XF-53 neutral gray. Then out came the airbrush. I tried some XF-69 Nato Black, but it was spurting weird through my airbrush, so I dumped that and went with a highly thinned XF-1 mixture. Anyway, it looks a bit too stark and contrasty now, I think. The paint that I got is a Vallejo rust wash, which I have never used before, but I quite like it. I looked at reference photos of Gold Leader and applied some rust in the appropriate places, and then some. Also notice the decals that were added to the top of the cockpit as well as the body itself. I took some liberties with those as well.

View attachment 1438812

View attachment 1438814

I looked at some more reference and hit some of the pipes on the body with the rust wash as well. It's still wet here, and from what I understand it'll look a little different when it dries. So we'll see about that.

View attachment 1438825

View attachment 1438826

So that's where it's at for now. It's fun to see it with a bit of color on the body, rather than just light gray. Makes it look a bit used.

Thanks for looking!

SB
Looking great, and it's nice to see the video of your work, great for getting tips and improving.

I like the 'carbon scoring' on the cockpit. I don't think it looks too contrasty, but I'm sure it will also look more subtle if you're doing washes/panel lines etc on top. For the decals, did you just use ones you had lying around or are they 1/48 Y-wing specific? If so I'd love you know where you got them. I've considered trying tp print some of my own but I've never had much luck with home-made decals.
Thanks. There's nothing really special about the way I do things. And I probably do them wrong, at that! :lol:

For the decals, I actually just used a spare sheet from the Bandai 1/72 kit. That's where the TIE icon as well as the main markings came from. Don't really care/can tell if they're out of scale, because who cares? I also used some stencils from an Eduard 1/72 FW-190 for some of the markings on the cockpit. I think those came out a bit small, and I should have raided my 1/48 FW-190 for those, but I'm not going back and changing them.

SB
 

Your message may be considered spam for the following reasons:

If you wish to reply despite these issues, check the box below before replying.
Be aware that malicious compliance may result in more severe penalties.
Back
Top