Limited Run Cloud city blaster - Relby K23 - aluminium conversion kits! NOW LIVE!

Yea I did this. I dropped my scuba gun and the bottom cap half popped out. I fully removed it to find the hollow handle doesn’t lead anywhere.

I took a dremel and burrowed some notches around the inside just in case, and poured resin into the handle. I sculpted the top (bottom)? Of the resin To allow the cap to snap back in. I ran a couple wood screws through the cap into the resin for good measure, bit of a creative license there
 
Precision work eethan!! These kits are fantastic. I drilled out one of my casts and install your kit. Im very happy with it. Bravo my friend!
20221007_113016.jpg
20221007_115917.jpg
20221007_115929.jpg
 
oh man! Ryan, thank you for posting those pics, first time I see one of my kits on a slick primed speargun like yours! It's starting to look amazing!
I'm also glad to see that using your plastic V8 cone and drilling it worked :)
cheers
 
Yeah, my dad and I just cast and drilled out our v8 caps and installed everything on spear guns.. it’s freaking beautiful. Everything clicks together, I’ll say it again, the other RPF member is right, it’s going to be a shame to paint them.

The flash hider especially is huge for the community, we haven’t had anything this true to the prop ever
 
Fantastic work Eethan! Now it’s time to work on the body and track down greeblies I don’t have.
 

Attachments

  • C2076691-031D-4932-8EEF-029CB03E6A80.jpeg
    C2076691-031D-4932-8EEF-029CB03E6A80.jpeg
    3.1 MB · Views: 77
  • 9F2215A4-3AE8-493A-85EF-480F7C3F1A40.jpeg
    9F2215A4-3AE8-493A-85EF-480F7C3F1A40.jpeg
    1.3 MB · Views: 77
  • 245AF583-BC63-4839-8801-5D141D605E75.jpeg
    245AF583-BC63-4839-8801-5D141D605E75.jpeg
    2 MB · Views: 73
Hello guys,
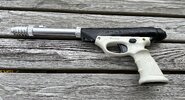
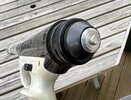
I saw that there was some discution about the trigger mechanism, so I tried my own as well to share and give you guys some options. There are countless options for this, there is room inside, there is a hook on the trigger that is very practical to use, the trigger will stop on both direction against the plastic of the pistol when re-assembled, so any good spring will give a nice feeling, what I did is pretty simple and I'm very happy with the result, it really "clicks" when you press the trigger :)

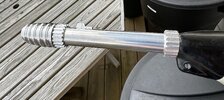
I just used a rather stiff spring that I attached to the trigger hook on one side, and I put a screw into the plastic and aluminium tube that goes inside and wrapped the other end of the spring to it :
View attachment 1621290

and a short video of it working:
What is the width/length/specs of the spring you used? Thanks!
 
What is the width/length/specs of the spring you used? Thanks!
I'll take a few measurements of it tomorrow. Basically any medium Spring that fits there and is a bit strong will work nicelly.
What is nice is that the trigger will bump against the handle when pressed and it gives a nice feel and sound.
Cheers
 
Not having much luck with mine. A lot of work and very poor results.

Nothing against Eethan. His parts are awesome. Basically perfect. Plug N play.

I am sure more talented prop builder could make this easier.

It seemed a very simple prop.

Touching the finish will ruin it so I am not sure how to ship it. On the other hand after a week of sanding, filling, repeating it still has lots of flaws so maybe the new owner can strip it and start over.

I have Ryan's amazing set of Greeblies.

I also have a cast of the calculator button from another member. Waste of time and money though. The CA lettering is so thin it disappears with paint so it's a red square you can scratch easy. Nothing against the member. It was a perfect cast.

I don't have any of the missing greeblies I posted above except I did find a set of Vintage Pan AM Coffee Stir sticks for the one Greeblie pieces.

If anyone wants it I will sell it at cost. Maybe even less. Just want it gone.

ONE TIP:

DO NOT paint the barrel on the actual Supergun. The one you will slip Eethan's parts over. Eethan is so precise that the "gear rings" things will not go one easily if its painted. I have one currently stuck in the middle of the barrel.

Trigger has a spring installed so it works.

1667069379062.jpeg


1667069403820.jpeg
 
Got mine. Amazing as always!!!!!!!!!!!!!!!!!!!!!!!

Making progress. Anyone have any idea where to get the below circled greeblies?

View attachment 1630794
I've got a swizzle stick, and the 3D printed part w/ the 4 raised circles (resin cast, got it years ago)

Where is this photo from?
I need the other 2 3D printed parts and the silver bits as well.

The green circle seems easy enough to make ;)
(maybe it's a thumbtack)
 
Window hardware? Surprising, but interesting! To me, all those round details on it make me think it's an injected plastic part.

Sorry to hear you are having a hard time with the paint jamesfett. Just to answer quickly on the parts that are so precise they might get stuck, it's not a choice on my end, i explained in my how to put together text that the barrels seem to have variations in size and that i can't predict that :) I have basically done a hole as large as i could with the materials i was using but there is always the possibility that someone will have a barrel that is slightly too large for the parts.
I Hope in your case, you can just strip your paint and slide the part :) you have done a great job so far. I haven't had the Time to even get started on the filling and painting on mine!
Cheers
 

Your message may be considered spam for the following reasons:

If you wish to reply despite these issues, check the box below before replying.
Be aware that malicious compliance may result in more severe penalties.
Back
Top