cwstandards

New Member
Hey Ladies and Gents,

I started a build for a female version of Captain Rex from Star Wars: The Clone Wars TV series. After reading so many posts on RPF I figured why not start my own thread of the build I've been working on/off for the past few months.

As a brief synopsis of what I have completed and the materials I've used so far:

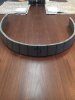
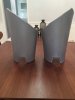
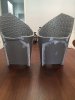
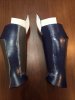
- templates - I used the Rex pepakura templates from JFCustoms - I did have to modify these a bit to fit me and to accommodate female body type, as well as reduce the amount of seams that would show
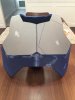
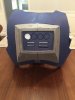
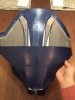
- the basis for the entire build are foam floor mats from Home Depot
- cheap snap off box cutters
- adhesives - cement glue and hot glue
- a dremel to round edges and create weathering/damage to armor
- basic white glue to cover the foam as a sealer
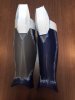
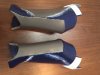
- white spray paint (many many cans)
- cobalt blue paint - I happen to have a can of paint that I used to paint a door with so I'm going to try using that for the Rex's custom paint work
- Hasbro voice changer clone trooper helmet - I'm going to attempt repainting this

I wanted this build to be as easy and as cheap as possible so some of the techniques that I used are not going to be canon accurate or good enough to make the 501st. I did however, pull the reference sheets from the 501st for Rex Phase II just so I could get it as accurate as possible given my level of skill and how cheap I am. This build is primarily for Halloween as well as my city's local Comicon.

I will be posting pictures and continuing to update this thread as often as possible.

Please feel free to provide feedback and tips/pointers you may have for me!

Thank you
 
Below are picture of some of the pieces I have made so far. All of them were made using grey/blue foam floor mats, contact cement, hot glue, and some kwik seal to fill some of the gaps. All of these pieces (except the chest piece as I have a few more things to add to it) have two coats of white glue on it to seal the foam pores.

Chest:
- Even though this is for a female version of Rex (Rule 63 :)) I didn't want to differ from the original design because I didn't want it to be overtly feminine
- I also screwed up one of the circles on the back pretty badly so I decided to not cut all the way through but to make a surface cut then heat the foam to open the cut for the rest
Rex - Chest (Front).JPGRex - Chest (Back).JPG

Abs and Cod:
- I attached these two pieces for ease of putting on the armor so hopefully this works out okay for movement
Rex - Ab and Cod (Front).JPGRex - Ab and Cod (Back).JPG

Belt:
- There are two belt boxes I've made for each side that are not attached to the belt yet
Rex - Belt.JPG

Thighs:
Rex - Thigh (Front).JPGRex - Thigh (Back).JPG

Chins:
- These took a good amount of modifying as I made them one solid piece so I needed to open the bottom quite a bit to allow my foot to go through
Rex - Chin (Front).JPGRex - Chin (Side 2).JPGRex - Chin (Side 1).JPG

Overall I like the outcome of most of this build but there are some definite things I've learnt along the way that I will incorporate into my next build. For now, this is good enough for Halloween and my local Comicon.

I have already made the shoulders, biceps, and hand pieces but I may redo them if time permits. They were the first pieces I ever made so the seams are pretty noticeable and the foam I used was different, I'm liking this type much better. I will post pics of those later on.

I'll be moving on to the painting process pretty soon so I'll post as I go along :thumbsup


Please leave comments with any helpful tips or tricks!
 

Attachments

  • IMG_0728.JPG
    IMG_0728.JPG
    49.7 KB · Views: 516
  • IMG_0719.JPG
    IMG_0719.JPG
    41 KB · Views: 481
  • IMG_0720.JPG
    IMG_0720.JPG
    40.3 KB · Views: 436
  • IMG_0721.JPG
    IMG_0721.JPG
    52.2 KB · Views: 496
  • IMG_0722.JPG
    IMG_0722.JPG
    49.6 KB · Views: 439
  • IMG_0723.JPG
    IMG_0723.JPG
    32.7 KB · Views: 438
  • IMG_0724.JPG
    IMG_0724.JPG
    42.7 KB · Views: 420
  • IMG_0725.JPG
    IMG_0725.JPG
    36 KB · Views: 394
  • IMG_0726.JPG
    IMG_0726.JPG
    44.6 KB · Views: 416
  • IMG_0727.JPG
    IMG_0727.JPG
    43.6 KB · Views: 444
As promised I am posting the pictures of the arm pieces I have made. Again, these were pretty rough builds as they were my first ones. I made them from foam floor mats like the pieces I have already posted but the mats were much thinner (approx 6mm). I am using them for this Halloween but I might still make newer, more clean ones for Forest City Comicon in a couple months.

I have painted them with flat white spray paint, two layers. I brush painted the blue paint on as I wanted it to look brushed on, it's my understanding that the clone troopers brought out some individuality by painting their armor themselves so that's what I was going for here. The blue paint I am using is from a can I used to paint a door a while back so I got lucky there, it's called Cosmic Cobalt from Home Depot, if anyone was interested. I am not done with the painting process yet as I still have a lot of weathering to complete on all the pieces.

Now for some pics ! :D

Shoulders:
Rex - Shoulders.JPG

Biceps:
Rex - Biceps.JPG

Forearms:
Rex - Forearms.JPG

Hands:
Rex - Hands.JPG

As always please feel free to leave comments for me! I'll answer any questions and always appreciate any tips!

Thank you :thumbsup
 
I am currently in the process of painting the abdomen/cod and leg pieces, I'll post pics when I'm done the base white and blue details!

For now here is an update on the Rex DC-17 gun holsters I made:

- materials - plastic clipboard paper holder from the dollar store and hot glue - approx cost $3
- blueprints - I got them from a fantastic creator that I subscribed to on YouTube named Sergio Solo, but I believe he also has an account here on RPF - all of his blueprints are in the descriptions of each video he posts

https://www.youtube.com/watch?v=Mvwen81cU-Y


- I did go a cheaper route than this guy because I couldn't find sheets of polystyrene and hot glue binds pretty well on plastic,very quickly so I didn't get the fancy modelling glue

And now here are some pics!

Rex - Holster 1.JPGRex - Holster 2.JPGRex - Holster 3.JPGRex - Holster 4.JPG


The white one was my first attempt and it came out well considering this was the time I've made something like this. The second attempt did go much better and I feel like it looks cleaner. From here I might get some putty to fill the gaps/edges and sand them down then paint.

Please let me know what you think!

Thank you
 
This looks REALY good can't wait to see the full costume
regarding the paint you are using and the foam, have you thought about flexibility in the foam and paint, I don't know how rigid the foam pieces are it would be a shame after all your hard work to see the paint flake and crack or am I overthinking this
Definatly subscribed to this

Hey!
For the arms/legs I used just white glue to seal the foam which does have some decent flexibility so the paint shouldn't chip or crack too much. For the chest piece though I have coated it in about 4 layers of plastidip as I figured this was the main piece people look at and will probably get the most wear/tear. Plastidip has good flexibility and binds the spray paint well. The reason I didn't do all the pieces in plastidip is honestly because it costs $22 a can and it basically takes a can to coat each piece.

I did do a good amount of research on the materials I was going to use and based a lot of it off of a wonderful foamsmith (he's the OG of foam work) by the name of Bill Doran. I bought his ebook from punishedprop.com for $10 and it tells you all you need to know about working with foam (sealing, painting, etc). If you're at all interested in building with foam floor mats this is definitely a must read.

Thank you so much for the subscription!
great work and great research, i now need to think what to build next keep up the good work.
 
Painting Process Update

Hi Everyone,

All of the armor pieces are now painted with their base white and the blue accents have been added! :D
This is the part that gets me pretty excited because I now feel like it's really coming along and seems real. I won't lie and say it was all smooth sailing, there were some definite headache moments in the painting process, particularly with the white spray paint

For the arm pieces I used Krylon Fusion White which worked super well and gave a smooth even coat. The crappy part is... Krylon Fusion spray paint cannot be found anywhere in my city anymore (perhaps it was discontinued in Canada? let me know), so for the rest of the build I had to use Rust-oleum semi gloss white. For whatever reason sometimes this spray went on well in a smooth coat but then other times it would be very dry and sand like, giving a powdery finish, not pleased... (anyone know why?). Also, I found that becuase the base coat is white it will show any flaws in the seams or larger pores in the foam more than a black base would, so if you're going to make a clone trooper/storm trooper out of foam floor mats definitely go slowly and ensure your cuts and seams are clean.

But overall I'm pretty pleased with the result!

Here are some progress pics:

Chest

Rex - Chest Painted (1).JPGRex - Chest Painted (2).JPG

Abs, Cod and Belt
Rex - Ab and Cod Painted.JPG Rex - Belt Painted.JPG

Thighs
Rex - Thigh Painted (2).JPGRex - Thigh Painted (1).JPG

Chins
Rex - Chin Painted (1).JPGRex - Chin Painted (2).JPG

Collar
- made from foam floor mats
- paint is an acrylic high gloss black
Rex - Collar.JPG

Belt Boxes and Detonator
- boxes made from foam floor mats
- detonator made from a pvc pipe, 2mm foam for button details, and knock out caps on the ends (found in electrical section at home depot)
Rex - Accessories.JPG


Now that I have finished this step in the build I think I am going to move forward into weathering all the armor pieces using acrylic paints!

More pics to come :thumbsup

Check out my other threads for how I made my DC-17 pistols also out of foam and a quick refinish on a Hasbro Anakin Skywalker lightsaber

As always, thank you so much and feel free to leave comments and tips!
 
Update!

So I spent a couple hours weathering all my pieces and thought I would share my progress

I used just a simple technique of brushing on heavy amounts of black and brown acrylic paints into all the creases and various parts of the armor and then used a wet rag to dab the paint away. I did not follow any pattern just put down some weathering wherever I thought there would be some as if the armor had actually gone through a bunch of battles.I also added in Captain Rex's notorious hash marks on the hands, forearms, and legs.

Here are my results:


IMG_0789.JPGIMG_0790.JPGIMG_0792.JPGIMG_0791.JPG


IMG_0793.JPGIMG_0794.JPGIMG_0795.JPGIMG_0796.JPGIMG_0797.JPG


IMG_0798.JPGIMG_0799.JPGIMG_0800.JPGIMG_0802.JPGIMG_0801.JPG


IMG_0803.JPG


Basically all the work for creating and painting is complete! :)

From here I will be getting my under suit and going through the process of adding snaps, buckles, elastic bands, possibly magnets, etc to get the suit to stay on my body! I'm currently waiting on some of those materials to arrive from Amazon so I'll post my progress when I can.

Let me know what you think and as always feel free to leave comments or tips! (especially for the under suit stuff, this is my first attempt)

Thank you
 
This thread is more than 6 years old.

Your message may be considered spam for the following reasons:

  1. This thread hasn't been active in some time. A new post in this thread might not contribute constructively to this discussion after so long.
If you wish to reply despite these issues, check the box below before replying.
Be aware that malicious compliance may result in more severe penalties.
Back
Top