Wupsje
New Member
Hi guys,
I'm new on this forum.
I have posted this in the Chappie discussion as well, but I thought I would make a new thread so I can
update and show the progress on my 1:1 scale Chappie head.
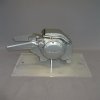
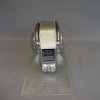
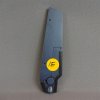
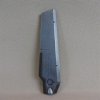
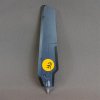
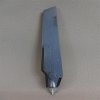
I'm currently busy with modeling his head in 3D:


This is a work in progress, so nothing is realy final yet.
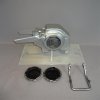
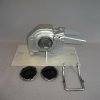
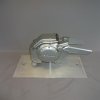
Only the top lid of his head, which I have already 3D printed and I am currently filling and sanding it.
I will show pictures here as I go along with the modeling and build process to keep you guys updated.
If you have any suggestions or comments I would like to hear them so I can get my build as accurate as possible,
because I might miss something.
If you have any questions do not hesitate to ask me.
Grtz,
I'm new on this forum.
I have posted this in the Chappie discussion as well, but I thought I would make a new thread so I can
update and show the progress on my 1:1 scale Chappie head.
I'm currently busy with modeling his head in 3D:
This is a work in progress, so nothing is realy final yet.
Only the top lid of his head, which I have already 3D printed and I am currently filling and sanding it.
I will show pictures here as I go along with the modeling and build process to keep you guys updated.
If you have any suggestions or comments I would like to hear them so I can get my build as accurate as possible,
because I might miss something.
If you have any questions do not hesitate to ask me.
Grtz,
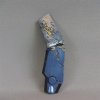
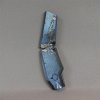
") It's hard to find good pics of the head without the 'eyebrow bar.'
It's hard to find good pics of the head without the 'eyebrow bar.'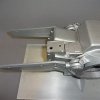
![2015-06-19 17_05_52-Solid Edge ST5 - Assembly - [Chappie V02.asm].jpg](https://therpf-f28a.kxcdn.com/forums/data/attachments/225/225883-56d433a28306111e5c7228f162a3b10d.jpg "2015-06-19 17_05_52-Solid Edge ST5 - Assembly - [Chappie V02.asm].jpg")

![2015-06-21 17_17_42-Solid Edge ST5 - Assembly - [Chappie V02.asm].jpg](https://therpf-f28a.kxcdn.com/forums/data/attachments/226/226418-58546f6e581b05cf9a7a8b2b5280de9a.jpg "2015-06-21 17_17_42-Solid Edge ST5 - Assembly - [Chappie V02.asm].jpg")

![2015-06-28 14_11_11-Solid Edge ST5 - Assembly - [Chappie V02.asm].jpg](https://therpf-f28a.kxcdn.com/forums/data/attachments/228/228085-5002ece498f390dd0edd4056518d0524.jpg "2015-06-28 14_11_11-Solid Edge ST5 - Assembly - [Chappie V02.asm].jpg")
.jpg")
