You are using an out of date browser. It may not display this or other websites correctly.
You should upgrade or use an alternative browser.
You should upgrade or use an alternative browser.
Captain America's helmet -> speed-peping foam file.
- Thread starter JFcustom
- Start date
JesterPoet
New Member
Easy question : look at the templates, they fill six paper sheets. Unless you rearrange them to save space, you'll need the same surface of foam.
Oh my gosh... that's so obvious. I feel super dumb now.
Thank you for answering!

SpiderMang
New Member


")
ravenssoul
New Member
Hi. Hope you don't mind me asking but what materials/process did you use after the foam stage to get such a smooth finish? It looks amazing!
If you're referring to JFCustom's first post, it appears to be raw foam, nothing done to it.Hi. Hope you don't mind me asking but what materials/process did you use after the foam stage to get such a smooth finish? It looks amazing!
If you are talking about Spidermang's post, as he say IN THE POST he didn't use foam, he used cardstock and bondo.
-Nick
SpiderMang
New Member
I used card stock then coated the whole thing with bondo fiberglass resin to get it hard "at this step you can heat it up with a blow dryer and bend it to it make it contour your head better". Then i used more fiberglass bondo and fiberglass mesh squares to line the inside to reinforce it "only do the inside, do not fiberglass mesh the outside". Then slowly coated it with about an 1/8 inch of regular bondo at at a time to the point where i had about 3/8" of bondo on it. then you sand it evenly and carefully for an hour or so depending on how well you put the bondo on. I'll have more pics of the A/Wing painting and leather work up soon.Hi. Hope you don't mind me asking but what materials/process did you use after the foam stage to get such a smooth finish? It looks amazing!
Let me also add that this took 3 trys. I ended up printing this scaled to 108% to fit better to be used with card stock and bondo layers.
Last edited:
Zlosk
New Member
I built this out of card stock at 100% to check the fit before shifting to foam, and it is too large for me. Passing it around to various friends, I found that it fit people with head circumferences around 23-3/4 (about 60 cm, or basically a hat size of 7-1/2). My head circumference is 22-3/8, and I've bought 1/8 (3 mm) thick foam, so I'll be trying again tonight, with a scale factor of 95% [ (22-3/8 + (2 x 1/8)) / 23-3/4 ].
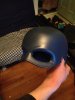
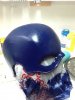
I too have just started foam fabrication, and this was my first attempt. One thing I found is that the helmet was a little tight. I then realized since I have a very average head size that something must be off. It dawned on me that I traced the pattern on the exterior of the 1/2" foam mat, thus subtracting 1" of space inside. I did a lot of grinding to get it to fit, but it's good now. As far as finishing it, I filled all the gaps with paintable caulk, then uses a makeup sponge to apply a light coat of caulk to the entire helmet and primed it while it was curing. It had dried to the touch but not fully cured. I let the primer dry overnight, the started with a pretty thick Layer of spray paint to really cover the grain. The next day I color sanded it with a foam sanding block (180 grit) the started doing 2 thin coats, followed by color sanding, and the repeated. It has a really awesome plastic feel to it, and is pretty durable. Lots of flex with no cracking. One more note I used rust oleum 2x safe for plastic paint. It is not quite finished, but here is a picture of what it looks like so far.
Attachments
SolSheppard
New Member
Looks like a good way to make a Constrictor mask too!
Wayne Bakken
Well-Known Member
Has anyone scaled this down for child size? and if so how far did you scale it? My 7 year old wants to be cap for Halloween and i figure getting everything figured out ahead is the best way to have it turn out well.
This is going to be my first attempt at working with foam. I've got the pattern printed out and joined and am ready to start transferring this to the foam etc.
However, I have noticed that there are dashed lines along the edge of the dome piece. Looking at the 3D pep file I note a ridge that runs all the way along both sides of the dome - which makes sense given the dashed lines along both sides. But looking at all the completed helms in this link, none of them have the ridge.
I'm just wondering if I should ignore the dashed lines and join them edge to edge, or attempt to create the ridge using the lines and bending it outwards from the edge of the dome? The pics of the actual costume seem to have a ridge running the length of the helmet but it's hard to tell in some pics whether it is a groove or raised.
TheFrankTurk
Active Member
I agree with all the kudos here. I have a question.
How do I take the .pdo file and print the unfolded version out on larger sheets -- like 11x14?
How do I take the .pdo file and print the unfolded version out on larger sheets -- like 11x14?
Lord Magneto
Sr Member
I agree with all the kudos here. I have a question.
How do I take the .pdo file and print the unfolded version out on larger sheets -- like 11x14?
open the file in pepakura designer... you should be able to change the paper size there then rearrange the pieces to fit the paper
Similar threads
- Replies
- 19
- Views
- 33,761
- Replies
- 11
- Views
- 8,196
- Replies
- 2
- Views
- 4,379