Tripper
Sr Member
So one of my earliest Trek memories is seeing the boomerang phaser in Chakotay's hand when he's handing it over to Seska in an early episode of Voyager. Ever since then the boomerang has always been my favorite, and really represents the genesis of my interest in prop replicas. It technically also represents the beginning of my journey into filmmaking, so when I had the chance to pick up a screen used boomerang about a decade ago I jumped on it instantly.
About a year ago I found a casting online that featured the same contours as the real thing. It appeared to have some lineage to a real casting since it also had the same hollowed out trigger button area to allow for a depressible trigger once built. Unfortunately, it's definitely 2 or 3 generations removed from the original, the whole thing is lighter in weight and has a slightly sunken-in quality. Beyond that the casting itself was full of micro bubble patches that took many passes to successfully take care of. I basically had to bore into the surface to completely remove the bubbles and leave a large enough cavity for the filler putty to adhere. I used alternating coats of grey and red filler primer to detect every imperfection I could. Since the originals also featured 1/16 inch thick styrene plant-ons I ground off the cast-in versions. I used some tougher 2-part epoxy to fill in the body's sunken surface around the head as best as I could, but I could only go so far. Speaking of plant-ons, the original power meter is also a separate piece, and it turns out the same tile styrene is used for the plates and buttons as well. When you look along the edges of the screen used prop, you can see the tile groove lines, so I made sure to replicate that detail as well.
When it comes to paint, I've tried at least 10 different colors. I've long ago gone through the last of my original 7173, as well as my old cans of Silversand and Med Marblehead. So over the last year since I started this project I've been trying to formulate and reformulate the perfect color. And, well, I still haven't nailed it. I tried the various custom paint codes I've found here and nothing was quite right compared to the original prop. Ultimately what yielded the closest match was to take the original down to an auto paint shop and have them scan the color. They found a color the system thought was close enough, and after a couple tries eventually landed on a version that had a bit of black mixed in to darken the color. The final result is STILL slightly lighter than the real thing, and it definitely requires a semi-flat black base coat, but it's the closest I've been able to create, and considering the whole thing is already somewhat smaller than the original, I'm not going to sweat it.
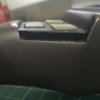
For anyone who is interested in the code for the paint, I've included a shot of the can's label below. The J86 +.5 is the additional black mixed in. I've also attached scans of the original boomerang for plant-on shape reference. On the original, the settings buttons are .38 inches tall x .41 inches wide. The trigger is .32 inches wide x .75 inches tall. I calculated the average difference of a handful of measurements between the casting and the original and determined my casting had about 2.6% shrinkage. I made sure to adjust my plant-ons accordingly. Underneath the trigger is a piece of dense, dark grey foam to match the same feel.
On the bottom of the emitter, the original features a blue piece of prism-tape with star patterns, which I was told meant it was built for the last couple seasons of DS9 and VOY. For my version, I just went with whatever I could find since each of the real props would have had something different anyways. The original emitter is attached to the main body with a Phillips head screw down the barrel. I found a similar screw and replicated this detail as well. Usually I enjoy replicating the actual props the actors held as opposed to the item the characters used, but in this case, I couldn't help but give the grip a nice plastidip coating.
Paints used:
Krylon Gloss Black for the emitter
Custom color for the body with a semi-flat black base coat and Krylon Satin clear coat
Tamiya Park Green for the power meter
Krylon Almond Gloss for the settings buttons
Krylon Dull Aluminum for the trigger
Krylon Semi-flat Black for the thumb pad w/ Krylon Matte clear coat
Black Plasti-dip for the grip with a semi-flat black base coat
This has probably been my favorite build I've ever done. Being able to reference the original while building it was absolutely a childhood dream come true. With all that said, here's a video comparing the two, as well as some photos. Let me know what you all think! Thanks for looking!
YouTube Link:
Original vs. Casting:


Scanning the Paint:


Plant-on Scans:


Half-way Through Filling the Bubbles:


The Finished Piece:


About a year ago I found a casting online that featured the same contours as the real thing. It appeared to have some lineage to a real casting since it also had the same hollowed out trigger button area to allow for a depressible trigger once built. Unfortunately, it's definitely 2 or 3 generations removed from the original, the whole thing is lighter in weight and has a slightly sunken-in quality. Beyond that the casting itself was full of micro bubble patches that took many passes to successfully take care of. I basically had to bore into the surface to completely remove the bubbles and leave a large enough cavity for the filler putty to adhere. I used alternating coats of grey and red filler primer to detect every imperfection I could. Since the originals also featured 1/16 inch thick styrene plant-ons I ground off the cast-in versions. I used some tougher 2-part epoxy to fill in the body's sunken surface around the head as best as I could, but I could only go so far. Speaking of plant-ons, the original power meter is also a separate piece, and it turns out the same tile styrene is used for the plates and buttons as well. When you look along the edges of the screen used prop, you can see the tile groove lines, so I made sure to replicate that detail as well.
When it comes to paint, I've tried at least 10 different colors. I've long ago gone through the last of my original 7173, as well as my old cans of Silversand and Med Marblehead. So over the last year since I started this project I've been trying to formulate and reformulate the perfect color. And, well, I still haven't nailed it. I tried the various custom paint codes I've found here and nothing was quite right compared to the original prop. Ultimately what yielded the closest match was to take the original down to an auto paint shop and have them scan the color. They found a color the system thought was close enough, and after a couple tries eventually landed on a version that had a bit of black mixed in to darken the color. The final result is STILL slightly lighter than the real thing, and it definitely requires a semi-flat black base coat, but it's the closest I've been able to create, and considering the whole thing is already somewhat smaller than the original, I'm not going to sweat it.
For anyone who is interested in the code for the paint, I've included a shot of the can's label below. The J86 +.5 is the additional black mixed in. I've also attached scans of the original boomerang for plant-on shape reference. On the original, the settings buttons are .38 inches tall x .41 inches wide. The trigger is .32 inches wide x .75 inches tall. I calculated the average difference of a handful of measurements between the casting and the original and determined my casting had about 2.6% shrinkage. I made sure to adjust my plant-ons accordingly. Underneath the trigger is a piece of dense, dark grey foam to match the same feel.
On the bottom of the emitter, the original features a blue piece of prism-tape with star patterns, which I was told meant it was built for the last couple seasons of DS9 and VOY. For my version, I just went with whatever I could find since each of the real props would have had something different anyways. The original emitter is attached to the main body with a Phillips head screw down the barrel. I found a similar screw and replicated this detail as well. Usually I enjoy replicating the actual props the actors held as opposed to the item the characters used, but in this case, I couldn't help but give the grip a nice plastidip coating.
Paints used:
Krylon Gloss Black for the emitter
Custom color for the body with a semi-flat black base coat and Krylon Satin clear coat
Tamiya Park Green for the power meter
Krylon Almond Gloss for the settings buttons
Krylon Dull Aluminum for the trigger
Krylon Semi-flat Black for the thumb pad w/ Krylon Matte clear coat
Black Plasti-dip for the grip with a semi-flat black base coat
This has probably been my favorite build I've ever done. Being able to reference the original while building it was absolutely a childhood dream come true. With all that said, here's a video comparing the two, as well as some photos. Let me know what you all think! Thanks for looking!
YouTube Link:
Original vs. Casting:
Scanning the Paint:
Plant-on Scans:
Half-way Through Filling the Bubbles:
The Finished Piece:
Last edited: