Building The ANH 5'Millennium Falcon

OK, I have a question... and there is no such thing as a stupid question , so ya'll behave! Is there a definitive list of all known kits needed to build this thing, or do you have to source it from different places? If there is a list, I would like a copy, cause I have wanted a studio scale facon since about 1979. I am 36, now, so if I start collecting donor kits NOW I might have them all in time to turn the Falcon into a retirement project. I had no idea it take about 10K to get all the kits and materials, or I would have started to collect them a long time ago. I just thought, " OK, I got about 500 bucks saved up, now I buy the kits I need and get started." Woe-is-me... :cry
 
Sorry, too many variables. The only true measurements we have are the kit parts themselves. Besides, the work is already being done and I'm confident it is accurate to the millimeter. ;)

Who wants a CNC'd hull? A sample:
A CNC d hull? What would the cost be on that?
Also try to remember that much of the ship is not really
even imho.I found that out when building some of the larger sections.
This is an early pic of the unfinished deck(still had lots to do like change and refine exhaust housings,used the size for greeblie placement) but getting it right was driving me nuts till I finally realized it wasnt exactly even.

100_1185-1.jpg
 
There is a 5 ft falcon ID thread here. It has all the kits and partmaps you need.

Thanks! I'll make a copy of it so I can have a wish list... I'll probably carry it around with me in case I run across one. From what I have seen, it's never too early to start collecting.
 
A CNC d hull? What would the cost be on that?

It ain't gonna be cheap. I'm basically duplicating the form seen in the early workshop photos. The armature plan has four mount points and the openings for the docking ring diamond caps. There will be revisions depending on if I feel it will forward-heavy. I have a good reference on a woodworker for the main cylinder but I'm also looking into plastic to keep the weight down.

And all of this is dependent on my final dimensions. I'm about 2/3 of the way finalized from docking ring to docking ring across the tip of the mandibles.

Sorry, Stu. Carry on!

Craig
 
That is awesome! I had no idea that they used so many different kits to build it. That thread didn't seem to specify how many of each kit would be needed. I read in another thread that some kits need duplicates because the same piece is used multiple times... I guess I could just buy one of each and just resin-cast the extras?
 
Wayne, it looks like you built your engine deck on a flat surface. How are you accounting for the curvature of the hull? And I agree, nothing on this ship is even or symmetrical.

Craig
 
Its not flat,its layered flexboard.The engine deck is not as curved as the rest of the hull (due in most part to its thickness).Luckily I was able to screw it on without any pieces flying off lol.Ill readily admit I think I got lucky!Just had to test it slow lol. Also it kept it pretty light and the screws allowed me to keep it pretty accurate since the real one has tiny ones which are also visable:)
 
Last edited:
That was lucky Wayne with the flexboard. Tell me, what is the board comprised of that you used as our various countries give these products different names.
If i can go the blowmolding route for the hulls, which im really hanging out for, then i will have a another spare top hull made so i can have the entire engine deck as a separate piece, seen in the pic with Gawley holding this section. It would have no practical use of course other than just a cool feature.
Stu
 
Hmm....thats a good question Stu.Ill have to ask the guy at the
plastics place what its really called.I have a plastics manufacturer
located not too far from me,kinda like a mom and pop place.I go there
to get some supplies and cuts sometimes and the owner likes me.
He gives me free run of the place and I just pay him for the use of the
machines,tools and supplies.I was scrounging aroung the storeroom
one day and found these large sheets of what I can only describe as
flexboard.Very strong and pretty thick,light weight and smooth sheets
which feel like styrene on the top.They are very flexable and were pretty easy to cut.
 
Thats great mate, very handy having a plastics place near you for these big projects.
Iv'e the similar situation here, having the run of a plastics supplier, even getting free stuff fom the scrap bins!. More often i get want i need out of these bins, although sometimes i have to make a purchase:lol
 
Right, here we go again guys!.

After quite a time of painful study of the cockpit & the fit of donor parts & orientation of the drilled holes & also the correct placement of the Panther strips, it is finally done, the schematic anyhoo!.
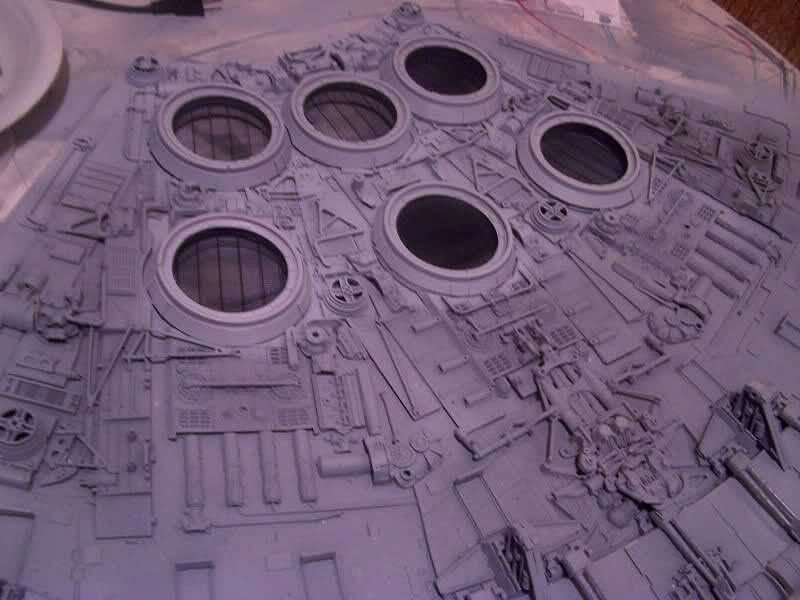
The tube size is definately 5 3/4", 6" & my original idea of 5 1/2" just don't work at all.
Also, the 9 holes were not drilled evenly spaced by ILM as is very evident when lining up the donors & especially the Panther strips to get the correct orientation. I know, I cut a tube, drilled the 9 holes, evenly spaced & yep, no go.:unsure
The drawing I have added here is 99% accurate, I'm that confident chaps. I can't fault it with all donors fitting as they should.

Regarding the Bandai Panther strips, you will need 2 fenders & 1 side-skirt. If you build it using solely kit parts as donors, no casts, then 2 kits required.

One interesting observation with the Panther side-skirt strips which end at the bottom of the cockpit, is that they taper in somewhat, from about 21mm in to 17.75mm which is very clear when you line up the Bandai King Tiger part.

I even counted the louvres between the holes as Wayne suggested to get the spacings for the holes, this did help too. Spacings ranged from 16 to 19 louvres, so quite some difference there!.

I'm going to try & get the new tube cut this week & the cone vac-formed as well. Made the buck to do the cone ages ago, but needed to be sure first on tube size.

Oh, the measures for the tube are:

Tube diameter = 5 3/4"
Side = 172.5mm
Top/Bottom = 132mm
Short Side = 93.75mm

I can email the schematic to anyone if the quality hasn't turned out here ok!.
 
Last edited:
Ok.....So i'm getting kinda drawn back in to building one of these again. After talking with Craig the other day and now you posting this......i dunno.....so many models......

nice schematic Stu.
 
Ok.....So i'm getting kinda drawn back in to building one of these again. After talking with Craig the other day and now you posting this......i dunno.....so many models......

nice schematic Stu.

I know what you mean. :) I have over a dozen want-to's on my list of things to build, but I can only afford to do one at a time! HA!!! It drives me nuts.
 
Your blueprints wil be alot tidier than mine Rod, these were drwan on a mere piece of card, I'm sooo old school:lol
At least the headache work for this is done, onto building it.

When this sections done, hopefully castings can be taken of the tube & cone with all the greeblies & offered to any other Falcon nutters!.

As a note, I noticed in the drawing that Iv'e put the fender rivets outside the drawing, should have been on the fenders themselves. Just bring them across I guess.

Also, regarding the 9 1/2" holes, I would guess they were drilled to aid in the release of heat generated from the motor/s in the tube that were used originally to turn the cockpit giroscopically (is that a word?). would also take away the heat from the bulbs too I guess?.

I did a quick stocktake of my kit stash last week, just to give me a shock. With the arrival of more kits my total is just over $10,000 NZD at around 70% of the donors required, ouch.:rolleyes
I knew she wouldn't be cheap, but there you go, gives folks an incling of cost.

Stu
 
Yeah, probably best not to know expenditure. In the end it doesn't matter really, having a kick#@:$ 5' Falcon in your display room is a boyhood dream come true.

Simon, you know you want in again, it is your destiny.:lol
 

Your message may be considered spam for the following reasons:

If you wish to reply despite these issues, check the box below before replying.
Be aware that malicious compliance may result in more severe penalties.
Back
Top