Build Thread- BladeRunner Spinner w/Lights

Robiwon

Master Member
Gone but not forgotten.
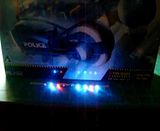
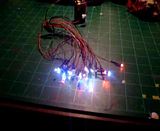
I just finished a lighting kit for a ST Voyager for a friend, I have a few commissions going on as well. I am going to try and squeeze this in and have it done in a few months hopefully. Of course, I am going for full lights on mine. The car is just too nice not to have lit up and twinkling! For this build I will be using some 30 LEDs (possibly more). Most will be for the light bar, wheel pod lights, underside and then the interior. For the most part I will be using 1.8mm flashing LEDs from Evans Designs. They are pre-wired and ready to go. While I could have done it cheaper by doing all the soldering myself, I just did not want to with this many small LEDs.

This will probably be my lone 2013 Wonderfest entry.

Here is a short video of some of the LEDs for the roof lights. I have another order of lights on the way.

Stay tuned, more to come...

 
Started with moddifying the light boxes on the bottom.

Stock on the left, modified on the right.


Both opened up.


Testing modified roof bubble with LED. Short video.

 
I love this vehicle! Do you reproduce one scene of the movie as a diorama?
I'm very curious about your next post. :thumbsup
 
It will be a diorama. I have a few ideas but need to hash out a few things first.
 
Oh, this looks great! I have that kit with the extra etched bits in a box, waiting for it's turn. Looking forward to seeing more of this for inspiration.
 
Been working on making the doors operable. I seperated the door glass from the window glass. Next is removing the inner door from the enterior tub. Lots of careful scribing with my pinvise and needle.Picks are clickable.


And we have seperated door glass!


Set back in place to check the fit. Looks good.
 
Thanks. Here is a short video of some of the 1.8mm and SMT LEDs.

 
I don't know if you have anymore canopy/glass cutting ahead of you, but if you do, I'd recommend the JLC razor saw JLC Universal Tools

I build quite a few model aircraft that come with single piece canopies, and the fine-tooth side of the saw, cuts through them like a hot knife through butter, without doing any damage.

Just thought I'd throw that out there, because I know how laborious the scribing method can be :cool

-Fred
 
Thanks for the link Gigatron. I've seen those saws before but do not have one. No more glass cutting but still plenty to do on the body and enterior shell. Scribing that will be difficult. I was thinking about a set of photoetched saws. There are going to be several small right angle cuts that are next to each other that I'm trying to figure out the best way to attack.
 
I have a scribing set that goes in a pinvise, but for the life of me, I can't remember who made it. It's 3, T-shaped tools (in different widths, for different size panel lines), that, when dragged along a panel line, not only scribed the line, but removes all of the chaff, so there's no sanding afterwards. I could have sworn I got it at UMM-USA, but I don't see it there.

I would suggest using masking tape as a guide, and the back of a #11 blade, if the lines are really that close together. I'm trying to get some Dymo tape, but keep getting outbid. My flex-rule, isn't nearly flexible enough, for some of the compund curves, I've been doing.

-Fred
 
I have several rolls of Dymo tape in the hutch in the kitchen. Let me find them and if you want a roll I'll send you one. Stand by and I'll be back in a minute.

Edit- I have one full roll of black Dymo tape. If you want it PM me your address and I'll mail it to you Monday.

 
Last edited:
I have both doors cut from the expensive body as well as the interior panels removed. I painted the recessed door panel to darken it. This way I could see the line better from the underside. I took my Dremel with a small cutting ball and ground away the plastic along the bottom of the panel line. This thinned the plastic enough so I could finish the cut with a few passes of my Xacto blade.


The door was then fee of the body! A few swipes with Mr. Sanding Stick and the edges were nice and clean.


Here the outer door panel is taped in place. An extender was added to the back side of the door panel to extend it. This makes the door look more substantial. A little photo etched detail to add interest was added.


Both doors tapped up and checking for fit. And one with the window glass set in place for insperation. Looking good!


I'll work on building the actual hinges tomorrow. Enjoy.
 
Doors are hinged! I started with some small diameter aluminum tubing and some paperclips. The paperclip fit the tubing perfectly with no slop. Sorry, but I dont know the diameter of the tubing, it was in my spares box. I cut off two small sections of tubing. I then cut the large loop off the paperclip and trimmed it to length. As usual, pics are clicky!


Assembled and tacked in place. Some minot trimming to make sure the doors cleared the body.


Some JB Weld globbed on for extra security. The doors now open and close nicely. First major hurdle on this build accomplished.

 
I got the door stops added. Steel strips were added. I need to go grab some neod... neodyin.... som Rare Earth Magnets.;).


This is the full range for the door.

 
Time for an update. The doors are complete. Magnets were added to hold the doors in the open position. System works really well.


Doors staying open on thier own!


Short video of the doors.


Added door pull handles on both sides along with some door pad detail.


I also modded the insturment cluster shroud. I cut the recessed areas out and replaced with clear plastic slices. Sandwiched all back together. This area will be lit from underneath with a yellow LED.


The solid plastic stand offs for the roof bubble lights were replaced with aluminum tube to run the wires thru.


This will be the brains of all the blinking LEDs. I decided to go with all SMT LEDs as the 1.8mm themselves were even to big for some of the lights. It fits in the back end and will be hidden by the new rear bulkhead.


That's about it for now.
 
Back
Top