Bruce Hansing Queen face repair and modification

Palantirion

Active Member
Time for round two...
after finishing the repair and painting of my ADI queen crown: ADI AvP Queen test casting, repair and modification
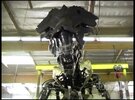
...it is now time to see about a face.

This was not part of the original plan! I bought the crown as a standalone piece, and I'm totally content to allow it to be so. However this Hansing head, verified by him via Instagram, pretty much fell into my lap and I couldn't pass it up.

Which is not to say that I knew what to do with it! Of course it stands to reason that one might combine it with a crown and make a more full head display out of the two. But there are a few reasons why I might not want to do that: 1) They were produced by different companies, and I want to ensure that proper respect is paid to each, 2) They are from different movies and while similar are not the same creature, 3) They [should not be] the same size so as to fit together - the Aliens queen was much smaller than the AvP queen.

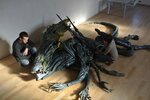
That being said, from my early test fitting (prior to beginning work on the crown) I was surprised that they looked pretty good together. The Hansing face has a sort of wall plaque behind it, and that hindered test fitment to a degree.
22,11-09, mystery head (1).jpg


And yes, I know it is missing teeth. The seller did not know (for certain) its pedigree and it sounded like maybe he was the third owner. It had seen better days. And also it seems that the teeth were originally fixed in place with hot glue! Which isn't very good at holding smooth hard things together, so it's no surprise that some teeth fell out. I have all of them, and they will all go back on no problem...but my intent is to strip off all the hot glue and re-sculpt the gum details around them using epoxy putty.

But back to the now...I took a saw to the plaque.
22,12-16 (27)cutting off backing plate edges.jpg


And now the test fit is a lot more accurate. Although the depth of the jaw will necessitate pushing the lower part of the crown about 12" off the wall. I have some ideas on how to do that, but it would be important to double-check the security of the hanging wire.
22,12-16 (28)test fit.jpg

22,12-16 (31)test fit.jpg


If they hang together then I would paint the face to match ADI's paint on the crown. If they don't hang together another option would be to simply repaint the face like Aliens and hang it separately, maybe over by the tail. Or perhaps below the crown but facing forward. I'm open to ideas.

In the mean time there is work to be done. LOTS of sanding, to smooth out the cuts from the backing plate and to remove some errant hot glue tendrils that were used as minor details from the plate to the face.
22,12-16 (37)sanding.jpg


Then epoxy putty to fill gaps and seal the raw edges of the MDF (of LDF?).
22,12-16 (42)putty to smooth edge.jpg


Then lots more sanding!
22,12-17 (1)sanding putty.jpg


Then I signed it, WAY prematurely. Traditionally I would never sign before completion. But it forces my hand to finish the job, and also I wanted to document that it was Bruce's work, revised by me, so there would be no confusion in the future. And I wanted to leave the original MDF visually exposed where it won't be seen because I like seeing the original materials when possible. I then sealed it with some Liquitex Gloss Medium (NOT High Gloss Varnish) because the medium will make it impenetrable to moisture but will allow gases to pass. This will ensure that there is no future buckling of that board from dissimilar moisture levels and also no bubbling if the interior fiberglass continues to offgas.
22,12-17 (2)signing.jpg


Then even MORE sanding. After finishing the ADI crown I wanted to have the face's finish quality closer to ADI's. And while a certain "hand of the creator" wabisabi is desirable, there were defects that needed to be ironed out. And the existing paint was of questionable integrity after so many years, so I wanted a good tooth for the primer to bite on.
22,12-17 (3)sanding.jpg


The teeth will be addressed after I am satisfied with the priming and sanding. There is some unfortunate slime goop in the mouth and on some teeth which seems to be an epoxy. I won't be able to get rid of it, and it's clear(ish) so I need to make sure I don't accidentally spray it or the teeth. So here is a pic where it sort of looks like it's wearing a retainer.
22,12-17 (7)masked.jpg


Some pics after priming.
22,12-17 (20)priming.jpg

22,12-17 (21)priming.jpg

22,12-17 (22)priming.jpg


After priming I noticed a lot more, smaller, defects. This led to a lot of time spent with various files and nippers cutting and shaving away unwanted distractions. As example, this recess between lip bulges, before:
22,12-19, filing defects (1).jpg

And after:
22,12-19, filing defects (2).jpg


That was just the first little area I attacked, quite a few hours of nitpicking followed. Here is a pic of the side of the jaw.
22,12-19, filing defects (4).jpg


Much more to come...

And to reiterate: I am open to ideas about display options with or without proximity to the crown.
 
Last edited:
I have more progress pics to process, from just before xmas. This time of year is hell for getting things done - too many distractions. In the next few days I hope to have time to test moving the lower portion of the crown out from the wall and fitting the face (face or head, which is more correct?) below it. Then we'll all have a better idea of just how it might look if they were hung together.

Oh, and a wide shot of the crown in place, for those that didn't wade through the other thread. (and my poor half-naked gun wall, I need to get stuff back up!)
22,12-20 (35)hung.jpg
 
The holidays are behind, almost ready to get back to work on the head. Just before xmas I was able to find the time to apply what I hope to be my last round of epoxy putty. Soon I'll be able to sand it down, do a quick primer and see what areas need a little more touching up before paint. As a reminder: I am not trying to get to "perfect". I still want organic imperfections, I just don't want distractions. Or at least that's how I'm framing it in my mind as I'm choosing what to modify.

From the front all that was needed was a little in the chin creases and a lot under the crown lip. That internal area was pretty much unfinished, and a few spots were knobby enough that even painted black the highlights would be distracting. So I'm smoothing over the area and will make any residual distractions disappear with paint.
22,12-22, more epoxy putty (3).jpg


Lots of filling on the left side, mostly in the deeper recesses.
22,12-22, more epoxy putty (4).jpg


Right side not as much to do, but a few significantly deep holes.
22,12-22, more epoxy putty (5).jpg


Surprisingly more to do on the underside, as the sculpt was considerably uneven in where some tendon met bone. So I built up a few areas so I can even it out a little with sanding. It will still be asymmetrical but it will be more balanced. And it will also be completely invisible because it will probably be against a wall. But whatever. Might as well do it all right, not just part of it.
22,12-22, more epoxy putty (6).jpg
 
On to the $64,000 question...shall it be hung with the ADI crown or separately?

To help answer this question I got myself a helper to hold the head roughly in place (the leading edge of the head's crown nestles under the leading edge of the ADI crown). I have mixed feelings.

From the side it looks like it belongs there. The angle is not quite right, but I don't want to set the crown off the wall any farther, so let's assume for now this is their relationship.
23,01-02,test fitting head to crown (2).jpg


From 3/4 angles it looks great.
23,01-02,test fitting head to crown (5).jpg


But from straight ahead it looks to me like the head is too narrow. There is a large gap between it and the cheek spikes on the crown. So from this angle I think it looks too small.
23,01-02,test fitting head to crown (4).jpg


HOWEVER...life isn't that simple, of course. I went back and looked at Aliens, Alien 4., AvP, and some of ADI's behind the scenes videos. And herein lies the problem with referencing off film. There is the rigid full size crown, but also (and I presume more actively used on screen) a life size crown that has flexible cheeks and front so that these will bend when the head hits them while moving. But wait, there's more...then there is also the 1/4 scale maquette, and on AvP a CG-enhanced queen. And worst of all (this is a compliment) it's very hard to tell which is which without behind the scenes footage to confirm.

So, in short, I think that my rigid crown and the head are probably a reasonable match of size and sculpt. But they will look odd together from the front because my crown's cheeks don't droop closer to the head.

As reference I submit for head/crown comparison, screenshots of...
Alien 4 full size animatronic.
ALIEN 4 Queen Building the Queen ALIEN RESURRECTION.mp4_20230103_133238.946.jpg


Aliens, what I believe to be the full size queen puppet.
aliens queen.jpg


AvP's full size queen, albeit unfinished. Possibly rigid crown here?
AVP Creating The Queen.mp4_20230103_131404.297.jpg


And flexible one here for sure, it moves in the video.
AVP Creating The Queen.mp4_20230103_131959.881.jpg


And a shot of the queen on-screen in AvP. But no idea how much post production may have changed her in this shot.
Alien vs. Predator, 2004, unrated, 720p264.mp4_20221204_105757.920.jpg
 
it does so much more right than wrong.. just build a mount so it's not permanently attached. That way if you come up with a better idea later you just pop it out.
 
it does so much more right than wrong.. just build a mount so it's not permanently attached. That way if you come up with a better idea later you just pop it out.
-That would be the plan, for sure. The pegboard should make attaching fairly easy, will just need to bend a rod the right way to hold it in the right location and attitude. Prior to that I was thinking of cutting PVC tube to slide over the long metal (smooth ball tip) pegboard "hooks" that will give me a quick option to fine tune the crown's distance from the wall. I could cut them into various lengths and stack them (like the world's least accurate setup blocks). Might be that I could get a slightly more natural angle with the head with a little more space.
 
Yep, that crown is not complete enough to put the head in there. Maybe in the future, you'll find a way to fill those moveable side gaps with some kind of medium that'll make the head + crown complete. For now, I would put it beside the crown.;)
 
Yep, that crown is not complete enough to put the head in there. Maybe in the future, you'll find a way to fill those moveable side gaps with some kind of medium that'll make the head + crown complete. For now, I would put it beside the crown.;)
- I don't think filling the gaps would be an answer. The issue is that my crown is rigid but the animatronic crowns used a flexible front. The only way to change that would be to cut off the front and replace it with a different sculpt - which obviously I would not do. Or am I missing a different solution?
 
I guess ADI will have to settle this... see if you can get them to respond to you again.
-Yeah, it got me thinking...why is there a rigid fiberglass crown anyway? Certainly the bottom casting, and the rear of the upper would need to be rigid, but if all of the on-screen 1:1 scale is going to be with a flexible front then why does my fiberglass one exist? Could it be that it was pulled specifically to become a test panel? But if so, then what did they make the animatronic ones out of? Seems like it would have been a dual material hybrid. And wouldn't that use multiple molds? More questions than answers.

Hmm, or...they sculpted over the Aliens crown, pulled molds from that (which we know). Then cast a fiberglass crown, cut it, and made new molds to allow the front to be cast separately out of rubber and spliced into a fiberglass back. That was used for production, then much later my crown was cast from the original top mold. Just thinking out loud.
 
Or, sometimes the answer is hiding in plain sight! Screenshots from the ADI vid, showing the separate front clip (to borrow auto parlance), and how it was blended prior to paint.
AVP Creating The Queen.mp4_20230104_195249.418.jpg

AVP Creating The Queen.mp4_20230104_195300.853.jpg


A pic showing what must be a rigid fiberglass crown. Presumably earlier in the queen's design. Spacing looks just like my head and crown.
AVP Creating The Queen.mp4_20230103_131404.297.jpg


And later pics of the flexible crown showing the cheek getting bent by the head and bouncing back.
AVP Creating The Queen.mp4_20230104_195536.448.jpg

AVP Creating The Queen.mp4_20230104_195538.273.jpg


Also notice how the flexible crown has long cutouts between the lower cheek parts and the center. On [my] rigid crown those areas are attached, but recessed with sculpted detail.
 

Attachments

  • AVP Creating The Queen.mp4_20230104_195019.532.jpg
    AVP Creating The Queen.mp4_20230104_195019.532.jpg
    95.5 KB · Views: 34
Well you got three choices. Leave the head and crown separate. Mount them together and live with the side flaps not folding in to meet the head.... or decide you gotta have it done right and start modding that crown.

Maybe ADI could do it on commission?
 
As you said and I think that your thinking is going in the right direction; part of the crown was made, it seems, in rubber/latex near the head.

One: as to close any wide gaps between head and crown.

Two: to allow movements of the head inside the crown. As you proly suspect, the head banging on the side of solid parts would've been bad:oops:

Maybe ADI could help you on that matter...or, as others have said, affix the head on the side of the crown.
 
So I've been thinking, and researching, and more thinking, about the head/crown display options. But first I need to post pics to bring the topic up to date.

Yesterday I figured out how to hang the head on the pegboard. although it could be adapted to wall mount without pegboard too. And I nearly finished the surface prep.

First, I was surprised by just how asymmetrically curved the head is, especially from the back.
23,01-04 (1)crooked.jpg


This was a quick test of my mount idea...
23,01-04 (8)first mounting.jpg


...using the magical material known as plumber strap...
23,01-04 (14)reversed hangar.jpg


...I ended up trying 5 different peg styles before settling on this one. Just the right length, stiffness and the turned up end for safety.
23,01-04 (22)reversed hangar.jpg


I also made these two simple braces to prevent the pegboard from flexing under load, presuming that the head would mount under the crown (ignore the different hook in this pic).
23,01-04 (21)reversed hangar.jpg


Then through trial and error I found a mount position that I think looks pretty good.
23,01-04 (23)reversed hangar.jpg

23,01-04 (24)reversed hangar.jpg

23,01-04 (26)reversed hangar.jpg


So maybe the head will mount with the crown. Maybe.

Regardless, I need to finish prepping the head for paint. So...MORE SANDING!
23,01-04 (27)sanding.jpg

23,01-04 (29)sanding.jpg


Anther quick priming with high build primer.
23,01-04 (30)primer.jpg


Then a highly boring overall surface sanding. Also marking pinholes and other tiny defects with blue tape flags.
23,01-04 (33)more sanding.jpg


I used 3M red Spot Putty, a first for me, to fill the tiny spots. It cures really quickly, I like it a lot for this use.
23,01-04 (36)red spot putty.jpg

23,01-04 (39)red spot putty.jpg


Then sanded the spots and added more as necessary. And yes, I realize I'm spending a lot of time finishing areas that will probably never be seen. And I'll spend more time painting them too.
23,01-04 (42)sanding and more putty.jpg
 
My thoughts on the mounting; I'm leaning toward mounting it with the crown. With the understanding that it can be removed in about 2 minutes to be mounted elsewhere if I change my mind later. There are a few reasons for this, some canonical and some practical.

For starters, we need to remember (as I seem to forget) that my crown is NOT painted correctly. Its paint scheme, while partially similar to the AvP paint, does not correspond to anything canonical in the Aliens franchise. So modifying it to more closely resemble screen shots is moot.

Furthermore, I began to wonder if the closer gaps of the flexible crown version are any more correct than the wider gaps of the rigid version. After all, it's a movie, and it's perfectly possible that the closer gaps of the flexible crown were just a side effect of the building materials and not germane to the original design. Possibly.

I researched Aliens and AvP pre-production artwork, such as I could find. And production stills as well. And a conclusion started to form...

This is the 1/4 scale maquette used for the egg chamber scene. Notice that the
"cheeks" are pulled in tight to the head, which is retracted in the semi-hibernating state.
Alien Queen.png


And in this shot the cheek gaps are very wide, wider than in the pics of my crown. But notice that there is a tendon strand connecting each cheek to the jaw! The AvP queen didn't have those, btw.
Ripley and queen.jpg


And there are plenty of Aliens screen shots showing the gaps more narrow with the flexible crown during the power loader battle.

That the same creature in the same movie has a wide range of cheek gaps (a weird sentence to type). WHY? Cameron is definitely one to think through the biology of creatures in his movies, so it's probably not an accident. Then, when I saw they were connected with tendons I realized that it was certainly intentional. In fact, I believe it was part of the design to show emotion. Like a cat's ears, or a cobra's frill. It gives the animators one more tool to convey expression to the audience.

Thus I have concluded that the cheeks were intended to be flexible, and part of the queen's expression. And thus, wide or narrow are equally valid. That the AvP version doesn't have these tendons is a lesser concern. If we want to get technical, then biologically an older (AvP's queen is much older than Alien's queen) piece of the Alien's evolutionary history would be a less complex organism. And a less complex version of the protective function of those cheeks (protecting the neck) would be a rigid form, spaced far enough away so as to not impede the head's range of motion. Over time this might evolve into a flexible, connected format that we see in Aliens.

Anyway, it doesn't matter much, as my crown isn't canon with it's current paint. So the cheek gap doesn't need to match any particular movie. Ultimately the question would be; Does it look good with the crown? Which, on a certain level we won't know until it's painted, as the gray primer doesn't have the same visual weight as a darkly painted head.

So I'm leaning toward painting the head in a bi-color manner like I painted the crown. Even if they hang separately later it would still be an interesting aesthetic.

Thoughts?
 

Attachments

  • 52e06d4ac5aba19fcd571dadebf0c802.jpg
    52e06d4ac5aba19fcd571dadebf0c802.jpg
    312 KB · Views: 80
For what it is worth: I say display it with the crown. Your pics with the test fitting look great and it makes for an impressive piece! One thought - if I were to walk in and see them displayed separately, I think my first question would be, why not display them together? Thanks again for sharing your progress and work, it is a lot fun to follow along!
 

Your message may be considered spam for the following reasons:

If you wish to reply despite these issues, check the box below before replying.
Be aware that malicious compliance may result in more severe penalties.
Back
Top