Stunning, Cameron! Way to work through the small challenges on the scope rail and also get that “nylon” finish. I’m a bigger fan of this prop after seeing your finished build.
Absolutely beautiful - fantastic job! I like the way you've hung it to display as well - I'll do similar with mine.
Thanks again for sharing all the steps along the way. It's provided me the inspiration to finally put mine all together and your WIP posts have been a very wonderful and very helpful addition to the community. Well done all around!
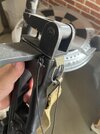
Thanks for the kind words. The strap and associated bag come up on the bay on occasion. There is a thread or portion of a thread dedicated to the strap. It’s from a British gas mask bag.
Bumping this thread up - I'm finally starting my build! Got the stock all sanded and ready for priming tomorrow.
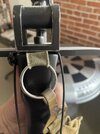
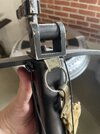
Cameron - might you be able to post a detailed pic or two of your front sling attached point? I'm clear on how the rear one goes, but the one up front is eluding me.
Thanks for this great thread - it's a wonderful instruction manual for this!
Bumping this thread up - I'm finally starting my build! Got the stock all sanded and ready for priming tomorrow.
Cameron - might you be able to post a detailed pic or two of your front sling attached point? I'm clear on how the rear one goes, but the one up front is eluding me.
Thanks for this great thread - it's a wonderful instruction manual for this!
Just another question for you on the various black finishes on the various parts of this. The stock itself has that nice satin sheen. What about the rest of the parts - how did you finish those? E.g., matte/flat, the same satin, etc. Which finishes and where/what parts? Hard for me to tell from the various reference images.
Just another question for you on the various black finishes on the various parts of this. The stock itself has that nice satin sheen. What about the rest of the parts - how did you finish those? E.g., matte/flat, the same satin, etc. Which finishes and where/what parts? Hard for me to tell from the various reference images.
Every single piece is painted with sandable black primer. Then I either leave it flat, polish it or lay down a gloss or a satin depending on the part. The frame has a coat of satin clear and then buffed and finally an application or clear shoe polish.
")