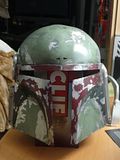
Testors is discontinuing Floquil and PollyS brands of paint so buy it up now.
Most of your colors will be Floquil.
I copied this years ago when I did my Fett costume.
Since Floquil paints where used on the originals, I suggest getting them if you can
find them.
Some Hobby Shops are willing to custom order paints for you.
Make sure all your paints are enamel.
( Polly S and Tamya are water based )
I decided to go through the painting thread and organize the colors in a more
orderly list so each step is easier to follow as well as put in a few of my own thoughts
on the paints that I use.
I had a heck of a time sifting through the whole thread to find what color went
where and in what order so this will make it much easier.
Helmet ( Empire version )
All
* Grey Primer ( 3 coats min. let sit at least 2 days )
* Plasticote Bright Silver Automotive (scratches) ( 3 coats min. let sit 3 days to a week to get a hard surface )
* SP Lark Dark Gray 'unsure' (Gray around scratches) or Dark Euro Grey ( let sit a few days to harden, suggest 2 coats )
Mandibles, sides, back stripe & insert
* PRR Maroon for the dark color on mandibles may need to darken this color with a touch of black I am unsure of the
correct color for this at this time but this works.
* Boxcar Red (mandibles)
Cheeks & Dome
* Panzer Olive Green (Cheeks and dome)
* PRR Green (Inside cheeks) this is practically black.
Dome
* UP Armor Yellow (Verticle stripes)
* MILW Road Orange (Verticle stripes)
Back
* Light Gray, any light gray will do. ( No one seems to have noticed this color even though they all have the same
pictures for reference )
* Undercoat (Lt) color, helmet (sometimes looks Lt Green sometines almost Tan )
Color options:
Doped Linen (very bright - neon green)
Panzer Dunkelgeld 1943
Sand or Desert Sand & Up Armor Yellow
Khaki & Humbrel Egg Blue
*What I used.
SP Lettering Grey, Panzer Olive Green & UP Armor Yellow ( for a Light Green look, about 6 to 8 drops Green and
1 or 2 of the Yellow are added to the Lt Grey base, more or less depenting on the amount of grey used )
* Euro Dark green 'Unsure' back of helmet. ( Euro Dark Green add a touch of "Dunkelblau" it's a german blue )
Ears, etc...
* Earth (Rangefinder ear) ( for a more Gold look use Testers Model Masters Champagne Gold #2922 )
* RLM Green (Left ear) 'unsure'
* Rock Island Maroon (Red scratches on left ear).
* Light Gray (on left ear) any light gray will do.
* Rust (various locations)
Best to let each coat sit 12 to 24 hours before doing the next color so the surface can take some abuse form the
masking.
Also suggest going over each color with 0000 grade steel wool than wiping down with a clean cloth between coats.
Some people use Scotch Brite pads but this may be to harsh on the surface.
Use the Blue light tack painters masking tape. (it costs more but is well worth it so you don't have residue or paint
lifting.
To do the painting the way ILM did it you will have to mask off each area that will be painted to avoid over spray.
All the scratchs will need to be masked off using Liquid latex, rubber cement, mustard, Frisk liquid mask or some other
removable (non Oily, ie... no mayonase) substance.
Latex works the best.


