Blade Runner Offworld Inc Blaster- All Metal - my first build

Nice equipment
Yeah, my wife's father has a nice setup...basically a full machine shop, wood shop onsite at his house. I've been getting A LOT of help from him and his friend Andy ( who did the CNC work on the butt plate and the outer-grip handle), and my uncle Charles who is doing the casting for me. Frankly, I wouldn't be able to do most of this without their help. It's been fun learning how to work on the lathe and mill. The CNC...well that ill be for a other project at some point...lol.
 
So spent some time in the shop today to drill out the outer grip and inner grip. Did a rough mock up...we will nee to do some minor "massaging" of the parts,be we are very close. Also found out about a new "card trick" today. I never new that you can use paper cards as a type of shim. Apparently that is a common practice for leveling pool tables. Of course different card stocks would be different use for different situations...we for example needed washer with a .18" depth....and we only had one that was .14". We used to pieces of paper (.04") to make up the difference. Who knew...?!. Also fun when you pick "tricks" like that. Also, I got a call the second run of bronze parts are complete. Unfortunately, I won't be able to work on those for a bit. We will be traveling for a little bit....so no shop time for me.
 

Attachments

  • IMG_0477 (2).jpg
    IMG_0477 (2).jpg
    335.9 KB · Views: 79
  • IMG_0476 (1).jpg
    IMG_0476 (1).jpg
    352.8 KB · Views: 77
  • IMG_0475.jpg
    IMG_0475.jpg
    331.3 KB · Views: 81
  • IMG_0481.jpg
    IMG_0481.jpg
    488.7 KB · Views: 80
So I picked up my parts to today. Most of the parts came out great...but I might need to recast one of the side covers...that split. Unfortunately, it was the side I was going to use for the mounting screw and the weaver knob. Other than that one piece everything came out great. Might be a little bit before I can clean up the parts. If I can't repair it....I'll ask for a recast on the part. Also I was curious if anyone knows where I might be able to get resin grips that fit an offworld?
 

Attachments

  • IMG_0483 (1).jpg
    IMG_0483 (1).jpg
    2 MB · Views: 63
  • IMG_0484 (1).jpg
    IMG_0484 (1).jpg
    645.5 KB · Views: 67
Last edited:
Well hoping to get back into the shop this weekend to work on cleaning up some parts...but I didfinished my second build. Make sure to zoom in or you might miss it. I made it the same size as the Tomenosuke "Nano". Not sure if it qualifies as a "build" but still kinda fun.
 

Attachments

  • IMG_0447.jpg
    IMG_0447.jpg
    3.5 MB · Views: 70
  • IMG_0446.jpg
    IMG_0446.jpg
    1.7 MB · Views: 68
  • IMG_0445.jpg
    IMG_0445.jpg
    485.6 KB · Views: 65
  • IMG_0537.jpg
    IMG_0537.jpg
    305.6 KB · Views: 70
So it's been a little while since I have posted updates...been trying to find time in the shop to work on the project...you know "adulting" stuff. Also we have been trying to navigate the fun world of "shrinkage" in casting. So we did some rough calculations and we are dealing with roughly 2 to 3 percent shrinkage...so making cast parts and machined/OEM parts match up is a bit of a challenge. So where does that leave us... I am currently working sanding down the Charter Arms OEM Cylinder to match the size of the cast chassis. This involved making a "lathe dog" (picture 1) to drive the cylinder while we sand it down. Unfortunately we didn't want to try and match the cylinder down because it was made of hardened steel and we were dealing with the interrupted cut at the front of the barrel. With the sacrifice of lots of sand paper and some filing (pictures 2, 3 and 4) we have gotten to the cylinder to fit but still have a little bit of binding. So I'll be working on that next weekend. We also did some tig welding on the chassis(picture 5) to help firm it up. Glad to be moving forward on the project...even it if is slower than I would like...progress is progress. So here is a quick mock up of roughly were I'm at on this part of the project. (picture 6)
 

Attachments

  • IMG_0735.jpg
    IMG_0735.jpg
    1.5 MB · Views: 91
  • IMG_0723.jpg
    IMG_0723.jpg
    1.2 MB · Views: 76
  • IMG_0725.jpg
    IMG_0725.jpg
    1.7 MB · Views: 83
  • IMG_0727.jpg
    IMG_0727.jpg
    1 MB · Views: 73
  • IMG_0736.jpg
    IMG_0736.jpg
    2 MB · Views: 94
  • IMG_0734.jpg
    IMG_0734.jpg
    4.3 MB · Views: 94
Glad you are back in the shop again; all of the effort put in certainly shows! Oooh the cylinder looks happy in it’s future home ! :cool:
 
So it's been a little while since I posted on this build. I was at a cross roads on what to do with the handle. I had some suggestions about putting a larger coyle handle a grips on the off-world. So I had been trying to figure out placement and fitment for the parts. It let to a virtual rabbit hole of possible changes, and it felt like the off-world blaster was gonna be lost in parts from other kits. Ultimately, I decided that I didn't want to change my orginial build plan. So....I did a rough mockup of all the parts I have from the original build, machined and cast. I all fits together pretty well. sill have a few minor tweeks but it's getting so close. All in all pretty happy with the way this thing is looking.
So far the list of parts are as follows ( smaller parts not listed are either metal offworld or Bulldog parts)
  • chasiss- cast part from off-world part
  • butt plate - machined aluminum
  • binding post and weaver knob - coyle
  • grip frame - machined aluminum
  • inner frame - coyle
  • laser site rod- machined aluminum
  • steryr receiver - original offworld part
  • end cap for receiver - cast part from off-world part
  • front cap -cast part from off-world part
  • safety - cast part from off-world part
  • bolt and bolt handle - cast parts from off-world parts
  • right and left covers- cast parts from off-world parts
  • cylinder - .38 Buld dog cylinder
  • front and back triggers - coyle
  • trigger guard - cast part from off-world part
  • center pin - will be machined
  • barrel - machined aluminum
 

Attachments

  • IMG_2783.jpg
    IMG_2783.jpg
    2.8 MB · Views: 96
  • IMG_2779.jpg
    IMG_2779.jpg
    2.9 MB · Views: 84
  • IMG_2784.jpg
    IMG_2784.jpg
    1.5 MB · Views: 78
  • IMG_2785.jpg
    IMG_2785.jpg
    1.3 MB · Views: 90
Last edited:
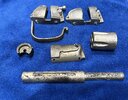
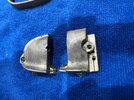
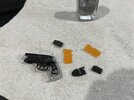
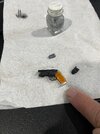
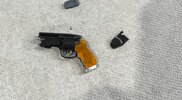
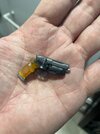
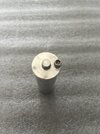
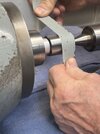
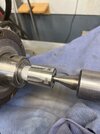
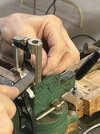
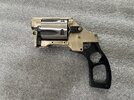
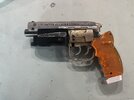
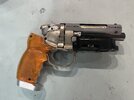
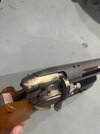
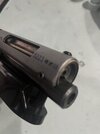
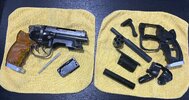
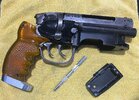
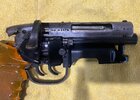
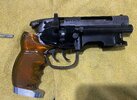
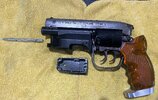
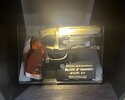
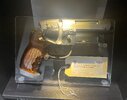
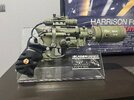
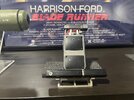
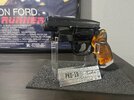
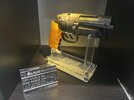
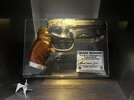
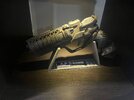
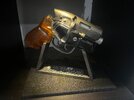
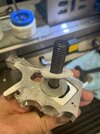
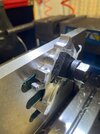
So it's been a while since I have worked on this project, but I wanted to circle back around to it. I spent some time working on fitting and bluing parts. I did have an issue with where I put the mag hole on the metal barrel..literally a couple of mm to farout to the front, causing a fitment issue on the chassis...so I've printed one up and I'll do the electronics for it. I didn't have the heart to cut up and file the ammo mag I have. Additional task items are - I need to mount the site rod, trim down the butt plate to a proper scale, currently it is a little too long. So, I still have not finished this by any means, but I hate it when someone starts a project thread and doesn't finish it. It's like reading a book and not having the last chapter to finish. So here's were I'm at.... ( have included the build where it's currently at and then one picture of an "exploded view" - lol of my OW parts next to it)
 

Attachments

  • IMG_3434.jpg
    IMG_3434.jpg
    2 MB · Views: 52
  • IMG_3433.jpg
    IMG_3433.jpg
    1.7 MB · Views: 51
  • IMG_3432.jpg
    IMG_3432.jpg
    1.7 MB · Views: 49
  • IMG_3431.jpg
    IMG_3431.jpg
    1.8 MB · Views: 49
  • IMG_3430.jpg
    IMG_3430.jpg
    2.2 MB · Views: 48
This is amazing! Sometime you should post your Blade Runner collection. I am sure you have a lot!

Btw - I hope to start my enforcer model you helped me acquire.
 
This is amazing! Sometime you should post your Blade Runner collection. I am sure you have a lot!

Btw - I hope to start my enforcer model you helped me acquire.
Here's what I currently have..but I have a few new additions "in the pipe" and hopefully another revision of the enforcer in the horizon :0p. Looking at this I might have problem...do they have a "Blade Runner Blasters Anonymous" group on here....lol.
 

Attachments

  • IMG_3534.jpg
    IMG_3534.jpg
    1.4 MB · Views: 21
  • IMG_3533.jpg
    IMG_3533.jpg
    1.4 MB · Views: 27
  • IMG_3527.jpg
    IMG_3527.jpg
    1,004.7 KB · Views: 24
  • IMG_3528.jpg
    IMG_3528.jpg
    864.4 KB · Views: 23
  • IMG_3529.jpg
    IMG_3529.jpg
    1.1 MB · Views: 23
  • IMG_3530.jpg
    IMG_3530.jpg
    920.7 KB · Views: 19
  • IMG_3531.jpg
    IMG_3531.jpg
    929.5 KB · Views: 23
  • IMG_3532.jpg
    IMG_3532.jpg
    832.5 KB · Views: 22
  • IMG_3540.jpg
    IMG_3540.jpg
    852.2 KB · Views: 16
I've got a bunch, but all derivatives of the original (No design alteration, as such) - and K's and Luv's too, last from the original props
 

Your message may be considered spam for the following reasons:

If you wish to reply despite these issues, check the box below before replying.
Be aware that malicious compliance may result in more severe penalties.
Back
Top