Blade Runner 2049 - Binoculars Build

PAULH

Well-Known Member
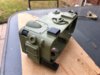
Inspired by Adam Savage's one-day build, I was keen to add the 2049 binoculars to my previous Blade Runner prop builds. I was lucky enough to buy a slightly-started kit from a fellow RPF member, and even luckier that it was the improved version modelled by Empiricus (on instructables.com), and it came complete with single lens binoculars for some real functionality. Here's what I started with:

BR BIN 1.jpg


While not screen accurate, I decided to drill out the dimples on this top panel so that I could add some M2 screws that I had on hand. For me, it just added a little more realism that this was a removable panel.

BR BIN 3.jpg


While in the mood for adding screws here and there, I also added them to this small panel:

BR BIN 5.jpg

BR BIN 4.jpg


My attention then turned to the main casing which was glued together from two halves. With CA glue I added some copper strips for added strength:

BR BIN 7.jpg

Copper is relatively heavy and would contribute to giving this prop a weight that matches its appearance. More of that later in the build.

That's it for now - more later as the build progresses.

Thanks for looking!
 
I have the feeling it will be great fun watching you put this together:). There is so much space and volume to ad things.
 
Oh wow another build of this fine model! Awesome.

I did one as well and added tiny screws everywhere I could as well for the realism factor. A lot of that kit looks like it's printed in resin, must have cost someone a lot of money.
 
Ok, so I started thinking about lights and whilst the aim of the build is to end up with these binoculars being screen accurate, I decided to explore an idea regarding a small control panel just beneath the eye visor; small and discrete was the `project brief'! Oh, and that's not the finished colour of the back plate - it's high-build primer.

BR BIN 9.jpg


The LED's came from ebay (they're called lighthouse bulbs) and the toggle switch (which has a rubber boot over the toggle came from Amazon. Ignore the battery holder, it'll take more than one button cell drive those bulbs. In fact, the plan is just to have the VIS and PWR lights come on, and two of the button cells are enough for that. And, of course, the implication of this panel is that you can switch between different viewing modes.

Here's the little panel made from 1mm aluminium:

BR BIN 10.jpg


And here we have it with the holes drilled for the switch, bulbs, and corner screws (slightly out of focus - sorry):

BR BIN 11.jpg


And then a test fit of the parts - I managed to find a drill size to allow a snug push fit of the bulbs in from behind. In the end, I'll swap the middle bulb to an orange one so that the functioning lights are different from each other; orange (VIS) and green (PWR):

BR BIN 12.jpg


BR BIN 13.jpg


Then it was time to think about graphics. I took a photo of the panel, imported it into Corel Draw, scaled it to actual size, and then overlaid what I had in mind.

- In the Blade Runner universe it made sense for this to be a Sony product (Clarendon is a very close font to the one used by Sony);
- That's `Blade Runner' in Japanese (at least according to Google translator it is);
- 9402 is a significant number backwards;
- the serial number is a date you might recall

So many Easter eggs on such a small part!

BR BIN 14.jpg


I made a test print onto paper to make sure I'd got the sizing right and that there was no distortion in the photo I'd imported. Luckily all was well so I then printed my graphics onto Avery "Heavy Duty Silver Labels". These have a matt aluminium finish which was the main reason for using them.

BR BIN 16.jpg


And here's the finished panel.

BR BIN 17.jpg


Apologies to the purists, but I think this feature will add to the overall look and feel of the finished prop. And, importantly, it really is rewarding making something from scratch!

Thanks for looking - more updates soon.
 
A last minute adjustment to my little panel was to flip the colours - silver graphics on a black background, with a few little scratches added for weathering it:

BR BIN 18.jpg


There is also a small plate that holds the wrist strap onto the side of the binoculars; I remade that in 3mm aluminium:

BR BIN 20.jpg


And talking of the wrist strap, I turned to eBay to gather the materials to make this:

BR BIN 48.jpg


The strap is a 1" wide x 2mm thick "belt blank"; essentially just a length of leather for those that make their own belts (£6). I decided to have the rougher side on the outside. Then the rectangular ring (30mm x 1/4") was also from eBay, again used by leather crafters (£2.69 for 5) - I roughed up the chrome finish and shot it with some matt black. A pair of 6.5mm chicago screws (£2.73 for 10), along with some contact adhesive held the whole thing together. So very cheap and easy to make!
 
Thank you Topgun1984. My approach is to always build my props as best as I can and allow enough time to think through options for everything. I don't want to look at them when they are finished and think "I wish I'd done this or wish I'd done that"!
 
This is the paint I used on the main body:

BR5.jpg


And here we have the main body painted along with some weathering completed;

BR1.jpg


BR2.jpg


BR4.jpg


I used various ways to achieve the finish in these photos:

- some liquid mask was applied before shooting the green paint.
- metal polish and 1500 grit paper to smooth out the overall surface finish and then I went a bit harder on edges to bring out the black base layer
- a dremel fitted with a polishing pad to add deeper scuffs here and there
- silver enamel paint to add some chips to corners
- some random scratches added with my front door key!

In the last photo that's at 1/4" camera adaptor (eBay - £2) so I could display this thing on a tripod. And I'd added a couple of M2 screws on the little bracket thingy.

Thanks for looking.
 

Attachments

  • BR3.jpg
    BR3.jpg
    512.5 KB · Views: 186
This thread is more than 4 years old.

Your message may be considered spam for the following reasons:

  1. This thread hasn't been active in some time. A new post in this thread might not contribute constructively to this discussion after so long.
If you wish to reply despite these issues, check the box below before replying.
Be aware that malicious compliance may result in more severe penalties.
Back
Top