You are using an out of date browser. It may not display this or other websites correctly.
You should upgrade or use an alternative browser.
You should upgrade or use an alternative browser.
Black Series Darth Vader Helmet Mod Thread!
- Thread starter Jennigirl
- Start date
bwize
Sr Member
I thought the helmet looked way too compressed, so I added four 6mm spacers on the inside of the helmet.
View attachment 1059407
I really think that your original helmet height really captures his ANH look perfectly. Just my 2 cents.
StephenMG
Active Member
Great job Guffe ! You've done much the same mods as me and I'm sure you're as pleased with them as I was - the whole helmet looks so much better now.
I too experimented with sitting the dome a little higher with spacers. The BS dome is a not quite tall enough so I considered cheating and adding a little extra height that way rather than performing major surgery on the top of it. Like bwize though I decided I'd prefer to keep the ANH look with the low brow - it was Vader looking his meanest in my view. Maybe 6mm is too much though? Perhaps I'll try again with, say, 3mm and see how that looks.
I too experimented with sitting the dome a little higher with spacers. The BS dome is a not quite tall enough so I considered cheating and adding a little extra height that way rather than performing major surgery on the top of it. Like bwize though I decided I'd prefer to keep the ANH look with the low brow - it was Vader looking his meanest in my view. Maybe 6mm is too much though? Perhaps I'll try again with, say, 3mm and see how that looks.
NICELY DONE!!!
Jed1master
New Member
I stumbled on this thread to mod a BS Helmet and you all have given me some great ideas. I hope this thread is still be used because the last one i from 11/5/2019. Please keep up the great work
SPYHUNTER705
Active Member
got done with this

Last edited:
SPYHUNTER705
Active Member
hi i was wondering what thumb nut did you usedMade a bit more progress trying to improve the look of my BS. Having extended the neck I have now painted the lower section with a graphite grey paint (alongside the appropriate black bits) and fully installed my metal mesh. I also wanted to ditch the Hasbro plastic tusks which look exactly what they are, painted plastic, and also looked very big to me. I made some cheap replacement metal tusks from some thumb nuts, a few washers and a couple of upholstery nails. The knurled section is a little short really but I still think they looks better than the original plastic ones.
I would post a comparison pic of the originals alongside my metal replacement but I think my cats have run off with the original tusks! Heaven knows where they are now so I couldn't put them back on even if I wanted to!!! :rolleyes
Next job is to paint the upper section.
View attachment 838150View attachment 838152View attachment 838151
StephenMG
Active Member
These - M2 M2.5 M3 M4 M5 M6 M8 STAINLESS STEEL HIGH KNURLED THUMB NUTS HAND GRIP KNOBS | eBay, M3 size.hi i was wondering what thumb nut did you used
The knurled bit is a bit narrow really but I'm pleased with the way they look.
SPYHUNTER705
Active Member
so i decided to do a bit more work on the helmet by trying to add a neck i'm used my 3d printer and made a neck from a file i bought it kinda fits but i need to put some work into it i'll post a pic when i made some progressgot done with thisView attachment 1290246
SPYHUNTER705
Active Member
well 3D print didn't work neck is to square but the idea is still open just wish someone would make a model for the neckso i decided to do a bit more work on the helmet by trying to add a neck i'm used my 3d printer and made a neck from a file i bought it kinda fits but i need to put some work into it i'll post a pic when i made some progress
Last edited:
Greetings, all!
I am new here to this wonderful forum, and have gotten back into the collector's game, having stopped back in the mid-late 2000s with my Master Replicas lightsaber hilt collection, and now getting interested in replica helmets.
I recently picked up EFX's Fett PCR helmet, which is an amazing way to start back into this sport!
I'm still always on the lookout for a DPDeluxe Vader, as I have a soft spot in my heart for it.
And of course I am eyeing some of the recent licensed Vaders out there , not sure which one I want to dive into getting, cause it will be only one of them. lol
But when I saw the Hasbro Vader, immediately I saw it's potential, and was SO thankful to have found this thread!
You guys are giving great points, and I have already gotten the recommended paints, and begun to disassemble mine, but I am starting with replacing the eyes or at least enhancing the existing eyes to red.
Found some thin sheet of red transparent styrene in an automotive tail light repair kit and it looks like I'll be able to cut to shape to make it work, but am not quite sure how to shape it to match the curvature of the existing eyes.
Any ideas?
I don't want to buy every little thing I need , premade, but if I can't get the styrene to work, does anyone recommend a place to get the red eyes pre made?
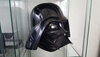
And here's my Vader, intact before I disassembled. : )
I am new here to this wonderful forum, and have gotten back into the collector's game, having stopped back in the mid-late 2000s with my Master Replicas lightsaber hilt collection, and now getting interested in replica helmets.
I recently picked up EFX's Fett PCR helmet, which is an amazing way to start back into this sport!
I'm still always on the lookout for a DPDeluxe Vader, as I have a soft spot in my heart for it.
And of course I am eyeing some of the recent licensed Vaders out there , not sure which one I want to dive into getting, cause it will be only one of them. lol
But when I saw the Hasbro Vader, immediately I saw it's potential, and was SO thankful to have found this thread!
You guys are giving great points, and I have already gotten the recommended paints, and begun to disassemble mine, but I am starting with replacing the eyes or at least enhancing the existing eyes to red.
Found some thin sheet of red transparent styrene in an automotive tail light repair kit and it looks like I'll be able to cut to shape to make it work, but am not quite sure how to shape it to match the curvature of the existing eyes.
Any ideas?
I don't want to buy every little thing I need , premade, but if I can't get the styrene to work, does anyone recommend a place to get the red eyes pre made?
And here's my Vader, intact before I disassembled. : )
Attachments
SPYHUNTER705
Active Member
i'm not sure on how to heat up styrene i think you can heat it up with a heat gun or maybe some hot water dip it in and bend the shape inGreetings, all!
I am new here to this wonderful forum, and have gotten back into the collector's game, having stopped back in the mid-late 2000s with my Master Replicas lightsaber hilt collection, and now getting interested in replica helmets.
I recently picked up EFX's Fett PCR helmet, which is an amazing way to start back into this sport!
I'm still always on the lookout for a DPDeluxe Vader, as I have a soft spot in my heart for it.
And of course I am eyeing some of the recent licensed Vaders out there , not sure which one I want to dive into getting, cause it will be only one of them. lol
But when I saw the Hasbro Vader, immediately I saw it's potential, and was SO thankful to have found this thread!
You guys are giving great points, and I have already gotten the recommended paints, and begun to disassemble mine, but I am starting with replacing the eyes or at least enhancing the existing eyes to red.
Found some thin sheet of red transparent styrene in an automotive tail light repair kit and it looks like I'll be able to cut to shape to make it work, but am not quite sure how to shape it to match the curvature of the existing eyes.
Any ideas?
I don't want to buy every little thing I need , premade, but if I can't get the styrene to work, does anyone recommend a place to get the red eyes pre made?
And here's my Vader, intact before I disassembled. : )
Ok, so I've gotten pretty far in the modding and paint job.
Still a few steps to go in detailing, but here's some updates thus far, kind of in order.
First, removed all inside face pieces, and sprayed the nose with Testors metallic silver.
Started basic taping off of the vents. ( and that is the bottom of my EFX Fett in the background of the 2nd picture) : )
Removed all innards of the jaw piece, and sprayed the whole thing Rustoleum Gun Metal
Then tried to use a transparent red spray for tail light repair on the outside of the lenses, but they just got too dark and kind of mucky.
Tried to maybe gloss them over to at least make them look better , but they got all boogered up. so it had to be taking a Dremmel to the lenses and cutting them out, and replacing them with 3M clear red repair styrene.
Worked great, but they have adhesive on one side, so I stuck to pieces together, which reinforced them, and made them easier to handle, cut the shape out to match the lense openings, and just lightly pinched them while holding a hair dryer to them to give them and outward bend.
Using an insta-cure styrene glue from a local hobby shop, the lenses sat into the visor opening perfectly.
Got the ROTJ style two tone paint job done on the mask using Rustoleum Gun Metal, leaving the black plastic of the helmet intact where the black needed to be. Gloss coat over the whole thing really brought out the black , and stopped it from looking like plastic.
And going to detail the head piece and greeblies on the mask later.
Replaced the lower jar grill with the metal grill mesh from an STP air filter, and black screen mesh behind it.
Left the speaker right in the middle of the bottom of the grill, and you can barely see it at all now, but still hear it clearly.
Was going to try to remove the tusks and order the aluminum ones, but I found this paper thin metal chrome foil for using on model cars, and it metallicized the tusks perfectly.
Sure, they're not ROTJ tusks, but at least they're ESB style.
Used this same foil on parts of the mask head piece as well.
Completed two tone on the jaw, and modded the interior wiring a bit in placement and coloring, and added a strip of black felt to the back of the neck piece instead of the plastic.
I used that same foil in the lower silver portions of the jaw interior, to make it more metal, but also cover up the screw holes to look more complete.
On the mouth grill, used the same mesh from the air filter, painted in black, and
glued a piece of black screen mesh behind it to fit.
Cut it down to properly fit in the mouth grill, and glued in the base of the original plastic mouth grill to cap the bottom so they stayed in place.
Cutting out the uprights from the original grill insert was surprisingly hard.
Popped the lenses in the mask just to see how it is looking.
Pretty nice!
The dome got about 5 coats of gloss black, and about 4 coats of clear gloss.
Filled in and smoothed out the mold point on the top of the dome best I could.
It's barely visible now, and only then even if you know it's there.
Was going to smooth out the widows' peak. but decided it wasn't a deal breaker, especially since I'm going to eventually display this in an exploded view , and have a special surprise to the display I'm concocting. : )
And finally, in progress on detailing the portions of the mask interior.
Sorry about the tons of pictures, but I hope you all enjoy it!
Thanks for all your motivations and information that helped me get this far!
Got the inside panels detailed and painted, and the lens assembly installed. The inside is done.
A few little details on the outside, and some wire details on the lower jaw piece, and this guy is done and ready for an interesting stand. : )
More pics probably tomorrow.

A few little details on the outside, and some wire details on the lower jaw piece, and this guy is done and ready for an interesting stand. : )
More pics probably tomorrow.
SPYHUNTER705
Active Member
imp
impressiveOk, so I've gotten pretty far in the modding and paint job.
Still a few steps to go in detailing, but here's some updates thus far, kind of in order.
First, removed all inside face pieces, and sprayed the nose with Testors metallic silver.
Started basic taping off of the vents. ( and that is the bottom of my EFX Fett in the background of the 2nd picture) : )
Removed all innards of the jaw piece, and sprayed the whole thing Rustoleum Gun Metal
Then tried to use a transparent red spray for tail light repair on the outside of the lenses, but they just got too dark and kind of mucky.
Tried to maybe gloss them over to at least make them look better , but they got all boogered up. so it had to be taking a Dremmel to the lenses and cutting them out, and replacing them with 3M clear red repair styrene.
Worked great, but they have adhesive on one side, so I stuck to pieces together, which reinforced them, and made them easier to handle, cut the shape out to match the lense openings, and just lightly pinched them while holding a hair dryer to them to give them and outward bend.
Using an insta-cure styrene glue from a local hobby shop, the lenses sat into the visor opening perfectly.
Got the ROTJ style two tone paint job done on the mask using Rustoleum Gun Metal, leaving the black plastic of the helmet intact where the black needed to be. Gloss coat over the whole thing really brought out the black , and stopped it from looking like plastic.
And going to detail the head piece and greeblies on the mask later.
Replaced the lower jar grill with the metal grill mesh from an STP air filter, and black screen mesh behind it.
Left the speaker right in the middle of the bottom of the grill, and you can barely see it at all now, but still hear it clearly.
Was going to try to remove the tusks and order the aluminum ones, but I found this paper thin metal chrome foil for using on model cars, and it metallicized the tusks perfectly.
Sure, they're not ROTJ tusks, but at least they're ESB style.
Used this same foil on parts of the mask head piece as well.
Completed two tone on the jaw, and modded the interior wiring a bit in placement and coloring, and added a strip of black felt to the back of the neck piece instead of the plastic.
I used that same foil in the lower silver portions of the jaw interior, to make it more metal, but also cover up the screw holes to look more complete.
On the mouth grill, used the same mesh from the air filter, painted in black, and
glued a piece of black screen mesh behind it to fit.
Cut it down to properly fit in the mouth grill, and glued in the base of the original plastic mouth grill to cap the bottom so they stayed in place.
Cutting out the uprights from the original grill insert was surprisingly hard.
Popped the lenses in the mask just to see how it is looking.
Pretty nice!
The dome got about 5 coats of gloss black, and about 4 coats of clear gloss.
Filled in and smoothed out the mold point on the top of the dome best I could.
It's barely visible now, and only then even if you know it's there.
Was going to smooth out the widows' peak. but decided it wasn't a deal breaker, especially since I'm going to eventually display this in an exploded view , and have a special surprise to the display I'm concocting. : )
And finally, in progress on detailing the portions of the mask interior.
Sorry about the tons of pictures, but I hope you all enjoy it!
Thanks for all your motivations and information that helped me get this far!
View attachment 1303774View attachment 1303775View attachment 1303776View attachment 1303778View attachment 1303779View attachment 1303780View attachment 1303781View attachment 1303782View attachment 1303783View attachment 1303784View attachment 1303785View attachment 1303786View attachment 1303787View attachment 1303788View attachment 1303789View attachment 1303790View attachment 1303798View attachment 1303799View attachment 1303801
Similar threads
- Replies
- 4
- Views
- 1,012
- Replies
- 0
- Views
- 189
- Replies
- 15
- Views
- 710