BKBT Din Djarin Build Thread

I chronicled my build over at The Dented Helmet but thought I could migrate some of the info here. I'll try and keep it short and concise so you won't see my mistakes along the way but of course I will answer any questions.
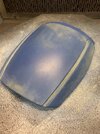
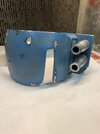
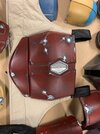
Anyways, lets start with the end result first and then I will show you how I got there. This currently sitting on a mannequin display that I am starting to build (more on that later).
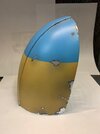
IMG_1745.jpg
 
I think the easiest way for me to do this is break it down into sections and elaborate on each piece. This is not necessarily in build order so some of the pics may seem out of place. This is also a budget build so I tried to make as much stuff as possible.

Chapter 1 -The Helmet

I did start with the helmet. This is Robert Pausa's V2 helmet from Thingiverse. I 3d printed, did the usual sanding and body filler thing and epoxy resin coated the inside. I sprayed with a gun metal paint, clear coated and then wet sanded before I shot the top coat of Alclad II. I haven't weathered this yet but it is taking on some natural wear form handling.
IMG_1732.jpg
IMG_1733.jpg
IMG_1734.jpg
IMG_1735.jpg


I made a paper template for the visor, cut up a welding visor and taped it in with Gorilla tape. I also fabricated a small aluminum piece and epoxied it in between the mandibles to give it some structural integrity since the visor is just taped in. The inside was sprayed satin black and I sprayed the lower visor as well so you cannot see my face from light leakage below. It was all finished off with some helmet padding and fits well!
IMG_0904.jpg

IMG_1736.jpg
IMG_1757.jpg
 
Chapter 2 -The Armor

I could not find accurate free armor so I bit the bullet and purchased the full pre Beskar armor files from Great Ape Studio and let me say that they were well worth it. I had to split up parts so it would fit on my printer bed but that is not a big deal. All of the armor I print in PLA and coat it with epoxy resin for strength and to fill the print lines. It makes the finishing easier on the large organic shaped parts as there is minimal sanding and clean up after.
IMG_0906.jpgIMG_0933.jpgIMG_0946.jpg
I printed the clean knee file by mistake so had to heat it up with a heat gun and press in the damage with the end of a screwdriver after.
IMG_0928.jpg

The right shin armor I had to resize to fit my boot so I elongated it from front to back so the proportions looks the same when viewing straight on. It is also a clam shell fit so I ended up using some paracord to lace up the front which allows it to act as a movable hinge. I tried to work out a method of attaching the front shin cover with magnets but I found it protruded too much and there was play in aligning them. I ended up permanently gluing to one side of the shin and it is working out just fine.

IMG_1117.jpgIMG_1118.jpgIMG_1119.jpg
IMG_1113.jpg
 
Chapter 3 -Painting

When I started this build I threw out the question "What colors /brands are people using?" and couldn't find any info at that time. Being a budget build I ended up using craft store acrylics thinned and shot through an airbrush. All colors were custom tinted and mixed.
IMG_0900.jpgIMG_0902.jpg

My process was as follows: base coat with Krylon red primer
IMG_0911.jpg


over shoot with red acrylic mix for some tonal variation
IMG_0912.jpg


dust the areas being damaged with grey
IMG_0913.jpg


hand paint the two different greys, going back and forth until all areas are covered. There is some slight texturing at this point but the next stages blend it all in.
IMG_0914.jpg


Seal it with a satin clear coat and then paint the silver damage and add scuffs and scrapes.
IMG_0916.jpg


Lastly, add the thinned down dirt wash. This was watered down acrylic as well. This I didn't seal as I wanted it to be a flat finish. I ended up going back with the silver for some touch ups and that really gave a nice effect as the silver was toned down when I clear coated it with satin in the previous step. With the brighter silver added on top (not going for full coverage) it looks like the metal is starting to oxidize.
IMG_0917.jpg
 
Last edited:
All of the armor was painted using the same above method and I studied the D23 reference pics to get a close representation. It may not be exact, chip for chip (I'm calling out you Boba guys :)) but it is close enough for me.
 

Attachments

  • IMG_0918.jpg
    IMG_0918.jpg
    89 KB · Views: 130
  • IMG_0929.jpg
    IMG_0929.jpg
    30.8 KB · Views: 125
  • IMG_0931.jpg
    IMG_0931.jpg
    38.3 KB · Views: 119
  • IMG_0932.jpg
    IMG_0932.jpg
    45.2 KB · Views: 117
  • IMG_0944.jpg
    IMG_0944.jpg
    299.6 KB · Views: 107
  • IMG_1050.jpg
    IMG_1050.jpg
    471.1 KB · Views: 136
The hand plates I ended up using some Tamiya paint, just because that is what I had on hand (refer back to budget build) and I weathered with some grey paint as per the reference pics. These are clean for some reason so I ended up staying with that look.
IMG_0899.jpg


I purchased the glove and boot combination from Crowprops. I was going to try and tackle these myself but by the time I purchased the two correct pairs of gloves, the correct Blaine Orson boots and the leather to cover them, it would have cost me more. All I needed to do was to add the velcro to the back of the hand plate and this costume part was finished.
IMG_1024.jpgIMG_1025.jpg
IMG_1026.jpg
 
Chapter 5 -Soft Parts

Since there is no decent fabric store near me, I knew that I would have to purchase online and probably run the risk of not getting the proper material or color. I found the one from Cosplaysky to have correct stitching details on the back of the arms and the base suit looked pretty decent. I also knew that getting the different fabrics, thread and zippers would cost me just as much and I would still need to draft up or purchase patterns and run the risk of screwing up. This was a no brainer for me so I made my order. About a month later and it arrived and was exactly as I expected, a great base to start with. The first thing I did was to get a seam ripper and carefully pull off all of the crappy vinyl armor and straight to the trash. The belts and pouches I kept as stand ins until I could get around to fabricating them.
IMG_1051.jpgIMG_1052.jpgIMG_1053.jpgIMG_1054.jpgIMG_1050.jpg

I added velcro to the pants legs and armor and added some elastic foot loops so there was no chance of them riding up when putting on my leg armor and to keep them on the inside of my boots.
IMG_1328.jpgIMG_1329.jpgIMG_1377.jpg

I also added a couple of darts to the back of the pants so they fit my waist better. I still added a grey web belt just for extra measure.
IMG_1378.jpgIMG_1379.jpg

I ended up adding an extra piece of fabric and velcroing the cumberbund to the suit so it will stay positioned and not move or slip down. In my opinion this should have been made as one piece with the top and may be an upgrade that I do in the future.
IMG_1380.jpg

I ended up purchasing material online for the cape. I chose to use a Melton wool as I couldn't find any reasonably priced boiled wool and I think they are quite similar. I think the color ended up being great.
IMG_1122.jpg

I cut out the neck hole and did some blind stitching so you wouldn't see the raw material around the back of the neck. I pleated the two ends, and sewed them together so the whole thing just slips over my head. They attach to the inside of the vest with a couple of small hooks like you would find on bra straps.
IMG_1381.jpgIMG_1389.jpgIMG_1390.jpgIMG_1387.jpgIMG_1391.jpg
 

Attachments

  • IMG_1122.jpg
    IMG_1122.jpg
    884.4 KB · Views: 189
Last edited:
Chapter 6 -Right Leg Finishing

I started with some lightweight leather that I purchased for the gun belt as this looks to be the same leather. I folded over the edges and glued down with some Barge leather cement and hammered flat for a good bond. The velcro end was also glued down with Barge and I made sure to scuff up the leather underneath. I used a strong double sided tape to secure to my leg armor as I didn't want to fuss with independent straps when suiting up and I can still take it apart if needed. This was my first attempt and the the thing that bothered me was the visible fold line under the leather. On version 2 I used a wider piece of leather and butted the two ends together in the center and that solved the problem. Final pics coming up.
IMG_1132.jpgIMG_1133.jpgIMG_1151.jpgIMG_1152.jpgIMG_1154.jpg

I bought a small mini lathe specifically for these kinds of projects and am learning as I go (I have no previous machining experience).
I wanted to use hollow tubing to keep the shin cylinders lightweight and it is also accurate to the costume. I started by turning an endcap first facing the material and then cutting a shoulder just slightly thicker than the inside diameter of the tube. The tube end was also faced so it was square and then I press fit the endcap on by heating the tube and throwing the endcap in the freezer. Once the temperatures go back to normal this thing is on for good!
IMG_1139.jpgIMG_1140.jpgIMG_1141.jpgIMG_1142.jpg

Back into the lathe it went and then I could turn the outside diameter for consistency. The grooves were cut in with a parting tool. I radiused the outer edges with a file while spinning in the machine.
IMG_1144.jpgIMG_1143.jpgIMG_1145.jpg
IMG_1146.jpg
 
I cut a piece of 4oz leather at 1" and used a grooving tool to get the detail in. It was cleaned with IPA and then dyed saddle tan.
IMG_1123.jpgIMG_1124.jpgIMG_1125.jpgIMG_1128.jpg

This was layed out on some calf skin that is about 3" finished height so I could get my spacing correct.
IMG_1156.jpgIMG_1157.jpgIMG_1158.jpgIMG_1159.jpgIMG_1160.jpg

The two pieces were dyed dark brown before gluing and I made sure to lace the ammo strap in beforehand as it would be impossible after. The strap was also glued down before sewing to keep it from moving around. I didn't use white thread as it looked too stark, the color I found is called Buff but anything off white should do fine.
IMG_1161.jpgIMG_1162.jpgIMG_1176.jpg

I wanted to keep the velcro closure pretty flat so I opted for two small strips on either side of the ammo strap and judging by the D23 pics I am pretty sure they did it the same way as you can see the two rectangular bumps on the outside of the strap. Also, I used some double faced tape to keep the shin cylinders in place and when they were inserted the tape would roll on itself, replicating the D23 pics again. I'm pretty sure they used the same method otherwise these things would work themselves loose over time. Lastly the whole rig was taped to keep in place using double faced tape again. The only thing I don't show is that I wet formed the straps after to conform to the leg armor contour better.
IMG_1174.jpgIMG_1176.jpgIMG_1175.jpg

Finished product! The leg armor was over sprayed with a custom acrylic mix to blend in with the leather tone better.
IMG_1282.jpg
 
Last edited:
Chapter 7 -Left Leg Assembly

I used the same calf skin on the left leg. I printed the tombstone shape and added a quick layer of bondo as I didn't want print lines migrating through the leather. I wet formed and worked in the form with a bone folder to create the shape, then let dry overnight. I glued in the tombstone shape and then dyed the final color. The strap was left long until final assembly.

IMG_1214.jpg IMG_1217.jpgIMG_1222.jpgIMG_1221.jpgIMG_1231.jpg

I made the top layer of the leg using some flooring underlay I had lying around. Craft foam would work equally as well. Since it is not a wear and tear piece I used some spray adhesive on the same leather that I used for the right leg strap and did a quick mock up with the Cosplaysky pouch to check my progress.
IMG_1219.jpgIMG_1220.jpgIMG_1224.jpg

I made a template for the leg pouch using card stock and it took two tries before I was happy with it. It was transferred to the same 4 oz leather I used for the ammo strap on the right leg and all the pieces were dyed before assembly.
IMG_1232.jpgIMG_1234.jpgIMG_1235.jpgIMG_1236.jpgIMG_1238.jpgIMG_1239.jpg

The detail on the front flap doubles as the belt loop and the decorative stitching on this piece was brown. I finished off with a button stud at the bottom and stuffed it with with a piece of foam so it would keep it's shape.
IMG_1242.jpgIMG_1243.jpgIMG_1244.jpgIMG_1245.jpg
IMG_1246.jpg


I made sure to check my progress as I went.
IMG_1254.jpg
 
For the lower skirt I used the lightest garment leather I could find and made pleats by gluing the leather to itself and hammering down flat and for a good bond. I did some light sanding to weather the leather and the end was finished with velcro and glued to the tombstone strap so it is one assembly and doesn't move around.
IMG_1267.jpgIMG_1268.jpgIMG_1269.jpgIMG_1270.jpgIMG_1273.jpg

One thing of importance to note and I don't have pics covering this, I have glued everything to a rigid form so the leg acts as armor rather than a soft covering. There is evidence to support that the screen used was done similarly. You can see in the D23 pics that the knee armor is attached at the top. Because I had to make the armor larger to fit my boot I have the advantage that everything is glued and strapped into place so the whole left leg including the knee is one assembly that I can slip on.
IMG_1281.jpg
 
Last edited:
Chapter 8 -Gauntlets

I used some elastic straps to create a movable hinge on one side of the gauntlet, super glued in. E6000 would have been better for this because it remains pliable, but I was under a Halloween time constraint so opted for something quick. I put some velcro in there to finish the strap ends thinking that I might need a piece on the suit to keep these form rotating but they fit tightly once the gloves are on so it is not a problem.

IMG_1287.jpgIMG_1289.jpgIMG_1290.jpg

The opposing side I decided to use the hidden piano hinge method with a removable pin. This is a tried and true method used on the screen Jango costume and it works great, everything is locked on without fear of coming off if bumped. These were superglued as well but if they come loose I'll epoxy them in.
IMG_1284.jpgIMG_1285.jpgIMG_1286.jpgIMG_1049.jpg

I used aluminum foil for the detail on the left gauntlet.
IMG_1296.jpgIMG_1479.jpgIMG_1480.jpg

I wasn't happy with the FDM flamethrower print and resin would be brittle so I approached my machinist friend and we came up with a few aluminum greeblies to dress these out.
3CBC12DB-71AC-481C-993D-3934C3FC501A.jpeg
BF3C500A-DA88-46C8-9568-3AF3F1CE0334.jpeg


He can be found on Etsy.ThinkBox_logo2_mono.jpg
Thinkbox Manufacturing by ThinkboxMfg on Etsy
 
Last edited:
Chapter 9 -Left Knee

I created my knee darts from measurements taken from my stl files and turned them out of aluminum using the same proceedures I used for the shin cylinders. I opted to put a threaded hole in the back so I could remove them if I ever needed to repaint or repair my knee armor. You can see in the last pic That the knee is glued to the leg armor with a leather strap and I also put an elastic strap with velcro on the backside, approximating what the D23 pics show. I also worked with Jordan at Thinkbox to recreate these but with greater accuracy, using the reference pics and overlays. You can see how the front muzzle lines up with the side detail.
IMG_1168.jpgIMG_1169.jpgIMG_1170.jpgIMG_1612.jpg
IMG_1613.jpg
 
Chapter 10 -The Belt and Bandolier

I didn't end up taking as many pics of this process as I was down to the wire for Halloween. Before I cut anything in leather I mocked up the whole belt in cardstock, marking out where the pouches and ammo were going to be placed.

I started off by getting Thinkbox to machine the buckle for me, using a 1.5" inner belt as reference. The total belt height is 2.25" and works out perfectly with the 1/2" rivets in the front. These I machined from stainless steel carriage bolts as I couldn't find the right hardware.
IMG_0950.jpg65A31944-8477-483F-B1BF-4BB766B4E0F7.jpeg

Next I made up all of my ammo cartridges. These were actually the first thing that I turned on my metal lathe so they are not perfect but good enough for me. I then layed out the components to get my spacing correct and glued everything down before sewing the bandolier. The ammo cartridges were taped in with double sided tape the same as the shin cylinders.
IMG_1102.jpg8863DC5C-DE03-4CFD-9685-632DCDB69109.jpegIMG_1476.jpgIMG_1573.jpg

I then made up the various pouches found on the belt using the same cardstock template method I used for the leg pouch and these were stuffed again with foam so they would keep their shape. The flat pouch on the bandolier has a small magnet glued in for the closure method.
7710B2FC-176F-40D5-8955-7357A3478EF2.jpegIMG_1477.jpgC3520C9E-F460-484C-9737-6DC0323CB860.jpeg

The small round open pouch is actually a D shape, so I 3d printed a form and wrapped it in leather. It added the small groove with a painters tool and it worked.
DFCEF3AA-AC34-4FD8-81EC-6F8D198AC9BD.jpegE4F7CDD2-0201-423E-A6F3-7B4239CB93D3.jpegB43D6143-3A21-430A-83FB-6876313A7DC0.jpeg

I 3d printed the front of the breach holder and bent a piece of aluminum to fit the shape. This was then screwed together and the lower section wrapped in leather. This time I used E6000 and clamped it up overnight.
1A5E0FD1-1712-4588-9657-3D987F3E8A13.jpeg3FB0F436-89BC-42F4-BA87-E7AE468BA835.jpeg11524C72-0ECB-4C32-97AD-DD78841DD645.jpeg

Since I opted to glue the breach cartridges in I decided to secure the assembly to the belt with Chicago screws that are hidden. The charges are 3d prints from Thingiverse.
IMG_1473.jpgIMG_1253.jpg
IMG_1474.jpg
 
Last edited:
Chapter 11 -The Weapon and Holster

I downloaded Straeker's latest file from Thingiverse and printed it full size. The grips I opted to replicate in wood. I would have liked to use a hardwood like chestnut but this being a budget build, I ripped apart a pallet at work that was made form some kind of hardwood.
IMG_1638.jpgIMG_1639.jpgIMG_1640.jpgIMG_1641.jpg

I patterned the holster and sewed the correct top stitching in where needed before assembly. The inner layer is a layer of veg tan that I dyed as I knew I would wet form this after and the veg tan is easy to form and will keep it's shape. The rectangular piece on top is a piece of wood that I glued in a wet formed around, stretching the leather to shape as I went.
IMG_1453.jpgIMG_1454.jpgIMG_1455.jpgIMG_1456.jpg

There was a little more to this but I didn't take too many pics. I was basically figuring this out as I built it. I actually didn't have the pistol ready in time fore Halloween so I was kind of flying blind with this but in the end it fit perfectly. I took a small palm sander to quickly weather everything up.

IMG_1475.jpg
IMG_1478.jpg
IMG_1642.jpg


All in all, this was about 5 months of work in the evenings and weekends off and on as time permitted. I am pretty happy with the end result but there are a few revisions that I may work on. Right now I am happy to display him on the mannequin display I am putting together.

IMG_1764.jpg
 
This thread is more than 3 years old.

Your message may be considered spam for the following reasons:

  1. This thread hasn't been active in some time. A new post in this thread might not contribute constructively to this discussion after so long.
If you wish to reply despite these issues, check the box below before replying.
Be aware that malicious compliance may result in more severe penalties.
Back
Top