Gojira
New Member
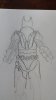
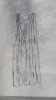
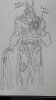
Hey there everyone! This ismy first foam build and post on here. I decided to make my own predecessor to Batman Beyond.I used a yoga mat for what would be the red parts, the standard EVA foam mats you get athardware stores, and craft foam. I actually started this project about 3 monthsago and finished in time for Planet ComiCon yesterday! I may not have kept have everything documented, but I still have my templates for every part. Here's a few pics of myinitial designs.


The work on this forumhelped inspire me to actually go through with the building. So thank you. Aftera long period of me trying to figure out the right measurements and whatnot, Ijust told myself "screw it," and started cutting away. Being anoriginal design, I wasn’t worried about screwing up. Thankfully it worked in myfavor in the end. I started with the bracers and the helmet. I don’t have shotsof the bracers being made, but here’s the head. For the nose piece I glued apiece of card stock behind the craft foam to give the appearance of rigidity.


I understand what you all mean when you say the projects get messy now. (and this is after I cleaned up a bit too)

After the bracers and most of the helmet were finished I started on the torso. I I essentially made a long adult size bib out of the yoga mat to use as a base for the torso. From there I just glued on the body pieces and the jetpack on the back. Here’s a pic of the jetpack. For the spinal segments and the jet pieces I used cardstock in-between two pieces of card stock to, once again, get the nice rigid piece look.

Since I do not have a bat-belt on this suit, I thought it would be cool if he instead had the deep hilt device on his right thigh where he would keep stuff. Oh and here’s the suit about 93% built. At this point batman has a rectangle for a crotch and no butt.


Woohoo! After the building was done I began the painting process. I used PlastiDip to seal and prime all of the foam. Since the PlastiDip is already a flat black color I just kept the black parts of the armor unpainted. I used some red acrylic paint that I watered down for the red parts and some dark grey acrylic for some of the metal parts.


To get the eyes on my suit to light up I disassembled a Craftsman LED Pocket Light I had lying around because it already has 6 LEDs on it and was cheaper than buying 6 individual LEDs. I did have to get a battery pack and a new button switch (I broke the switch disassembling). I tried using this guys method to get the eyes to glow while still being able to see out of it: https://www.youtube.com/watch?v=SHcH60giVys What he did was put some reflective tint over plexiglass and then put some wide mesh material over it. The LEDs are then on the bottom of the plexiglass so that it shines upward. Unfortunately for me, the LEDs from the light I used were too bright for me to see out of the eyes while they were on, but they looked good while on. Perhaps his method would work if I had dimmer LEDs.


Yay! The suit was finished just a day before I went to Planet ComiCon! (Darth Bat?)


I entered into the costume contest and got into the finals, I didn’t win but for my first build I was very happy. And look who I meet there! It’s fellow RPF member springsteel!


The work on this forumhelped inspire me to actually go through with the building. So thank you. Aftera long period of me trying to figure out the right measurements and whatnot, Ijust told myself "screw it," and started cutting away. Being anoriginal design, I wasn’t worried about screwing up. Thankfully it worked in myfavor in the end. I started with the bracers and the helmet. I don’t have shotsof the bracers being made, but here’s the head. For the nose piece I glued apiece of card stock behind the craft foam to give the appearance of rigidity.
I understand what you all mean when you say the projects get messy now. (and this is after I cleaned up a bit too)
After the bracers and most of the helmet were finished I started on the torso. I I essentially made a long adult size bib out of the yoga mat to use as a base for the torso. From there I just glued on the body pieces and the jetpack on the back. Here’s a pic of the jetpack. For the spinal segments and the jet pieces I used cardstock in-between two pieces of card stock to, once again, get the nice rigid piece look.
Since I do not have a bat-belt on this suit, I thought it would be cool if he instead had the deep hilt device on his right thigh where he would keep stuff. Oh and here’s the suit about 93% built. At this point batman has a rectangle for a crotch and no butt.
Woohoo! After the building was done I began the painting process. I used PlastiDip to seal and prime all of the foam. Since the PlastiDip is already a flat black color I just kept the black parts of the armor unpainted. I used some red acrylic paint that I watered down for the red parts and some dark grey acrylic for some of the metal parts.
To get the eyes on my suit to light up I disassembled a Craftsman LED Pocket Light I had lying around because it already has 6 LEDs on it and was cheaper than buying 6 individual LEDs. I did have to get a battery pack and a new button switch (I broke the switch disassembling). I tried using this guys method to get the eyes to glow while still being able to see out of it: https://www.youtube.com/watch?v=SHcH60giVys What he did was put some reflective tint over plexiglass and then put some wide mesh material over it. The LEDs are then on the bottom of the plexiglass so that it shines upward. Unfortunately for me, the LEDs from the light I used were too bright for me to see out of the eyes while they were on, but they looked good while on. Perhaps his method would work if I had dimmer LEDs.
Yay! The suit was finished just a day before I went to Planet ComiCon! (Darth Bat?)
I entered into the costume contest and got into the finals, I didn’t win but for my first build I was very happy. And look who I meet there! It’s fellow RPF member springsteel!
Last edited by a moderator: