Athanasios
Active Member
Sup guys and gals, welcome to this Thread. Unlike the silvery glittery threads that devour everything in their path (those who got the reference, high five yo, that's a great series!), this thread will hopefully be informative and helpful as I walk you through the creation of various pieces of gear from Ezio's outfit (AC:II), made from genuine calfskin vegetable-tanned leather. Most of the steps you should be able to do at home with some leatherworking tools, but there are a couple things you need an industrial sewing machine for. If you don't have an industrial sewing machine capable of handling ridiculously thick leather, FEAR NOT!, cause I don't either. I just go to a bag maker I know down town who does it for me for like a couple bucks.
Alright enough with the intro chit-chat let's get down to brass tacks. Or, I guess rivets, more accurately. Since we'll be using rivets, not brass tacks. Brass tacks are probably useless when working with leather. MADNESS I TELL YOU.
Anyway we're going to be making the following:
1) Ezio's Cape + Pauldron
2) Ezio's Belt + Pouches
3) Ezio's Vambrace
4) Ezio's Boot Tops
I'm still in the process of building these various pieces. So far I've finished the belt, pouches, and vambrace, and I'm almost done with the boot tops. The pauldron still needs some work but I need to machine-stitch a section of it and I'm waiting for the shops to open. They're closed until around the end of august.
Today I'll upload the progress on the belt and pouches, and maybe also the vambrace. Tomorrow I should be finished with the boot tops so I'll upload my progress there as well. And at some point I'll start uploading my progress on the pauldron and when I've finished I'll upload the rest.
Okay so let's take a look at what we'll be making.
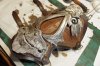
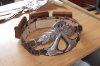
Here's the belt:


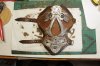
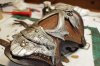
And the vambrace:


I'll post the other pieces when they're completely finished. Obviously feel free to click on any of the images to expand them.
We'll start with the vambrace in the next post.
Alright enough with the intro chit-chat let's get down to brass tacks. Or, I guess rivets, more accurately. Since we'll be using rivets, not brass tacks. Brass tacks are probably useless when working with leather. MADNESS I TELL YOU.
Anyway we're going to be making the following:
1) Ezio's Cape + Pauldron
2) Ezio's Belt + Pouches
3) Ezio's Vambrace
4) Ezio's Boot Tops
I'm still in the process of building these various pieces. So far I've finished the belt, pouches, and vambrace, and I'm almost done with the boot tops. The pauldron still needs some work but I need to machine-stitch a section of it and I'm waiting for the shops to open. They're closed until around the end of august.
Today I'll upload the progress on the belt and pouches, and maybe also the vambrace. Tomorrow I should be finished with the boot tops so I'll upload my progress there as well. And at some point I'll start uploading my progress on the pauldron and when I've finished I'll upload the rest.
Okay so let's take a look at what we'll be making.
Here's the belt:
And the vambrace:
I'll post the other pieces when they're completely finished. Obviously feel free to click on any of the images to expand them.
We'll start with the vambrace in the next post.