Ash from Ash vs. Evil Dead costume build

Zendragon

Sr Member
RPF PREMIUM MEMBER
Back in March of 2006 I started my first Ash costume based on "Army of Darkness" which you can see here:
http://www.therpf.com/showthread.php?t=4111

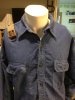
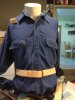
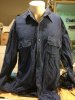
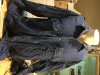
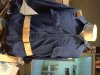
and almost 10 years later I am at it again, this time I was inspired to build Ash's new costume from the new STARZ series, Ash vs. Evil Dead which comes out next month!

Seeing how the show isn't out yet, the reference images I was able to get were from promos and screen captures from the trailer, so needless to say, this costume will be a work in progress.

Untitled-7.jpg1504_1200x1200x80_ash-poster.jpg11221825_1611273789113156_2691622754771453085_n.jpg11944554_10156013298155608_2077126818_n.jpgCPIGVpEXAAAPPq_.jpg large.jpg
 
So for Ash vs. Evil Dead, the costume designers made some changes to the iconic look of Ash, but they kept the same color scheme and overall feel. Ash is now 30 years older so it stands to reason that some elements would change. In essence, the shirt, pants, harness system and I believe even chainsaw have changed, even though the chainsaw is very very similar and probably based on the same Homelite that they all were based on.

The first part in all of this would be finding the necessary parts on very little information.

So I hunted for a shirt that had similar characteristics to what I saw in the reference photos, same with the pants, found some black grommets, along with various other odds and end and once all of those things came in I was ready to start. Oh... did I mention that I wanted this for Dragon Con? 3 days before I would leave for Dragon Con? Yeah... I am nuts.

I knew that the shirt would be too light, so I figured I would dye it to a closer color of blue.

11947507_1017899068228303_5233438348210342295_n.jpg11896165_1018118098206400_4994785214252807350_n.jpg
 
So while the shirt was cooking, it was time to do some work on my old shotgun that I had commissioned back when I first did the Army of Darkness costume. The shotgun itself was well done, but had some issues that I have been meaning to fix and until now hadn't had the motivation to do so.

As you can see, the original had a very blocky shape and I had hoped to give it a more accurate shape. That meant I would have to cut it down and somehow not ruin it in the process. Now I should note that I am not a guy who does much with wood, and I don't have a large selection of tools either. So off to Sears I went, while texting Bill of Punished Props about what type of saw I should consider. I ended up with a small band saw which allowed me to do the work.

I also had to disassemble the shotgun and considering that I had no idea how it was build in the first case I ended up breaking one of the PVC barrels while trying to remove it. I later realized that the maker had drilled in 2 holes in each barrel to be able to screw into the wood and then covered the holes up with putty. Needless to say, I now had to build a new barrel.

Once I cut down the base of the shotgun I needed to make new barrel grooves, sand the entire piece and then reapply stain. I then ended up making two new barrels out of 1/2" pvc pipe and attaching them using the same method that the maker had before.

While it wasn't perfect, based on time, it would have to do.


IMG_7394.JPGIMG_7400.JPG11206941_1018187788199431_7968642064903279057_n.jpgIMG_7426.JPGFullSizeRender(2).jpg
 
Once the shirt was close enough to the color I wanted, it was time to figure out the harness. The hold harness was completely different so I would have to wing it.

I started what I considered to be relatively known information first based on the reference photos.

The top right shoulder strap is made of cotton webbing of some sort, probably a belt. I just happened to have an old green belt that looked close enough. RIP old belt, you served my shorts well.

The ring for this appeared to be some sort of D ring, although I have yet to identify the correct one. It could be a D ring on it's side. Not sure.

Then I made the main belt, I used a buckle I had and will update this later.

Moving onto the cross strap. In the reference pics, it seems a bit wider than the pants belt. I did the pants belt at I think 1 1/5" so I ended doing the cross strap at I think 1 3/4". After looking at them together later, I think they are both a tiny bit too wide by maybe 1/4"

At the end of the cross strap, there looks to be some sort of button stud, but I needed to find something smaller than the normal sized ones and fortunately Amazon had just the thing.

IMG_7429.JPGIMG_7428.JPGIMG_7436.JPG


IMG_7397.JPG11221343_1018570341494509_328390778845339873_n.jpgIMG_7435.JPG
 

Attachments

  • IMG_7435.JPG
    IMG_7435.JPG
    955.8 KB · Views: 283
  • IMG_7397.JPG
    IMG_7397.JPG
    1 MB · Views: 270
  • IMG_7397.JPG
    IMG_7397.JPG
    2.5 MB · Views: 258
  • IMG_7435.JPG
    IMG_7435.JPG
    2.4 MB · Views: 237
Awesome work mate, I am looking to make a 1/6 version of Ashso have been studying the clothes what screen shoots etc.

I look forward to seeing your finished outfit :)
 
Last edited by a moderator:
Once I had some of the basics worked out, it was time to start working on the details.

The main cross belt has a number of grommets, 18 I believe. I had found a place on the web that sold the size I needed and in black, so they were ordered and sent priority.

I quickly realized that doing all of these and trying to make them even and straight would be a challenge.

11057486_1018714744813402_8540048532262561503_n.jpgIMG_7439.JPGIMG_7450.JPG
 

Attachments

  • 11221343_1018570341494509_328390778845339873_n.jpg
    11221343_1018570341494509_328390778845339873_n.jpg
    74.3 KB · Views: 303
SUPER late response. Sorry. Some pics of the completed stuff... regretfully, the majority of this costume (minus boom stick and chainsaw) has gone missing in the move.

So now I get to make it again, but thankfully, this time with a lot more reference photos.

10698618_1019569071394636_9039682454902570645_n.jpg11949490_1019569088061301_8947410035513184764_n.jpg

11951900_1022132824471594_6745641229003601973_n.jpg11218615_1030844163600460_162530009696618430_n.jpg12132383_1036229886395221_7844046135796037263_o.jpg
 
Hey man great attention to detail. If I may, whats the make and model of that shirt you scrounged up, or is that a tightly held secret? ;)
 
Thank you and of course. The base shirt used is from Amazon... https://www.amazon.com/gp/product/B0057XBCJI/ref=oh_aui_search_detailpage?ie=UTF8&psc=1

The actual shirt used in the show was custom made for the show but this was as close as I could find.

I found this shirt to be almost exactly what was used on the show. It was Wrangler brand that I got it at Wal-Mart in 2017. It is no longer sold by Wal-Mart, but it pops up on eBay on occasion, just search for "Wrangler Denim Long Sleeve." The thing that really sells it for me is the pocket flaps have the corners cropped just like in the show.

s-l1600.jpg
 
I found this shirt to be almost exactly what was used on the show. It was Wrangler brand that I got it at Wal-Mart in 2017. It is no longer sold by Wal-Mart, but it pops up on eBay on occasion, just search for "Wrangler Denim Long Sleeve." The thing that really sells it for me is the pocket flaps have the corners cropped just like in the show.

View attachment 944788

That's a nice find.

I ended up getting a couple of the shirts and pants from the Auction a while back and as it turns out, both the pants and the shirt were made for the show. The shirt is a stretch denim, that has been reversed. So it has the denim look but not the denim color. I also suspect that they color treated the fabric, but I am not 100% on that. The color is very blue.
 
This thread is more than 5 years old.

Your message may be considered spam for the following reasons:

  1. This thread hasn't been active in some time. A new post in this thread might not contribute constructively to this discussion after so long.
If you wish to reply despite these issues, check the box below before replying.
Be aware that malicious compliance may result in more severe penalties.
Back
Top