kenlandrum
Sr Member
You can have this one if you like: Right Electrical Connector - Google DrivePerhaps my stl was mislabeled and it's actually another connector then?
Using this collection: NASA Space Suit Connection Cluster by PublicUniverse
You can have this one if you like: Right Electrical Connector - Google DrivePerhaps my stl was mislabeled and it's actually another connector then?
Using this collection: NASA Space Suit Connection Cluster by PublicUniverse
Weird. This is a photo from the Armstrong Suit. Seems different... still some differences to the model. I will make those adjustments tomorrow.I just looked at those. Those models are not particularly accurate.
Here is a photo of an actual Airlock Apollo electrical connector. On the left is the part mounted to the suit (Less the base disc) It's .907" tall and 1.067" in diameter.
I was going from memory in my earlier post, but you can now clearly see the circumferential groove , which is flat bottomed and centered on the fitting.
View attachment 1255836
View attachment 1256631
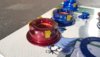
Well as this part isn't accurate, figured I would test out the method of using wire to replicate the electrical contacts of the part. Using 1.00mm brass wire, straightened then press fit into the holes of the plug. Roughly trimmed to length with a side cutter then flipped the whole plug upside down and sanded with 100 grit to get all the contacts level. Finished up with some 180 and 220 grit to polish it up a bit and inserted into the connector.
Hopefully will do the same when I get my hands on some accurate connectors.
 drive.google.com
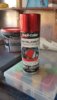
I'm thinking of using the Duplicolor VHT Anodized color coat paint.
...They look heaps more 'metalic'' in real life.