Another, yes another Rocketeer Jetpack build.

gnolivos

Sr Member
Ok there are plenty builds here and I’ve been learning. I thought I’d create a thread because I’ve found different sources for parts and others in the future could learn from my mistakes as well...

I bought the kit from Rusotech at Etsy. $200 plus $47 ship to USA is a steal for his gigantic print.

It is not screen accurate but it can be modified if needed. Mainly the radiator doesn’t have a hole right through, no fins on the top of rockets (I have them on order custom
made shapeways $15 the set), and the bottom of the rocket tubes need to be chopped off in a straight line. Still debating if I will do that.

I have done 90% sanding. Needs some details finished off next week before assembly. Then painting.

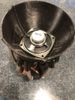
Also I found this awesome 3.5 inch fan in eBay!!

Thanks for looking. Will
Update regularly.

Adjustments.jpg
Adjustments.jpg
IMG_6154.jpg
 
Any fellow members used the DO3D mold? Im having a very hard time getting the rods on the flaps to line up into the two orifices on the back of the pack. It ain't possible due to the angle and design of the pack... that's my opinion. What have others done? I need some pics of the back of your packs!
 
Very good build and for the price...wow. My only minus is the black caulk to mimic the welding; any engineer I know is really careful with his welding, specially when it comes to turbine/engine welding: it should be neater looking (I know, it's inside...but still);)
 
Very good build and for the price...wow. My only minus is the black caulk to mimic the welding; any engineer I know is really careful with his welding, specially when it comes to turbine/engine welding: it should be neater looking (I know, it's inside...but still);)

Actually the weld line IS exposed lol. I made it neater but still not perfect. I can always remove it which is the beauty of the caulk. (Is what she said! [emoji23])
 
Watching with interest. That's what I love about the RPF; everyone has a different approach and we all learn from each other. Your nose-cone-magnet idea is very good. I wish I had though of that before I glued mine in place.
 
If you can find a +5v motor to attach that fan to.. I think the *"Valor"* kits have some +5v pads broken out to power it from.. (no control.. just on/off with the rest of the kit).. but should work.. I believe there is also a VIN pin broken out.. which should be a direct connection to battery pack/source
 
Last edited:
If you can find a +5v motor to attach that fan to.. I think the *"Valor"* kits have some +5v pads broken out to power it from.. (no control.. just on/off with the rest of the kit).. but should work.. I believe there is also a VIN pin broken out.. which should be a direct connection to battery pack/source

Are you a mind reader? I came in here looking for your username (printed on valor instructions!) to ask you exactly that lol.

Also, am I able to customize the arduino (python code I assume?) to my liking? I’d prefer red and blue flames instead of the red green pattern. I think. Would like to mess with it.

Thanks!
 
Last edited:
If you can find a +5v motor to attach that fan to.. I think the *"Valor"* kits have some +5v pads broken out to power it from.. (no control.. just on/off with the rest of the kit).. but should work.. I believe there is also a VIN pin broken out.. which should be a direct connection to battery pack/source

I tested the board. There are two pairs of 5v and ground. Also there is one 3.3V and ground.

They are always powered, however if I connect the 5V to the pushbutton ground then the fan will power up only with the button. :)

Capturing here for other members to learn what I’ve tested.
 
Are you a mind reader? I came in here looking for your username (printed on valor instructions!) to ask you exactly that lol.

Also, am I able to customize the arduino (python code I assume?) to my liking? I’d prefer red and blue flames instead of the red green pattern. I think. Would like to mess with it.

Thanks!

Its C++/Arduino sub-set.. not Python.. (but there may be an interface/interpreter for Python somewhere?)

but you would have to start over from scratch, as I have never released this particular firmware for public use. (I dont believe Valor has either, but I cant speak for him)
 
I tested the board. There are two pairs of 5v and ground. Also there is one 3.3V and ground.

They are always powered, however if I connect the 5V to the pushbutton ground then the fan will power up only with the button. :)

Capturing here for other members to learn what I’ve tested.


You are probably right.. I havent looked at the schematic in a long time..

tapping a controlled GND is a nice fix/work around..

It was a (at the time) a planned feature... and I guess I never really thought about WHEN the fan should be running. (but only during button press make sense).. in my mind.. it was to be running if the pack was 'on' (not just during the 'blast/ignition' portion... but I guess that makes more sense)

Always v2 I guess LOL ;)
 

Your message may be considered spam for the following reasons:

If you wish to reply despite these issues, check the box below before replying.
Be aware that malicious compliance may result in more severe penalties.
Back
Top