Another Rubie's Han Solo Blaster

bcubed

New Member
Rubies_Blaster.jpg

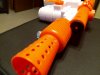
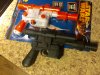
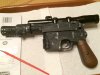
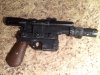
Starting a new build, after looking over the forum for something fairly simple that I could accomplish I choose to get a Rubie's Han Solo Blaster ... (as you can see I also have plans for a Blade Runner pistol in the future).

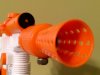
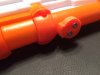
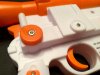
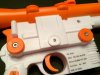
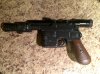
I have plans for some minor changes to the Blaster and then paint. I've already opened up the flash hider and drilled out the holes. I also have started some work on the ends of the scope. I have some more pictures and will post them when I can.

This weekend I hope to be able to get to paint and possibly have a finished Blaster by this weekend.
 
Here are my photos from tonight ... I've modified the barrel, opening it up and drilling out the holes .. I added a knurled nut to the underside .. then looking at reference photos I decided to put a screw in the handle .. I made the hole large enough for the screw to be recessed, however then it would fall in .. so I glued a washer to the back side to catch the screw. I'll fill in the other holes before I paint.

I also added some detail to the scope, taking a razor knife and scratching in a crosshatch pattern ... it's not perfect but hopefully will look OK after paint.

Lastly I added a piece to the back of the scope using a sprite bottle cap. Once painted hopefully I can put something in it to make it look more realistic.

I'd also like to get rid of the fake screws on the scope mount and add some real ones.

I'm just trying to make an interesting piece, won't be accurate ..... let me know what you think or if you have any suggestions!

image.jpgimage.jpgimage.jpgimage.jpgimage.jpgIMG_0579.JPG
 
It's a good project for a beginner like me, if you mess anything up your out $12 but you still have a parts gun!

I'm going to try to fill the other holes today in preparation for a first coat of paint.
 
Went ahead and took a razor knife to the 2 knobs on the side, added some cross hatching like I had one the top. Then went ahead and drilled them and inserted a screw. Not quite centered, but I'm rushing a bit more than I should be.

The front of the scope lacked detail, so I took a flat plumbers washer and trimmed it and glued it to the front. I also put another washer down the barrel to cover uo the speaker.

Lastly on top, all the reference photos I had seen there were a couple screws on the elevation control . so I drilled a couple holes and glued in some screws.

I hope these details once painted will make it look less like a plastic toy.
 

Attachments

  • Photo Aug 15, 11 12 00 AM.jpg
    Photo Aug 15, 11 12 00 AM.jpg
    449 KB · Views: 129
  • Photo Aug 15, 11 10 23 AM.jpg
    Photo Aug 15, 11 10 23 AM.jpg
    1.1 MB · Views: 203
  • Photo Aug 15, 11 09 24 AM.jpg
    Photo Aug 15, 11 09 24 AM.jpg
    1.1 MB · Views: 223
  • Photo Aug 15, 11 08 25 AM.jpg
    Photo Aug 15, 11 08 25 AM.jpg
    1 MB · Views: 124
  • Photo Aug 15, 11 08 03 AM.jpg
    Photo Aug 15, 11 08 03 AM.jpg
    1.1 MB · Views: 208
I didn't like the design of the middle knob (or lack of one) .. so I glued on another plumbing flat washer and screw. Also started to fill in the extra screw holes.

Photo Aug 15, 1 04 12 PM (1).jpgPhoto Aug 15, 1 04 46 PM (1).jpg
 
After some flat black, I want to paint the scope gloss black and then weather the whole gun.

The other Blaster I'll do eventually, and the pass one of them on to a family member.
 

Attachments

  • Photo Aug 16, 1 48 57 PM.jpg
    Photo Aug 16, 1 48 57 PM.jpg
    1.6 MB · Views: 155
Painted the grips brown and the the scope gloss, and then started weathering, This is my first time doing this, I found what I thought were some good reference photos and trying to use them for inspiration ... I'm pleased with it so far.
 

Attachments

  • Photo Aug 16, 4 57 50 PM.jpg
    Photo Aug 16, 4 57 50 PM.jpg
    994.3 KB · Views: 281
Well, I think I am done for now ..... gonna sit back and look a it fir a while.

Does anyone have any plans for a stand or links to purchase one? Simple or inexpensive is great, since this is just a toy.
 

Attachments

  • Photo Aug 16, 6 07 31 PM.jpg
    Photo Aug 16, 6 07 31 PM.jpg
    1.6 MB · Views: 152
  • Photo Aug 16, 6 07 21 PM.jpg
    Photo Aug 16, 6 07 21 PM.jpg
    1.6 MB · Views: 187
Very nice work, what type of paint did you use for the grips? I have one I've been meaning to repaint & I thought of using brown enamel with a wash of darker brown to bring out the details of the grips. As far as a stand it'd simply be a case of a base & a vertical "arm" to hold the barrel in place. It'd be a fun little one-day build I'm sure,
 
Thanks! The grip is actually rust primer with some other random brown paint over top. I want to thin some black down and wash over the grip to darken the crevices.
 
This thread is more than 8 years old.

Your message may be considered spam for the following reasons:

  1. This thread hasn't been active in some time. A new post in this thread might not contribute constructively to this discussion after so long.
If you wish to reply despite these issues, check the box below before replying.
Be aware that malicious compliance may result in more severe penalties.
Back
Top