fiveliter8
Active Member
Howdy all!
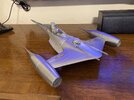
Ever since the Mando episode aired on Book of Boba, I jumped right into modelling up the "turbonic venturi power assimilator" which took a few weeks off and on to complete. I was going to print a full-size version of it to display, but that will take hours, lots of material, time, and money to complete. My focus shifted to converting a model kit N-1 but decided to convert the toy since the scale was larger and the assimilator would be able to be seen in more detail. I acquired one (relatively cheap) but couldn't bring myself to chop it up, so instead, I decided to do a minimal chop conversion that would allow the ship to be returned to stock.
First thing was to scale the assimilator down and curve the bottom to match the surface of the ship:

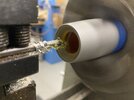
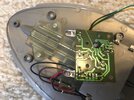
Next, I modeled the front of the engine. Here, I did have to "destroy" one of the nacelles to see how it was all held together. From that experience, I was able to get just the front of the other nacelle open in order to remove the cone and replace with the fan assembly. Here, the only hacking required was to open up the hole where the cone was held in. If the cone is swapped back in, the modification is not noticeable at all. (it's just loosely fit in the picture)

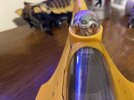
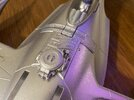
Next I worked on Grogu's seat. Getting the R2 out was a royal pain in the butt. I did manage to remove it without any visible damage to the ship or R2. It took a while to figure out how to do the dome. In the end, it came out great!

Once Grogu was finished up, I went to work on the tail. In the show, the section of exposed tail goes further up toward the front than where that point is on the toy. Otherwise, it looks pretty good in my opinion.")

Work on the cannons were next. I modeled those up to mount in the same manner as the stubby toy cannons and printed them in clear resin so that the LED light will still be visible in strategically unpainted spots.


Here is where it's at at the moment. I'll be working on the leading edge details as well as the "engine compartment" details for in front of the canopy next.

STAY TUNED!
Ever since the Mando episode aired on Book of Boba, I jumped right into modelling up the "turbonic venturi power assimilator" which took a few weeks off and on to complete. I was going to print a full-size version of it to display, but that will take hours, lots of material, time, and money to complete. My focus shifted to converting a model kit N-1 but decided to convert the toy since the scale was larger and the assimilator would be able to be seen in more detail. I acquired one (relatively cheap) but couldn't bring myself to chop it up, so instead, I decided to do a minimal chop conversion that would allow the ship to be returned to stock.
First thing was to scale the assimilator down and curve the bottom to match the surface of the ship:
Next, I modeled the front of the engine. Here, I did have to "destroy" one of the nacelles to see how it was all held together. From that experience, I was able to get just the front of the other nacelle open in order to remove the cone and replace with the fan assembly. Here, the only hacking required was to open up the hole where the cone was held in. If the cone is swapped back in, the modification is not noticeable at all. (it's just loosely fit in the picture)
Next I worked on Grogu's seat. Getting the R2 out was a royal pain in the butt. I did manage to remove it without any visible damage to the ship or R2. It took a while to figure out how to do the dome. In the end, it came out great!
Once Grogu was finished up, I went to work on the tail. In the show, the section of exposed tail goes further up toward the front than where that point is on the toy. Otherwise, it looks pretty good in my opinion.
Work on the cannons were next. I modeled those up to mount in the same manner as the stubby toy cannons and printed them in clear resin so that the LED light will still be visible in strategically unpainted spots.
Here is where it's at at the moment. I'll be working on the leading edge details as well as the "engine compartment" details for in front of the canopy next.
STAY TUNED!