Another Bomber for the Empire

scotthothpatrol

Well-Known Member
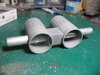
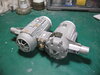
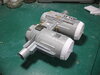
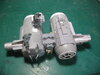
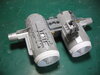
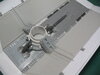
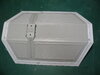
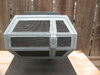
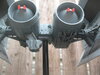
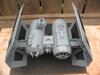
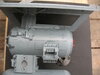
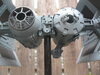
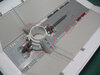
What can I say about the bomber that already has not been said. For mine the armature block is a cast resin piece I made. After building she was primed using Tamiya Fine Light Grey primer and gone over with Tamiya TS-32 Haze Grey. The model is actually a lot more blue. I tried photographing indoors and out but the pictures kept coming out grey. For the fine pin striping I used a Uni Pin dark grey 0.1 pen. Something to note for anyone planning the built is to use two port side wings which requires two kits. instead of the two mirror image wings you get in one kit. I did not make this observation until after I got the starboard wing done. So at that point I was left with either going with what I got of redoing the starboard wing. I decided to compromise and sand off and or replace some the kit detail on the out side face to better match the port wing. Thanks to all the previous bomber posts and reference photos.
 

Attachments

  • IMG_8127.jpg
    IMG_8127.jpg
    1.9 MB · Views: 301
  • IMG_8130.jpg
    IMG_8130.jpg
    1.8 MB · Views: 314
  • IMG_8137.jpg
    IMG_8137.jpg
    1.7 MB · Views: 302
  • IMG_8138.jpg
    IMG_8138.jpg
    1.6 MB · Views: 283
  • IMG_8140.jpg
    IMG_8140.jpg
    1.6 MB · Views: 283
  • IMG_8142.jpg
    IMG_8142.jpg
    1.6 MB · Views: 282
  • IMG_8145.jpg
    IMG_8145.jpg
    1.5 MB · Views: 303
  • IMG_8151.jpg
    IMG_8151.jpg
    1.3 MB · Views: 349
  • IMG_8153.jpg
    IMG_8153.jpg
    1.5 MB · Views: 339
  • IMG_8184.jpg
    IMG_8184.jpg
    1.7 MB · Views: 360
  • IMG_8185.jpg
    IMG_8185.jpg
    1.7 MB · Views: 337
  • IMG_8186.jpg
    IMG_8186.jpg
    1.7 MB · Views: 310
  • IMG_8191.jpg
    IMG_8191.jpg
    1.3 MB · Views: 340
  • IMG_8192.jpg
    IMG_8192.jpg
    1.7 MB · Views: 327
  • IMG_8195.jpg
    IMG_8195.jpg
    1.4 MB · Views: 322
  • IMG_8197.jpg
    IMG_8197.jpg
    1.5 MB · Views: 330
Looks good. I did the same thing on mine with the wings. Realized after it was built that one was wrong but I wasn't going back.
 
Love it, nice build! Nothing I enjoy more than watching these scratch and kitbashed builds get put together.

Nice work!
 
That looks awesome!!
What was your approach to cutting the octagonal hole open?
Thanks, I was thinking taking that Plaststruct dome and cutting out all those openings was going to take longer and be more of a pain than it actualluy was. Basically I started by sanding the somooth surface of the dome to make it dull so the pencil or pen markings would go on better and not rub off. Then I drew every thing out. Next I took a dremel tool and cut away most of the material. then with a smaller bit I got in closer and finaly finished it up with files.
 
I love the Bomber! I am actually in the middle of building one myself and was hoping you might answer a couple of questions:
What did you use for the wing socket pipes? They look a too thin to be PVC.
it looks like you reproduced the inner wing greeblies from the Morser Karl kit, I presume by casting, given their color differences. I am trying to do the same, but having a lot of trouble getting the points to form all the way. Can youtell us your method and materials?

Thank you for any tips you might want to share.
Hi Odysseus Thanks for writing. It will be a pleasure to help you. From the items circled in red in the photo I assume these are what you are asking about. The white tubes are Plastruct TB-28, TB-32, TB,36 and the disk at the bottom is a ring/flange RI-36 which I sanded away some of the thickness. The tube/pipe that runs through the ship from wing to wing has an outside diameter of 3/4 so TB-28 has an inside diameter of 3/4. The Karl pieces were a pain in the ass to get those 8 points to come out. I made dozens of them and used the best ones. I made a two part mold using Moldmax 30 and cast them in Smooth -On 300. I would take the mold half with with the points and bent the mold on one hand to open up the cavities and brush in the resin with the other hand and brush on the other half and put them together. If I can help you with anything else feel fee to ask. Scott
 

Attachments

  • production photoii.jpg
    production photoii.jpg
    1.2 MB · Views: 148
This is a fun subject to scratch build. Compared to some SW spacecraft, it's not too crazy in trying to acquire the all the necessary kits.
That Tamiya Haze grey is very close to the original 76-77 TIE color. especially nice nice it is readily available"out of the can"
For spray bombs--"Tamiya's spray cans actually perform quite well. -far better than their Testors/or Rustoleum counterparts

Lookin' sharp
 
One more question, please. The piece along the wing extension. According to other references, this is from the Leopold kit. Can you recall the part number? I can't see anything like it. Thank you again.

1599803937137.png
 
One more question, please. The piece along the wing extension. According to other references, this is from the Leopold kit. Can you recall the part number? I can't see anything like it. Thank you again.

View attachment 1347339
I don't recall where that came from. The original part I think was a light gray like the leopold parts. I did a search through my other kits but did not come up with anything I will look again this weekend in the meantime maybe someone else will chime in.
 
Odysseus, I think that small wing nurnie is part A-16. Only 2 per kit, so you'll need to cast more or buy 6 kits!

---edit: confirmed that it is A-16 but there are 4 per kit not 2 per kit.
 
Last edited:
You bet. It being on the sprue in a sideways orientation from the way we look at it doesn't help :) Glad to hear it worked out.
 
This thread is more than 3 years old.

Your message may be considered spam for the following reasons:

  1. This thread hasn't been active in some time. A new post in this thread might not contribute constructively to this discussion after so long.
If you wish to reply despite these issues, check the box below before replying.
Be aware that malicious compliance may result in more severe penalties.
Back
Top