Another Bandai 1/5000 Star Destroyer (with custom base)

skahtul

Sr Member
RPF PREMIUM MEMBER
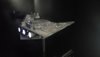
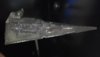
Here is my version of the Bandi Star Destroyer. I reviewed a lot of the builds here on the RPF to get some ideas on how to finish this, so thanks to all those who have been posting their builds!

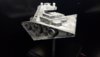
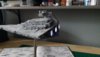
This kit is pretty amazing and like all Bandai models, the engineering is spot on. The only part I did not like was that you have to remove the upper bridge section in order to turn on the lights so I decided to make my first custom base and run the battery pack external along with an external switch. Not only does it make it easier to turn on and off it also allows a much tighter fight reducing light leaks and makes the model much lighter for mounting.

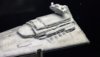
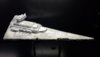
Here is the model pretty much assembled and ready for painting and effects.
20200321_160701.jpg
 
I pre-ordered this model and I have been sitting on it ever since. I have only ever put lights into one other model and it did not turn out good... Also, even though I have built several Star Destroyers I was not exactly sure how to finish one of scale, that was until I watched a Tested video and saw how they did some of the finishing work. That video series along with the builds here finally gave me enough ideas on how to finish it.

I started with a base coat using the Tamiya Fine Surface Primer. I tried to keep the paint to a minimum as to not fill in all the small details. This thing really does look way better than my larger destroyer from Revell.

I started with some green masking tape and cut out random shapes to get the desired Aztec pattern.

Ship 1.jpg


Added some extra light-blocking to the bridge and the rest of the model.

20200328_211432.jpg
 
Last edited:
Once everything was masked off it was time to pre-shade and apply the base coat.

For my base coat I used the following:

XF-2 along with a few drops of XF-19 Sky Grey.

Ship 2.jpg
 
For pre-shading I used XF-1 Flat Black along with some XF-53 Neutral Grey to lighten it up a bit.

Ship 3.jpg
 
Here is the completed paint job.

Ship 4.jpg


I applied a few coats of Tamiya TS-13 clear to in order to prepare it for a bit of weathering.

I also used some of the Tamiya S-23 and 27 along with clear Elmer's blue to tint some of the windows red and blue.

I have never used pigments but I decided to apply a bit on the engines and around the top to weather it up a little. At this scale, I tried not to apply too much weathering. I initially was not going to do anything with the panel lines but decided to give it a try and I think it really helped a bit. For the panel lines, I used Tamiya Grey panel line accent paint.

Ship 5.jpg


Removing all of the masks:

Ship 6.jpg
 
Last edited:
Time to build the base. My local lobby store has these nice wooden bases that are pre-routed and make it pretty easy to get started. I have made these in the past but for $2.00 I think it's easier to buy one then make it in this instance...

I also ordered some square aluminum tubing to use in feeding the wires through and to use as a support. I usually see these supports made with round and though I would try the square tubing. I think it turned out okay but I can see why the round is most often used as the square was a bit of a pain...


Base 1.jpg


Used some black enamel and added the switch for turning on the light. Once my 3D printer finally arrives I will try to make some kind of imperial symbol or plaque to mount on the base. This will also house the battery pack.

20200402_112531.jpg
 
To get the base ready for the remote switch I had to re-wire some of the original battery pack. This allowed me to have the battery and switch externally.

Later I will clean up all the wiring with some solder and wire sleeving but this is good for now.
Base 2.jpg


Here is the wiring changes I made in case anyone else want's to see what's needed. Initially, I thought I could just cut the positive and negative wires from the battery pack, but there was a bit more too it. I just had to tie in the battery terminals and then I was able to attach the remote battery pack.

Base 3.jpg


Base 4.jpg
 
Here is the final product. I sprayed it with the Tamiya TS-80 as the final coat to finish it off.

Finish 1.jpg
 

Attachments

  • Finish 2.jpg
    Finish 2.jpg
    2.6 MB · Views: 275
  • Finish 3.jpg
    Finish 3.jpg
    2.3 MB · Views: 248
  • Finish 4.jpg
    Finish 4.jpg
    2.3 MB · Views: 233
  • Finish 5.jpg
    Finish 5.jpg
    2.5 MB · Views: 247
  • Finish 6.jpg
    Finish 6.jpg
    2.7 MB · Views: 262
  • Finish 7.jpg
    Finish 7.jpg
    2.5 MB · Views: 260
Pretty nice! How did you avoid the smile, on the bow?

And for the $64 question, where did you find papertowels?! ;)

and Welcome to the RPF.
 
Pretty nice! How did you avoid the smile, on the bow?

And for the $64 question, where did you find papertowels?! ;)

and Welcome to the RPF.

I have been using the paper towels sparingly... :)

I heard a lot of people had issues with the bow, I think maybe I got lucky? Even though it was an early one since I pre-ordered it, it seemed to go together well from what I could tell without any bowing.

Actually reading about all the people having warping issues is part of why I held off for so long, but when I did some dry test fitting a few weeks back it seemed okay so I just went for it. It did take some clamps, tape, and glue to get it really get minium light bleed on the seams.
 
This thread is more than 4 years old.

Your message may be considered spam for the following reasons:

  1. This thread hasn't been active in some time. A new post in this thread might not contribute constructively to this discussion after so long.
If you wish to reply despite these issues, check the box below before replying.
Be aware that malicious compliance may result in more severe penalties.
Back
Top