ANH Pyro X-Wing References - Mainly: Red 6 Search

Yeah, moving all that stuff was a pain. Between Edlund's warehouse and my own stuff, I spent the entire summer looking at boxes. And I'm still looking at them (I just don't have to move them as much.......


Huh? Been sniffing the primer again Julien? :lol But yes, I forgot to mention our esteemed Paris Bureau and their love for all things metric.

Gene


I thought you were born on November, 30th ! That's what is written on your profile ! :lol

I'm trying to think imperial, but when it comes to 1/16, 7/8 of an inch etc... Im totally lost ! :D My only reference is 32", and I know how big it is. Like a Falcon ! :lol
 
Thanks for the excellent pics Gene, and thanks on behalf of the Aussies for the metric. Oh and I have the perfect spot for a charred nose full of lead shot.
 
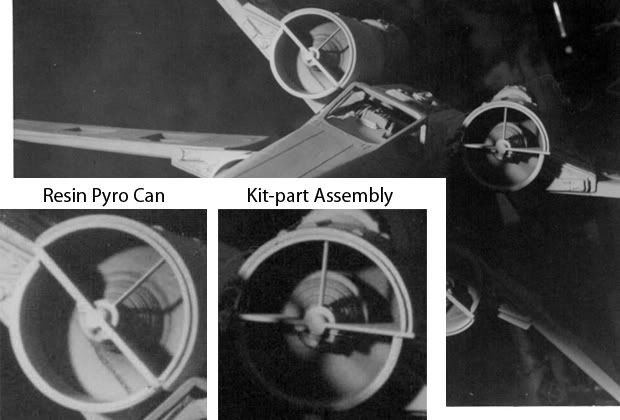
So whats up with these Saturn V cans? In the pavement photo of the kit parts we do not see the half with the long rectangle. Only four duplicates of the same can. You can spot a repair in these Pyro kits on these... with a recombined segment at the back. We could assume this is an original part or it would have been replaced in its entirety. The panels on top are consistent with actual Pyros.

But did you notice the other cans with rectangle on top are from the Monogram version? I've only ever spotted Airfix parts used on the original models. The quality of this duplicate is quite sharp, perhaps a later addition to this kit.

Then looking at the paintbooth photos we see that long rectangle can on a Pyro... but its an Airfix can. Regardless of brand, do other Pyro's feature this can? Would they have been resin duplicates or actual kit parts?

Here I go answering my own question, with the evidence staring me right in the face this whole time.

Ever notice that Hero cans use the entire Saturn V bell inside, while the Pyro versions are trimmed shorter? Neither did I, until I went to build one. I think this photo already posted proves two things. First kit parts were utilized on some Pyro builds, and second we could guess this intentional out-of-the-way utilization of kit parts would have been to match the Hero versions. Otherwise, why bother? So here you go... a deeper kit part can with a thinner styrene base right along side a resin version.
Pyrokitparts.jpg


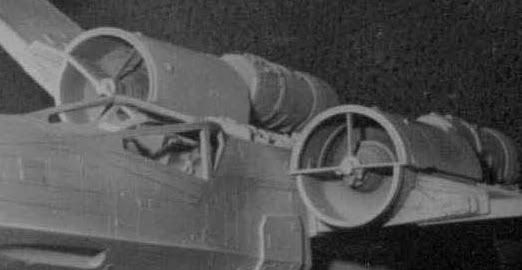
EDIT: Another view
anotherview.jpg


Gene... those photos have been mega helpful. Working on the fuselage with confidence now.:thumbsup
 
Last edited:
Yeah, moving all that stuff was a pain. Between Edlund's warehouse and my own stuff, I spent the entire summer looking at boxes. And I'm still looking at them (I just don't have to move them as much.......

Gene

I feel your pain.... moving sucks.... even when moving something awesome. ;) I will call ya before the Holiday... love to catch up. :)
 
I hadn't even got to the cans yet... Been too obsessed with the fuse. But now you point it out it's obvious. I'm glad everyone is focusing on these birds and as the weeks go on and more info comes forward we should have a definitive pyro thread available for all to see.

Any progress on porkins Carsten?
 
Yes, slow. Had some issues with my eyes hurting, so it was limited and the reason for me not adhering to my weekend deadline. Simply didn't have anought to show. Did his vest, working on the orange flightsuit or whatever it's called. Building up the mohawk on the helmet and working on the chestbox. Built up his legs a bit too, so they didn't look so weird. The kneadatite was planned to be used for most of these additions, but it hardens too fast, so I had to keep using super sculpey for some of the parts, which means baking and a more fragile build, so I'll have to figure out a way to secure it when it gets shipped to whoever can do the molding and casting.
 
Just took a picture of him... seriously... he looks like crap. Decided I'd rather not shock you with it... will see if I can fix the issues I was seeing in the picture that I was not seeing when looking at the sculpt itself. .(
 
Sculpey blows for this kind of fine work. Use a two-part epoxy putty like Milliput or the equivalent that Tamiya makes. Easier to work with = better results.

Gene
 
Wasn't so much the sculpey part of it, but rather the kneadatite part. Guess it will be hard to fix now. Hmm... pressing on to get the rest done on the body. Then onto finishing the arms.
 
Anyone started on their paint-up of their Red 6's, or are you guys still busy compiling info and reference and tweaking your models for that perfect pyro look?
 
Popping bubbles, filling, sanding , finding more bubbles , filling , sanding, getting the nose right, filling sanding, cutting styrene chips, ...... Etc etc.
 
Yeah, the underside of mine looks like the surface of a bowl of tapioca pudding, there's so many bubbles. Looks like I'm gonna have to do the bubble clean-up too... meanwhile I'm finally getting round to putting the cannons on my V3...
 
I've put so many hours into this solid fuse i have to follow through now. I'm beyond the point of no return. But i still want another hollow fuse kit. Anyone wanna buy an SMT Probe droid ? so i can get another Pyro.
 
Hopefully it wasnt too bad. I thought I caught all the bad ones. Funny how its only the Guys in AUS. Maybe the trip over at altitude made em worse?
 
I couldn't have afforded the hollow one, lol... anyway, I'm not too fussy about close-up surface perfection; reckon it'll clean up OK for my needs.
 
Back
Top