phillbarron
Active Member
That pouch isnt empty in any picture I've seen. Probably just a wood block though.
Well, colour me surprised.
That pouch isnt empty in any picture I've seen. Probably just a wood block though.
Hey Dan, Who's scope mount did you go with? Nice work by the way, It looks awesome
...Also, does the distance between the scope mount and pistol look larger than anyone else imagined/seen in their replicas?
Yeah, it looks like the FH and upper were cropped out and moved to the left to show some Ford chin. Looks doctored to me...
No reason to chop a preproduction test image.
The different look is simply due to camera perspective and lens.
I had done a lengthy reasoning for my belief of how the front sight greeblie was made and its final appearance post production back in the day... but the long and short of it is that I believe originally the front sight was built and attached much like seen on the MerrSon version. Note the comparison of the MerrSon cast and the ANH hero.
I believe the Antenna rods were glued directly on the barrel and NOT on the T track. The comparisons IMO prove this. The antenna simply sit TOO high when attached to the track. My model matches the outline on the HERO exactly. I feel the only think we see in the final post production images is the right side antenna head and glue residue. I believe there was only the vertical upright blade dividing the antenna which provides the perfect gap for the images.
In some production images we can see half the right antenna rod and others it is longer.
I believe the antenna sight was assembled with full length rods as shown in my recreation and when first fired, the ejected case knocked the left antenna off completely and broke the right one off short.... OR Ford "may" have dropped it since there is other damage to the blaster.
View attachment 965669
For the hole drilling is there a needed amp to make it through the side wall? I found a drill press that has 2.4 amps. Here it is 8 in. 5 Speed Bench Drill Press Or is there a better one for a price lower than a hundred dollars?
Thanks for this photo collage! I think I've seen almost all of those comparison shots, but it's nice to have them all together in one big image.
I remember all the discussion back then about the sight greeblie setup, but for whatever reason, I draw a complete blank about the T track base not being there! I'm totally convinced, though, and (thanks to you) I'm gonna change my replica "accordingly". (I never use words like that when I'm speaking, I think it's silly that I can type in such a vastly dissimilar way to how I normally talk. And there I go again, "vastly dissimilar"?! I'd never say that!)
ANYWAY, I also remember your theory about the front sight parts and the way they broke. Makes perfect sense to me.
I ALSO remember when that almost perfect Hero replica was presented to us, complete with totally convincing "vintage" replica photographs! My favorite replica of this blaster to this day!
I think one of the photos even recently fooled a member here into thinking it was a real reference pic, now THAT'S sayin' something!
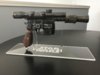
Thanks! I had considered posting the "trick" images I made up as "just found" real blaster images but reconsidered... I did not want to give you guys a heart attack or anything.... and the fall out would have been hell to pay ! ; )
here is a sample... just for fun.
View attachment 966069