AMT Speeder Bike

toftdale

New Member
Hi,

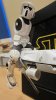
Normally I am an automotive modeler, but every now and then like to try something different.
I remember seeing this model a long time in the Tamiya Model magazine and thought it looked cool.
Well I saw one going cheap on Ebay the other day and thought I’d give a go.

This is my first kit of this type so any comments, feed backs hints are all gratefully received.
 

Attachments

  • Speeder 1.JPG
    Speeder 1.JPG
    62 KB · Views: 465
I found my one took some mods to get the pedals and handles to line up with the figure. yes, that's a nice base, err, display unit.
 
Hi The Scout trooper now looks like he come from the forrest for as opposed to straight for a car-wash. Again this is the first time I have realy tried anything along these lines so any comments good or otherwise welcome. Normallly as I have spent so long making a model I have never had the nerve to try this just incase I ruin it, I am sure I am not the only person with a rally car or two which look spottless, have tried this I might now readdress this. I have also done a couple of mods to the bike, however I cannot take any credit for these as they are teakn striaght form the excellent tutorial on this bike from Norm Lajoie on youtube
 

Attachments

  • Speeder 2.JPG
    Speeder 2.JPG
    69.1 KB · Views: 223
  • Speeder 3.JPG
    Speeder 3.JPG
    64 KB · Views: 199
  • Speeder 4.JPG
    Speeder 4.JPG
    76.6 KB · Views: 221
  • Speeder 5.JPG
    Speeder 5.JPG
    80.2 KB · Views: 237
I've got at least one of these still sealed in the shed; I've always heard the bike is pretty good in detail and ease of build, but getting the pilot to fit on the bike in a proper position requires subjecting him to a fairly extensive amount of surgery.

Qapla'

SSB
 
So! It can be built into something nice! I wonder if it takes as much surgery to get 'seated' as the STAP pilot takes to mount? ;^P
Great pieces, guys.

Regards, Robert
 
I love this kit...I've had it as a part of my display for about ten years.
The only thing about it that bugs me is the scout, so I just display it without its rider...
This kit doesn't seem to be that much bigger than the SWB 6" bike now that I think about it...hmmmmm.
 
I love this kit! I've had mine mostly built enough to be on display with plans to finish it up for a long time now.

I like your detail additions and positioning of the troopers head. Your display set up gives me some ideas using a picture of the forest behind it.
 
I have one of the newly released SB figures and Speeder Bike. Factory paint on it's horrible as is the way the figure sits on the bike. I plan on sorting it out after I'm finished with my what seems to be a year long Tie Fighter rework. SMH..
 
Hi,

Thanks for the photos (GF); I had already printed a couple of photos of your bike of the internet several months ago. I was unable to quote you as a source of inspiration because I had forgotten where I had found them. However I have to say a big thanks as because the reason for my trooper not looking straight on, has his visor adjusted and a top on his back pack is directly because I copied your model! As funboy asks what fabric did you use? as I have settled for matt paint

When I bought the kit it was still in its original shrink-wrap; when I opened it I found that not enough plastic had been added to the sprue containing the rear of the trouper his boots were complete and so was his upper thighs and above, but the rear of the knees and lower thighs were missing. But with the amount of adjusting to get him to sit on the bike it did not make any difference. I think a good end result can be made, but do not attempt this kit if you don’t want to spend hours on trying to make seams disappear!
 
Thanks for the nice words! for the fabric I used white hockey stick tape, it yellowed in time but it was originally whiter, just cut to size and stick it on.
love what you did so far.

BTW not sure if you selected your color but if I remember I used used Tamiya "Earth" color which is pretty much a close match to the filming miniature.


Gerardo
 
Hi, I knew it had been a while, but not that long. The missus managed to break the model (although it was not her fault?) then work got crazy so I left it for a while. But now back on it, repaired the damage (mainly to the trooper) and added some extra detail to the bike.
Speeder 7.JPGSpeeder 6.JPG
 
Just mocked up the whole thing for a bit of inspiration before finally adding some paint to the bike. I used Vallejo black surface primer on the bike before adding Tamiya XF-64 (red-brown) to the body; hopefully the stark contrast between the two colours will tone down with the weathering. Again any comment suggestions most welcome.

Speeder 8.JPGSpeeder 9.JPGSpeeder 10.JPG
 
Construction finally finished. Only one mistake (one day I’ll learn to fully read the instructions), I placed the four control sticks leaning forward, fortunately I don’t think this is noticeable and I am certainly not going to risk damaging the bike in order to rotate them. Does any one know whether the largest of the round disks on the control panel was meant to be a light etc or should it be left brown? All what’s left is to now weather the bike; I know I keep threatening to do this, but as I said I normally make shiny cars and this goes against all my years of modelling. This is my first Sci-Fi subject so any comments are most welcome
 

Attachments

  • Speeder 11.JPG
    Speeder 11.JPG
    60.1 KB · Views: 135
  • Speeder 12.JPG
    Speeder 12.JPG
    63.7 KB · Views: 124
  • Speeder 14.JPG
    Speeder 14.JPG
    42 KB · Views: 117
  • Speeder 16.JPG
    Speeder 16.JPG
    89.1 KB · Views: 135
  • Speeder 17.JPG
    Speeder 17.JPG
    78.8 KB · Views: 115
  • Speeder 18.JPG
    Speeder 18.JPG
    77.7 KB · Views: 117
  • Speeder 19.JPG
    Speeder 19.JPG
    98.6 KB · Views: 123
  • Speeder 20.JPG
    Speeder 20.JPG
    47.4 KB · Views: 132
That is looking very nice. If you hadn't mentioned the throttle/shifters placement I would not have even noticed. It's just set for "run into tree at high speed mode" :D 
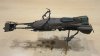
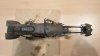
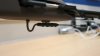
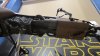
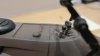
Nothing strange about that. Quite common in fact. I've always thought of the large round cap as the gas cap. I have no idea if it is or not but it would make sense. I'd leave it brown and possibly put a "Twist to remove" arrow on it for effect. :lol
 
This thread is more than 8 years old.

Your message may be considered spam for the following reasons:

  1. This thread hasn't been active in some time. A new post in this thread might not contribute constructively to this discussion after so long.
If you wish to reply despite these issues, check the box below before replying.
Be aware that malicious compliance may result in more severe penalties.
Back
Top