All-resin training remote

ganesha7

Active Member
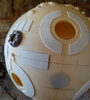
All-resin, that is, except for the styrene rings&strips, of course.
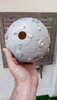
The rest has been cast from real kit parts.
My choice is based on optimizing some rare to find kits, also I had some silicon left from another project.
I'm halfway through (still some sanding to do) and I'm unsure about the thickness of said rings.
I cut them out of a vac-formed 1 mm thick styrene sheet hoping that the process would reduce it to roughly .75mm, but it still looks too thick to my eye.
Any thoughts/pieces of advice would be thoroughly appreciated!
 

Attachments

  • IMG_20200702_180420.jpg
    IMG_20200702_180420.jpg
    2.3 MB · Views: 213
  • Remote_detail.jpg
    Remote_detail.jpg
    617.4 KB · Views: 188
I've honestly never thought of it, since I'm not a professional modelmaker and, though I am somewhat experienced in mold making, I don't consider my castings good enough to charge for them...
PM me and we can talk about it.
 
I've honestly never thought of it, since I'm not a professional modelmaker and, though I am somewhat experienced in mold making, I don't consider my castings good enough to charge for them...
PM me and we can talk about it.

Thank you so much for the offer!
Sent you a PM
 
Small update...
Again, the thickness of the styrene rectangles looks a bit too much for me.
But I'm starting to get used to these proportions and I'm being tempted to leave it like that.
Any help from a fresh set of eyes would be massively appreciated!
 

Attachments

  • IMG_20200706_094126.jpg
    IMG_20200706_094126.jpg
    3.8 MB · Views: 139
  • IMG_20200706_094135.jpg
    IMG_20200706_094135.jpg
    3.4 MB · Views: 139
I've been slightly distracted from the remote, but yesterday I decided to sand down all the styrene parts, including both rectangles and rings.
I'm glad I did it. I'm much happier now with how it all fits together and the fact that using this method I've ended up with an uneven thickness doesn't bother me too much.
Just some more putty&sanding to do at the equator and it'll be ready for the last greeblies.
And then the magic moment: priming time!

DSC_2204.JPGDSC_2203.JPG
 
And...here it is.
I'm sure I don't need to explain to any of you what it feels like to hold your first SS Model in your hands...
It's far from being perfect, but I made it!
Let's hope I don't ruin it too much when I paint it...
 

Attachments

  • IMG-20200901-WA0000.jpeg
    IMG-20200901-WA0000.jpeg
    1,023.7 KB · Views: 118
Looks good! The thinner styrene was definitely the way to go.
Thank you!
Indeed it was! I surely learned a valuable lesson with this one. Now it looks great (at least to my eyes).

By the way, swgeek, I followed both your bombers builts with awe and excitement. Incredible work!
I'm looking forward to contribute to the bomber fleet soon myself...
 
By the way, swgeek, I followed both your bombers builts with awe and excitement. Incredible work!
I'm looking forward to contribute to the bomber fleet soon myself...

Thank you very much! I look forward to seeing what you do. I never get tired of the TIE Bomber.
 
This thread is more than 3 years old.

Your message may be considered spam for the following reasons:

  1. This thread hasn't been active in some time. A new post in this thread might not contribute constructively to this discussion after so long.
If you wish to reply despite these issues, check the box below before replying.
Be aware that malicious compliance may result in more severe penalties.
Back
Top