You are using an out of date browser. It may not display this or other websites correctly.
You should upgrade or use an alternative browser.
You should upgrade or use an alternative browser.
Aliens Dropship Pilot Helmet
- Thread starter Star Wars Chick
- Start date
:lol Nope, no helmet for him!
marsattack
Sr Member
Hey Great Video!!
I am still waiting for Lewis to do the wire for that helmet too!!lol
probably silly question, but you are in the ALiens Legacy???
Mars
I am still waiting for Lewis to do the wire for that helmet too!!lol
probably silly question, but you are in the ALiens Legacy???
Mars
I am! I just went and posted this up over there today.
Gotcha. Well, both have been successfully retrieved from the trash can!
So... after three years of doing NOTHING with this helmet, we are finally ready to move on it... and I have a LOT of questions.
First, I read ALL 40 page of the research thread on the Aliens Legacy board. For anyone following this thread, you should start there FIRST!
The Aliens Legacy ? View topic - Dropship Helmet
The Aliens Legacy ? View topic - Dropship helmet parts - anyone with updated info?
These threads are also helpful:
http://www.therpf.com/f9/greeblie-identification-needed-aliens-36203/
After reading that thread, here are my questions (and I am looking at you @Birdie, @LDR and @clanger68!):
1. In the kit we bought are these parts. None of them seem be model kit parts or go on this build. Can you ID them for me or at least let me know if I should be holding on to them?

2. Were these parts ever positively IDed?


3. In the photo above, is part 3 and part 6 the same part?
4. @Birdie mentioned getting the audio jack from bitsbox.co.uk and then Bugstomper mentions getting the correct colored tan version... but I couldn't find either at bitbox. Is there a part number for these?
The closest I could find was this: http://www.bitsbox.co.uk/index.php?main_page=product_info&cPath=225_226_295&products_id=1554

5. In the list of kits needs, Bug Stomper (on the Aliens Legacy board) mentions that you need a "Imai 1/72 scale VF-1D Valkyrie Variable Type (Revell Robotech Orbot; Bandai VF-1D Variable Type)" but in the discussion, I couldn't find any mention of the parts needed from this model. What do you need off that model?
6. There are a pile of very small screws used to attach a number of parts. Is there a known size for these screws?
7. The back end of the hama cable looks like this. Are you just cutting this off entirely? Are you removing the inner cable or leaving it?

8. How are you attaching the hama cables here and here:


9. I know there was debate back and forth regarding the camera model and there was some debate about a CL (closeup) not being exactly right. Was an absolutely correct camera model with ALL the correct parts ever determined?
10. Was this part ever IDed?

11. Is there any way to get @noble 's templates?
OK, that is it for now!
First, I read ALL 40 page of the research thread on the Aliens Legacy board. For anyone following this thread, you should start there FIRST!
The Aliens Legacy ? View topic - Dropship Helmet
The Aliens Legacy ? View topic - Dropship helmet parts - anyone with updated info?
These threads are also helpful:
http://www.therpf.com/f9/greeblie-identification-needed-aliens-36203/
After reading that thread, here are my questions (and I am looking at you @Birdie, @LDR and @clanger68!):
1. In the kit we bought are these parts. None of them seem be model kit parts or go on this build. Can you ID them for me or at least let me know if I should be holding on to them?
2. Were these parts ever positively IDed?
3. In the photo above, is part 3 and part 6 the same part?
4. @Birdie mentioned getting the audio jack from bitsbox.co.uk and then Bugstomper mentions getting the correct colored tan version... but I couldn't find either at bitbox. Is there a part number for these?
The closest I could find was this: http://www.bitsbox.co.uk/index.php?main_page=product_info&cPath=225_226_295&products_id=1554
5. In the list of kits needs, Bug Stomper (on the Aliens Legacy board) mentions that you need a "Imai 1/72 scale VF-1D Valkyrie Variable Type (Revell Robotech Orbot; Bandai VF-1D Variable Type)" but in the discussion, I couldn't find any mention of the parts needed from this model. What do you need off that model?
6. There are a pile of very small screws used to attach a number of parts. Is there a known size for these screws?
7. The back end of the hama cable looks like this. Are you just cutting this off entirely? Are you removing the inner cable or leaving it?
8. How are you attaching the hama cables here and here:
9. I know there was debate back and forth regarding the camera model and there was some debate about a CL (closeup) not being exactly right. Was an absolutely correct camera model with ALL the correct parts ever determined?
10. Was this part ever IDed?
11. Is there any way to get @noble 's templates?
OK, that is it for now!
MAY have found a place to order the 2.5mm jack socket, boy is their shipping pricey!
JYO-25 (FC6810) CLIFF - Socket | TME - Electronic components
JYO-25 (FC6810) CLIFF - Socket | TME - Electronic components
MAY have found a place to order the 2.5mm jack socket, boy is their shipping pricey!
JYO-25 (FC6810) CLIFF - Socket | TME - Electronic components
Well it's coming from the EU so that's pricey and every online electronics parts place is pricey thanks to a flat rate which i think they do to get you to buy more stuff.
One of the things I want to do in this thread is summarize the 40+ pages of info found at the Aliens Legacy.
While none of these discoveries are mine, hopefully having them all together in a relatively shorter thread will help anyone in the future.
Part of the right ear cluster on both Ferro and Spunkmeyer is from a Takara/Hasbro Transformers G1 Megatron toy. It is a small plastic tube that connects the "silencer" (actually just a barrel extension) to the base P38 pistol. This piece does not appear to be significantly modified in any way. It is fairly readily available on eBay, usually as part of the silencer kit for Megatron.
Thanks to TWF2005 for the great pic!
Part #2:
Also from the right ear cluster on both Ferro and Spunkmeyer is from a HASEGAWA 1:72 Leopold Railway Gun. Only a small part of one of the pieces from the model is used. See photo for details. This model is readily available on Amazon, eBay, and various other vendors.

Also from the right ear cluster on both Ferro and Spunkmeyer is from a HASEGAWA 1:72 Leopold Railway Gun. Only a small part of one of the pieces from the model is used. See photo for details. This model is readily available on Amazon, eBay, and various other vendors.
Ok, so its been a while, but will answer what I can remember (without looking).
1. Looks like you have duplicates here. The finger nail looking parts are for where the bike pump adaptor sits, so two of these go over the top. I think the two white circular parts are the bits that go below the bike pump adaptor. See here:
2. Pretty sure 2 was off a motor bike model, but dont think it was ID'ed. Can't remember what 1 was off. The speaker looking part behind 1 was from the Polaroid camera internals.
3. Think its a smaller version of the same item. From Plastruct. As was number 5.
4. Think I got mine from a ALF member.
5.
6. Will need to measure.
7. Believe I cut the end off and left internal cable.
8. Cables just sat in place. Though cut hole in part nearest visor for the ends to sit into.
9. Yes. Pretty sure it was a polaroid. Not sure which type now.
10. Had to custom make this. Bent copper wire, and milliput ball or bead on end. Painted black.
11. The link to the template no longer works. I did have it, but its appears it was just a link to the HTML page...which is gone
Just found this in a text file I have:
Three barrel part (left side):
Revell - Robotech Changers Drifanddal
Revell - Trigon
ARII Orguss Variable Drifand
Arii 1/48 scale Drifand Dal
'7' Part (left side)
Imai 1/100 scale Destroid Tomahawk
Bandai Attack Tomahawk
Revell Robotech Factory
Cable front and rear stop. Double barrels, t-connector, double step, D shape (Both sides, rest of helmet):
ARII Orguss Variable Fighter 1/48 (Caution! the Imai 1/40 scale Orguss / Revell Robotech Nebo kit looks very similar but is wrong!)
Revell Robotech Tabor
Long Ear Sections, Turret flaps, double barrel short (right side):
Revell - Axoid Robotech Changers (1/72)
Imai 1/72 scale VF-1D Valkyrie Variable Type
Revell Robotech Orbot
Bandai VF-1D Variable Type
Track (right side):
1:72 Hasegawa Leopold railway gun.
Plastruct:
LF-316 Mercury Vapor Relamp
LF-312 Mercury Vapor Relamp
TB-6 Butyrate Tube (Screw Posts)
M-5 Motor
- Gentex Corporation SPH-4 Flying Helmet with suspension liner (not the TPL liner!), no leather parts and M87 Mikrophone
- Polaroid 635 Supercolor (Closeup version will work, but has the wrong lens frame for the sight unit)
- Takara Transformers G1 Megatron Silencer Connector
- Imai 1/100 scale Destroid Tomahawk (Bandai Attack Tomahawk; Revell Robotech Factory)
- Imai 1/72 scale VF-1D Valkyrie Variable Type (Revell Robotech Orbot; Bandai VF-1D Variable Type) has parts for Smartgun Headset
- Arii 1/48 scale Drifand Dal (Revell Robotech Trigon)
- Arii 1/48 scale Orguss Variable Drifand (Revell Robotech Tabor) Caution! the Imai 1/40 scale Orguss / Revell Robotech Nebo kit looks very similar but is wrong!
- Plastruct M-5 Motor
- Plastruct LF-312 Mercury Vapor Relamp CP
- Plastruct LF-316 Mercury Vapor Relamp CP
- Plastruct TB-6 Butyrate Tube (Screw Posts)
- Hama Cable release with metal mesh (+transparent heat shrink tube for new versions)
- Airbrush/Ball pump hose (2x)
I am sure I am going to have to do the same, especially since it seems like all of those parts were never completely IDed.
I am struggling a bit with the two plastistuct "mercury lights." Maybe when I get them in hand it will be clear, but based on what I am seeing:
LF-316 (1:24 scale) is 15/32" wide, just a hair under half an inch. While LF-312 (1:48/1:32 scale) is 3/8" wide.
Looking at the right ear cluster, the part on the base of the cluster is obviously the bigger part (LF-316) while the part inside the Megatron silencer adapter is smaller (LF-312). However, from my measurements, the hole in the top of the Megatron part is LESS than 3/8" wide.
I have both parts on order, but it seems to me that the LF-312 isn't going to fit where it should.
Ok, I've just measured the light part inside the megatron piece and the top width (marked W on the link you sent) is around 7mm. Cant measure the lip part as thats inside the megatron.
That is what is weirding me out a bit. Based on the research from the ALF, that should be part LF-312. Plastruct has it listed as 9.5mm wide... I ordered it anyway. We will see when it gets here.
BTW, thanks for the help and identification. I just placed my order with Plastrut (since you have to place a $20 order, I also ordered all the parts for the Rapier Sight seen on Spunkmeyer's helmet).
BTW, in looking at part #4 in the photo below, I have to believe that is Plastrut TB-8 (1/4" tubing) while all the other screw posts are 3/16." That tubing diameter just looks a bit larger to me... possibly even larger than 1/4". Thoughts?

A pretty easy step completed here. The old style Hama shutter release cables (hard to find) were plastic coated, but the newer models (easier to find) are not. There is a relatively easy fix for this. Simply slide 1/4" clear heatshrink tubing over the cables and heat them up.
I was a bit concerned 1) about the fact that my heatshrink was cloudy and not clear, and 2) that there were some harsh crimps in the heatshrink. However, my fears were unfounded. Upon heating, the heatshrink became clear and the crimps completely disappeared. All that is left is to trim the excess from the end of the tube and cut off the back end.
Step 1 - heat shrink off the cables.
Step 2 - heat shrink slid on cables.
Step 3 - heat shrink shrunk onto cables.
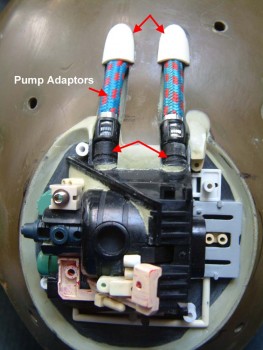
On the right ear of the helmet are two hoses that run from the cluster into the dome of the helmet. These have been IDed as bike pump hoses. I don't know where they come from specifically as a pair came with my kit. However, they need some modification to be correct.
Step 1 - hose as I received it.
Step 2 - screwed black plastic washer off left side. Pulled and then unscrewed threaded cap off right side, which freed up black plastic bird cage.
Step 3 - black plastic bird cage does not easily fit over left end. I had to VERY CAREFULL grind down just a bit of the crimped collar behind the double serrated nut. After that, I VERY CAREFULLY heated the metal and black plastic bird cage to get it to slide into place. One thing is for sure... once everything has cooled, these pieces aren't going anywhere.
Similar threads
- Replies
- 3
- Views
- 864